Preface
This article mainly introduces the concept of state in React.
Comparison between Declarative UI and Imperative UI
When designing UI interactions, you may think about how the UI responds to changes based on user actions. Imagine a form that allows users to submit an answer:
As you input data into the form, the “Submit” button becomes enabled.
When you click “Submit,” the form and the submit button become disabled, and a loading animation appears.
If the network request is successful, the form hides, and a “Submission Successful” message appears.
If the network request fails, an error message appears, and the form becomes enabled again.
In imperative programming, the above process tells you directly how to implement the interaction. You have to write explicit commands to manipulate the UI based on what should happen.
Both Vue.js and React follow a declarative programming approach.
Thinking Declaratively About UI in React
From the example above, you’ve seen how to implement a form. To better understand how to think in React, you generally need to follow these steps to reimplement this UI in React:
Identify different view states in your component.
Determine what triggers the changes in these states.
Represent the state in memory (using
useState).Remove any unnecessary state variables.
Connect event handling functions to set state.
State Management in React
In React, state management is a crucial concept, and it is achieved through state. state is an internal object in a React component used to store the component’s internal state. It is a regular JavaScript object, accessible through this.state.
React builds a render tree for the UI components.
When you add state to a component, you might think that the state “exists” within the component. However, in reality, React keeps track of each state by associating it with the correct component based on its position in the render tree.
This is different from Vue.js, where the reactive system is isolated from components, while React’s state is bound to components.
We embed the state into React components as part of the component’s vnode information. When React’s state updates, it implies that the component’s information updates, triggering a re-render.
Understanding this, we can easily grasp how React’s reactivity works. React’s state is bound to components, and when the state updates, the component also updates. This is the reactive system in React.
Let’s take a specific example:
import { useState } from 'react';

export default function App() {
  const counter = <Counter />;
  return (
    <div>
      {counter}
      {counter}
    </div>
  );
}

function Counter() {
  const [score, setScore] = useState(0);
  const [hover, setHover] = useState(false);

  let className = 'counter';
  if (hover) {
    className += ' hover';
  }

  return (
    <div
      className={className}
      onPointerEnter={() => setHover(true)}
      onPointerLeave={() => setHover(false)}
    >
      <h1>{score}</h1>
      <button onClick={() => setScore(score + 1)}>
        Add One
      </button>
    </div>
  );
}
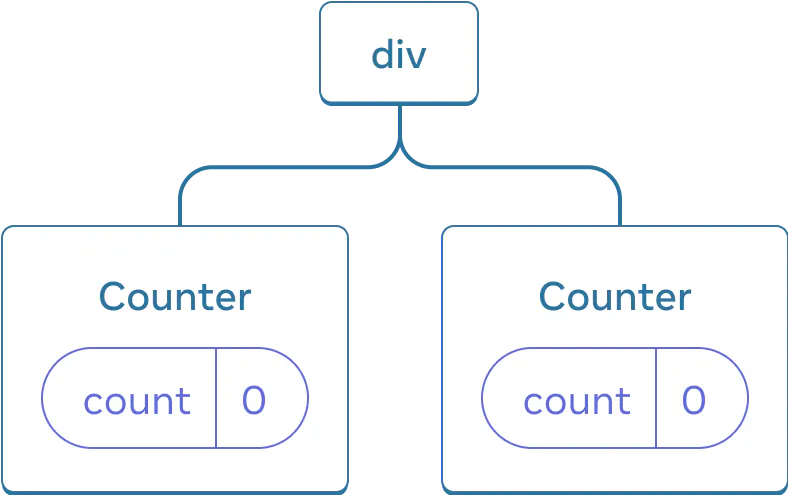
The tree structure for these components looks like this:

These are two independent counters because they are rendered at their respective positions in the tree. In general, you don’t need to consider these positions when using React, but knowing how they work can be useful.
They have their own states because each component instance has its own state. You can use multiple state variables in a component. When I update the state, it triggers a re-render of the component. Here, you can see that the states of the two counters are independent and do not affect each other.
Preserving and Resetting State in React
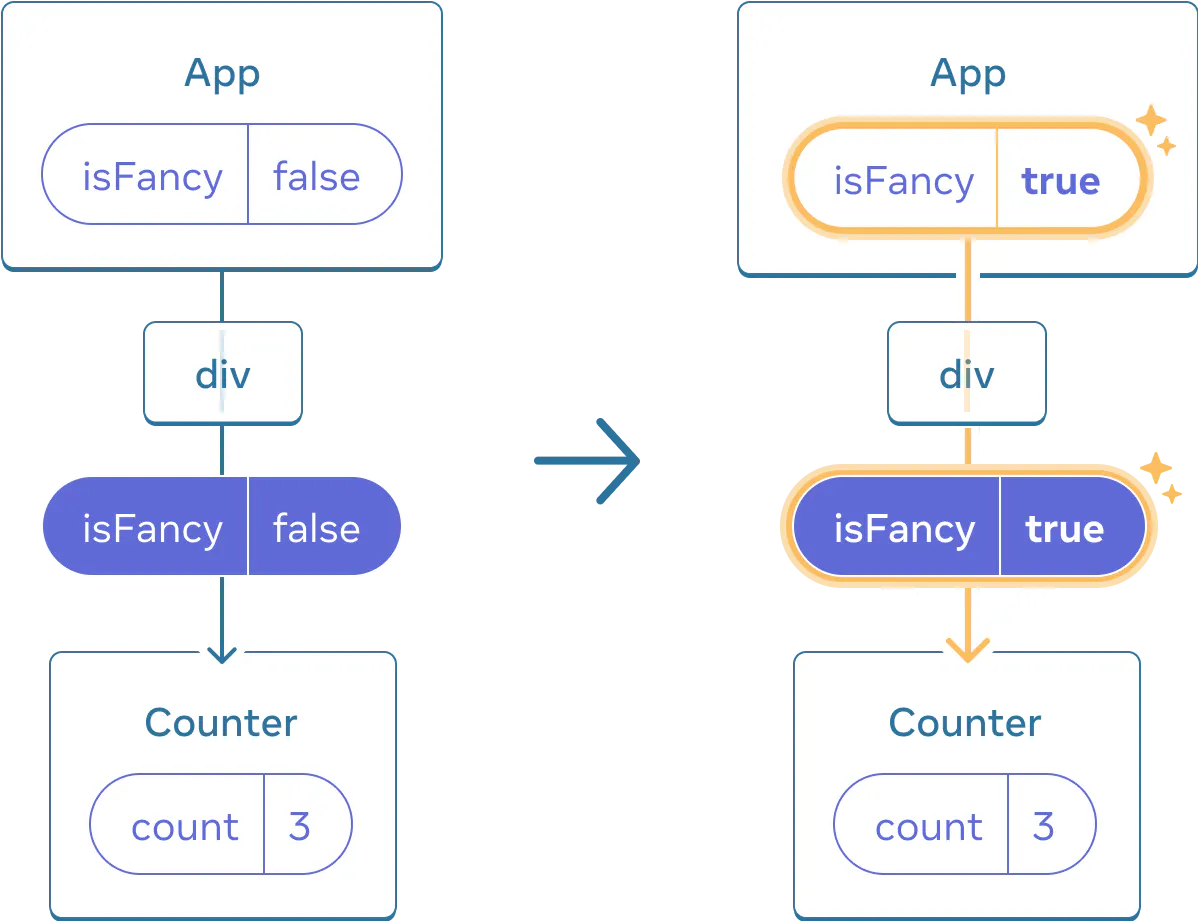
Same Component at the Same Position Retains State
import { useState } from 'react';

export default function App() {
  const [isFancy, setIsFancy] = useState(false);
  return (
    <div>
      {isFancy ? (
        <Counter isFancy={true} />
      ) : (
        <Counter isFancy={false} />
      )}
      <label>
        <input
          type="checkbox"
          checked={isFancy}
          onChange={e => {
            setIsFancy(e.target.checked)
          }}
        />
        Use Fancy Style
      </label>
    </div>
  );
}

function Counter({ isFancy }) {
  const [score, setScore] = useState(0);
  const [hover, setHover] = useState(false);

  let className = 'counter';
  if (hover) {
    className += ' hover';
  }
  if (isFancy) {
    className += ' fancy';
  }

  return (
    <div
      className={className}
      onPointerEnter={() => setHover(true)}
      onPointerLeave={() => setHover(false)}
    >
      <h1>{score}</h1>
      <button onClick={() => setScore(score + 1)}>
        Add One
      </button>
    </div>
  );
}
Different Components at the Same Position Reset State
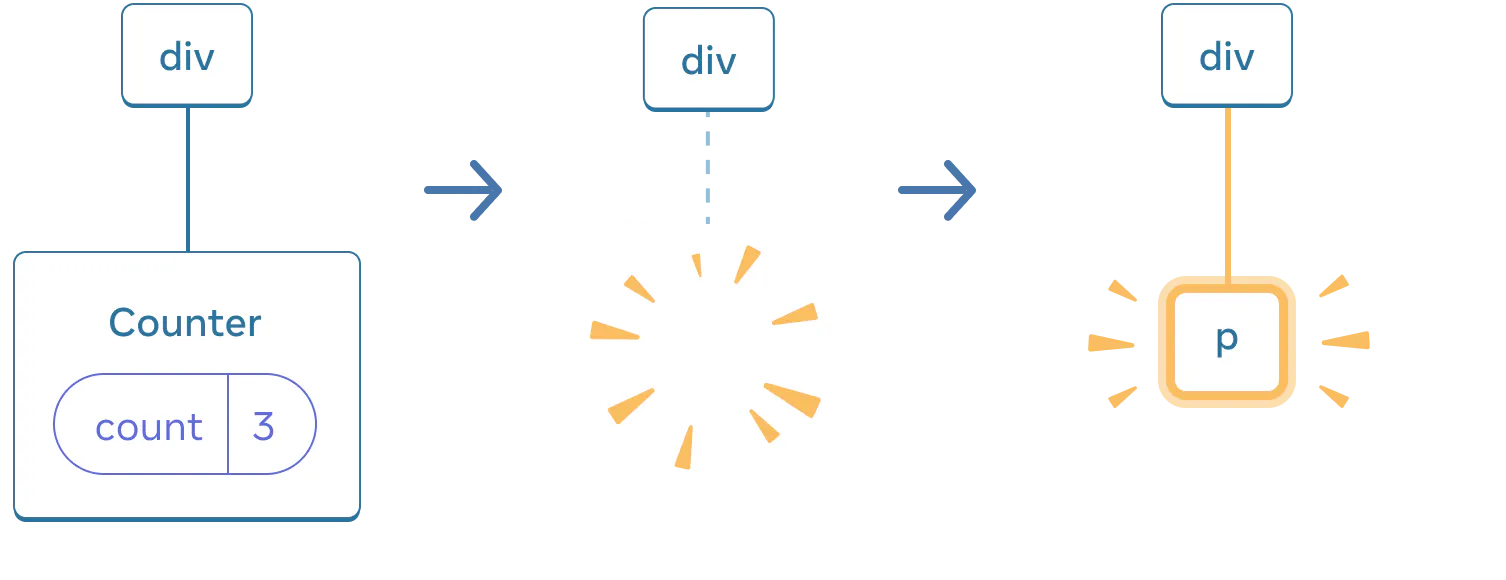
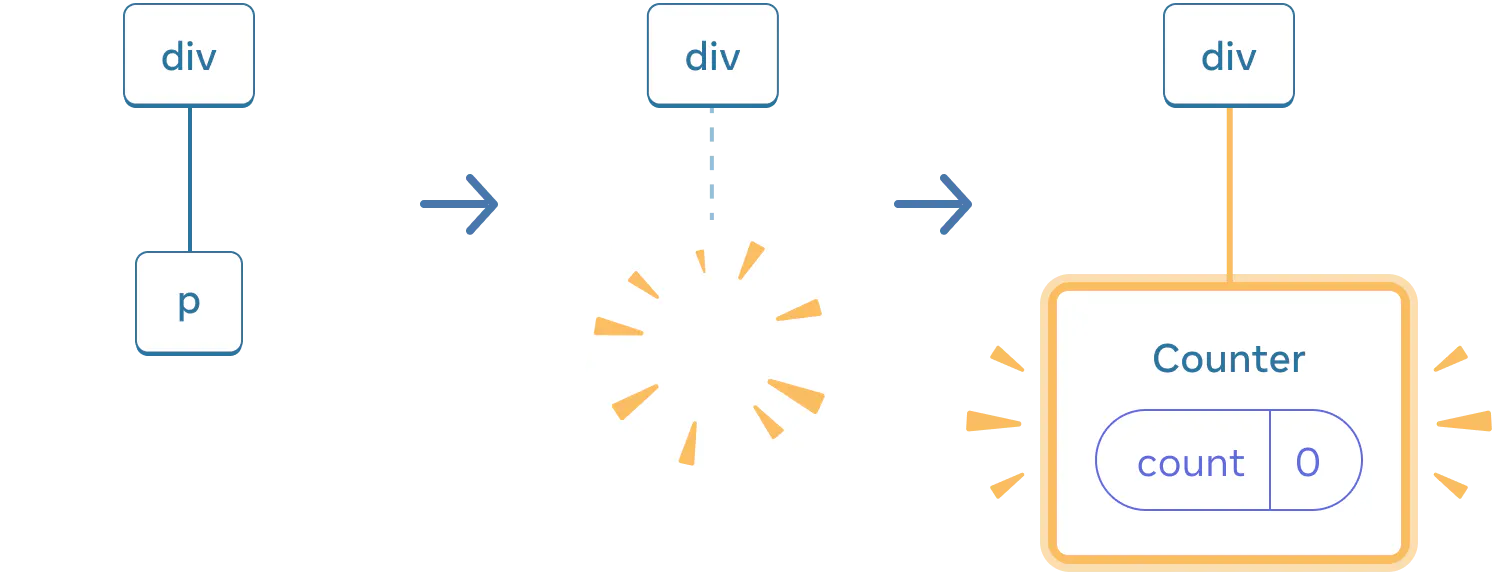
This is intuitive as changing components at the same position would reset the state. Consider replacing <Counter> with a <p>:

When Counter is replaced with p, Counter is removed, and p is added.

When switching back, p is removed, and Counter is added.
Reference in the React documentation: State and Lifecycle - Preserving State in the Tree
Extracting State Logic into a Reducer
For components requiring updates to multiple states, scattered event handlers may become overwhelming. In such cases, you can consolidate all state update logic into a function called a “reducer” outside the component. Event handlers become concise as they only need to specify user “actions.” At the bottom of the file, the reducer function specifies how the state should be updated in response to each action!
useReducer is a React Hook for managing component state logic. It provides an organized way to handle more complex state logic, suitable for those with multiple sub-values or states that need to be updated based on previous states. The usage of useReducer is similar to the reducer concept in Redux.
Here’s a basic example of useReducer:
import React, { useReducer } from 'react';

// Reducer function, takes current state and action, returns new state
const reducer = (state, action) => {
  switch (action.type) {
    case 'INCREMENT':
      return { count: state.count + 1 };
    case 'DECREMENT':
      return { count: state.count - 1 };
    default:
      return state;
  }
};

const initialState = { count: 0 };

const Counter = () => {
  // Use useReducer, pass in reducer and initial state
  const [state, dispatch] = useReducer(reducer, initialState);

  return (
    <div>
      Count: {state.count}
      <button onClick={() => dispatch({ type: 'INCREMENT' })}>Increment</button>
      <button onClick={() => dispatch({ type: 'DECREMENT' })}>Decrement</button>
    </div>
  );
};

export default Counter;
Key steps include:
Define the
reducerfunction: This function takes the current statestateand an action describing the action. It then executes the corresponding logic based on the action type and returns a new state.Initialize state: Create state and
dispatchfunction by callinguseReducer(reducer, initialState).Use state and
dispatchin the component: Access the current state value throughstateand trigger thereducerwithdispatch.
Deep Data Transfer Using Context
Usually, information is passed from parent to child components through props. However, if you need to deeply pass some prop in the component tree, or if many components in the tree need to use the same prop, passing props can become cumbersome. Context allows a parent component to provide some information to any lower-level component without the need for props to be passed layer by layer.
import React, { createContext, useContext, useState } from 'react';

// Create a Context
const MyContext = createContext();

// Create a component with Provider and Consumer
const MyProvider = ({ children }) => {
  const [data, setData] = useState('Hello from Context');

  return (
    <MyContext.Provider value={{ data, setData }}>
      {children}
    </MyContext.Provider>
  );
};

// Use useContext to get values from Context
const ChildComponent = () => {
  const { data, setData } = useContext(MyContext);

  return (
    <div>
      <p>{data}</p>
      <button onClick={() => setData('Updated Context')}>Update Context</button>
    </div>
  );
};

// Wrap components that need to share data with Provider in the application
const App = () => {
  return (
    <MyProvider>
      <ChildComponent />
    </MyProvider>
  );
};

export default App;
Extending State with Reducer and Context
Reducer helps consolidate state update logic in components, and Context helps pass information deeper into other components.
You can combine reducers and context to manage the state of complex applications.
Based on this idea, use a reducer to manage the state of a parent component with complex state. Other components at any depth in the component tree can read its state through context. You can also dispatch some actions to update the state.
Using Reducer and Context intelligently can help you manage state better and make your code more concise.
Compared to Vue.js’s reactive system based on Proxy, using proxies, and the use of provide and inject, Vue.js’s state management is done in a separate WeakMap. When the variable state changes, it can trigger effect side functions and update the value. React’s state management is bound to components, and when the state updates, the component also updates. However, when dealing with global state management, it needs to be defined in the parent component.
Understanding how to define React state based on specific situations allows for better state management.
Comments