Ethereum Official Website

Ethereum Official Website

Introduction to Ethereum

Ethereum is a decentralized, open-source public blockchain platform with smart contract functionality. Ether (ETH) is the native cryptocurrency of Ethereum —— extracted from Ethereum Wikipedia

Features of Ethereum

Compared to most other cryptocurrencies or blockchain technologies, Ethereum’s features include the following points:

  • Smart Contracts: Programs stored on the blockchain, executed by the nodes, and the executors of the programs pay transaction fees to the miners or stakeholders.
  • Distributed Applications: Applications on Ethereum cannot be shut down or turned off.
  • Tokens: Smart contracts can create tokens for use by distributed applications. Tokenization of distributed applications aligns the interests of users, investors, and managers. Tokens can also be used for initial coin offerings.
  • Proof of Stake: More efficient than proof of work, it saves a lot of computer resources wasted in mining and prevents network centralization caused by specialized integrated circuits. Merged with the main chain on September 15, 2022.
  • Gas: An extension of the transaction fee concept, gas consumption is calculated when performing various operations, and gas fees must be paid, including sending Ether or other tokens, which is considered an operation.
  • Proto-Danksharding: Temporarily stores data on some nodes to enhance efficiency (not yet implemented).
  • Uncle Blocks: This feature was discontinued after switching to proof of stake. The original function was to use Directed Acyclic Graph technology to incorporate shorter blockchains that were not included in the main chain in time, to increase transaction volume.

Is Ethereum programmable?

A common question asked is: What is the difference between Ethereum and Bitcoin? Are both just cryptocurrencies?
Ethereum, launched in 2015, builds on the innovations of Bitcoin and has some significant differences.

Both allow you to use digital currencies without paying service providers or banks. However, Ethereum is programmable, so you can also build and deploy decentralized applications on the Ethereum network.

Account Model

It’s worth mentioning the account model. Bitcoin has two types of accounts: user accounts and contract accounts.

Ethereum’s global “shared state” consists of many small objects (accounts) that can interact with each other through messaging. Each account has an associated state and a 20-byte address. In Ethereum, an address is a 160-bit identifier used to identify accounts.

Two types of accounts:

  • Externally owned accounts, controlled by private keys with no associated code
  • Contract accounts, controlled by their contract code and associated with code

Comparison of Externally Owned Accounts and Contract Accounts

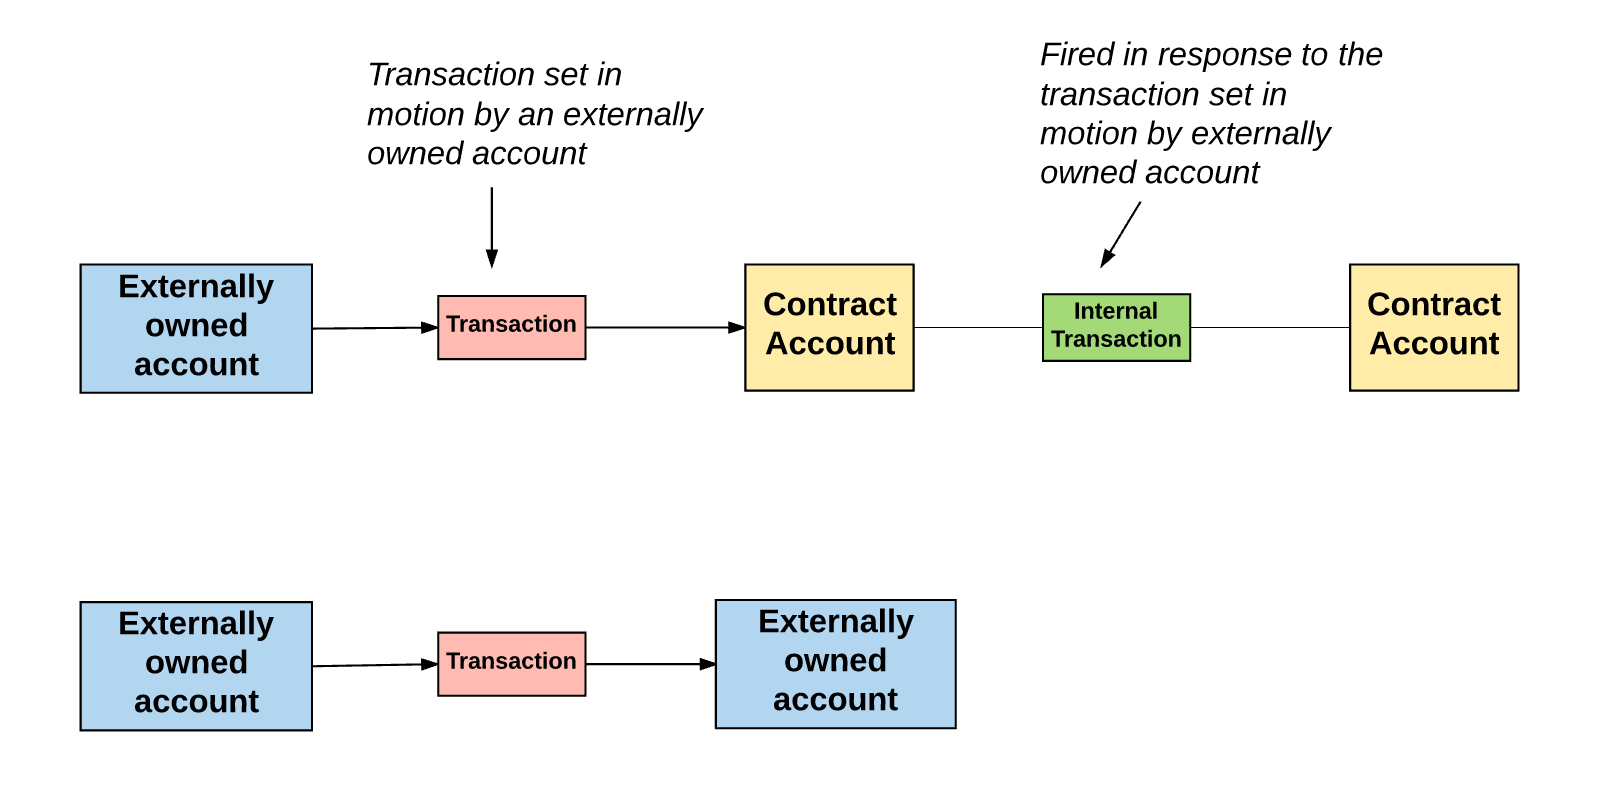
Understanding the basic differences between externally owned accounts and contract accounts is important. An externally owned account can send messages to another externally owned account or a contract account by creating and signing transactions with its own private key. The messages sent between two externally owned accounts are just simple value transfers. However, messages from an externally owned account to a contract account activate the contract account’s code, allowing it to perform various actions (such as transferring tokens, writing to internal storage, mining a new token, performing some computations, creating a new contract, etc.).

Unlike externally owned accounts, contract accounts cannot initiate a transaction on their own. Instead, a contract account only triggers a transaction in response to receiving one (from an externally owned account or another contract account).

Therefore, any action on the Ethereum platform is always initiated by transactions triggered by externally owned accounts.

This is why Ethereum is known as a “smart contract” platform and is called programmable. Because the code of contract accounts can be called by externally owned accounts, it can perform some operations.

Account State

The account state consists of four components, regardless of the account type:

  • nonce: If the account is an externally owned account, the nonce represents the transaction sequence number sent from this account address. If the account is a contract account, the nonce represents the sequence number of the contract created by this account.
  • balance: The amount of Wei owned by this address. 1 Ether = 10^18 Wei
  • storageRoot: The root node hash value of a Merkle Patricia tree (we’ll explain the Merkle tree later). The Merkle tree encodes the hash values of the content stored by this account, which is empty by default.
  • codeHash: The hash value of this account’s EVM (Ethereum Virtual Machine, explained later) code. For contract accounts, it is the hashed code saved as codeHash. For externally owned accounts, the codeHash field is the hash value of an empty string.

eth account

The Mysteries of Web3 DAOs

I first encountered Web3 DAOs on platform X, reading about programmer Guo Yu’s understanding and practice in The Birth of CodeforDAO and the Future of a Self-Organized Internet.

The Web3 DAO market is still in its exploratory phase, with some prototypes of smart contracts available on GitHub, but a complete DAO ecosystem is not yet in place.

Using the methodology of DAOs to improve the structure of startups, and perhaps, taking it further, enabling anyone to easily create a self-organized chain-based company or organization.

Actually, you can easily find examples of self-organization in school clubs, companies, families, friend groups, etc. These instances of self-organization are usually made up of like-minded individuals who come together spontaneously around common goals, rules, values, etc. This aligns well with the principles of DAOs.

Challenges in DAO and Web3 Governance

Web3 emerged because centralized institutions failed to ensure security, fairness, and transparency in managing financial and social infrastructure. Web3 is built on blockchain and oracle networks that minimize trust, utilizing cryptography, consensus protocols, and mechanism design to manage digital infrastructure without the need for trusted human intermediaries, instead relying on cryptographic proofs.

What is a DAO?

DAO stands for “decentralized autonomous organization.” The primary purpose of a DAO is to transcend traditional organizational forms, enabling collective decision-making in a distributed, transparent, and trust-minimized manner. Simply put, a DAO is a new type of organizational architecture. People can independently verify how the organization operates and work together towards common goals based on this consensus.

For a more detailed explanation, see here: Understanding DAOs and the Challenges of Web3 Governance

It is worth noting that although the acronym DAO includes the word autonomous, DAOs are not fully autonomous. DAOs are made up of people, thus requiring manual operations to function, such as voting, deploying code, and discussing proposals. The term “autonomous” is used because some specific functions of a DAO are embedded in unchangeable smart contract code. However, people still need to interact with these contracts (i.e., input data) to perform specific tasks (i.e., produce outcomes).

Types of DAOs

Although DAOs are still in their early stages of development, they can generally be categorized into the following six types:

Protocol DAOs—These DAOs are responsible for developing and managing decentralized applications (dApps) or the infrastructure for dApps. Similar to companies or foundations, their main task is to develop open-source technology.

  • Tezos is a blockchain that uses a DAO-like on-chain governance structure, requiring a supermajority vote to initiate protocol upgrades.
  • MakerDAO manages the decentralized stablecoin DAI, with DAO members setting parameters such as interest rates and adding or removing collateral assets.

Investment DAOs—These DAOs control funds in the DAO treasury and use these funds to initiate and manage investments. Their main purpose is to generate profits for members, similar to private equity funds or hedge funds.

  • BitDAO allows BIT token holders to vote on various investment strategies, aiming to generate returns for the DAO treasury.
  • MetaCartel Ventures is a for-profit DAO that invests in early-stage dApps, offering a community-centered membership with more flexible participation mechanisms than traditional venture funds.

Philanthropic DAOs—These DAOs manage funds and plans for a specific cause, such as charity, politics, or public utilities, similar to charitable organizations, lobbying groups, and bonus incentive schemes.

  • Gitcoin is a DAO that uses quadratic voting mechanisms to fund public goods and other open-source blockchain projects on Ethereum.
  • Big Green is a DAO that provides charitable grants to schools, communities, and families to help them learn to grow food.

Social DAOs—These DAOs manage a shared social space, jointly own assets of artistic value, and create culture and organize events for members, similar to modern social clubs.

  • Bored Ape Yacht Club (BAYC) offers limited edition NFTs that serve as membership tokens and provide special benefits.
  • Krause House is a social DAO composed of basketball enthusiasts aiming to someday purchase an NBA team. It has already acquired the Ball Hogs team in the Big3 basketball league.

Data DAOs—These DAOs develop and manage data controlled by the DAO. They aim to aggregate user data or develop unique data products for sale to third parties, including developing AI algorithms or conducting market research.

  • dClimate is a marketplace for buying and selling weather data and forecasting models, where users can sell innovative data sets and institutions can buy them. The DAO evaluates the published data to ensure quality and provide appropriate network incentives.
  • Delphia is a robo-advisor that buys user personal data with native tokens. Delphia aggregates this data to formulate investment strategies, which users can access using native tokens.

DAO Governance Structures

For any DAO, achieving consensus is both the most important and most challenging task because it involves making decisions in a decentralized manner. The following section outlines the governance mechanisms currently used to reach consensus, incorporating some of the tools mentioned above.

Direct on-chain democracy—Refers to DAO members directly voting on proposals on the blockchain. Most DAOs using this model employ a token-weighted voting system where the number of tokens a user holds determines their voting power (typically 1 token = 1 vote). This is the most common and simplest form of consensus in DAOs because it has the lowest complexity and cost and is resistant to sybil attacks.

Direct off-chain democracy—Refers to DAOs using Snapshot for off-chain voting. Most DAOs using this model also employ a token-weighted voting system, but implementation requires a trusted entity to strictly execute on-chain changes according to the proposal through multisignature. Thus, off-chain democracy involves a trust assumption that the multisigners will faithfully execute according to the snapshot of DAO voting results.

Representative democracy—Refers to DAOs appointing representatives to vote on proposals on their behalf. Representatives are usually elected by the DAO and may refer to off-chain snapshots to gauge community sentiment. DAOs might also implement mechanisms to veto or modify results when a representative’s vote significantly deviates from community sentiment.

Quadratic democracy—Based on quadratic voting, the cost to a voter is proportional to the square of the number of votes they cast. For example, casting one vote might cost one governance token, but casting five votes would cost 25 tokens. Quadratic voting prevents control of DAO voting outcomes by a minority of large stakeholders. The collective voting outcome of the majority will have equal or even greater effectiveness. However, implementing quadratic voting effectively requires anti-sybil mechanisms to prevent fraudulent behavior or dispersing tokens across multiple wallets.

The Future and Present State of Web3 DAOs

There are quite a few DAOs on the Internet, but most DAOs seem to operate with a significant degree of human governance, relying limitedly on contract governance. These governance purposes are quite macroscopic, such as whether to allow the use of some money from the DAO treasury to complete an investment or to establish a complex roadmap. Because these purposes are so broad, most governance is done using off-chain voting with snapshot, which is somewhat akin to the representative democracy we are familiar with: you can participate in voting, but no one can guarantee that the purpose of the proposal will be fully executed.

“A network nation is a network society, morally innovative, with a sense of nationhood and recognized founders, capable of collective action, where people live in harmony, issue cryptocurrencies, use social smart contracts to constrain consensus-based government, crowdsource to purchase physical territories forming islands, establish virtual capitals, conduct census on-chain proving the nation’s population, income, and real estate, and thereby gain diplomatic status.” Help me translate this into English.

Design and Technical Goals

The early versions of the HTTP protocol were designed for simplicity of implementation: HTTP/0.9 was a single-line protocol to kickstart the World Wide Web; HTTP/1.0 documented popular extensions of HTTP/0.9 as an informational standard; HTTP/1.1 introduced an official IETF standard. See A Brief History of HTTP for more details. Thus, HTTP/0.9-1.x perfectly achieved its intended use: HTTP is one of the most widely adopted application protocols on the Internet.

Unfortunately, simplicity came at the cost of performance: HTTP/1.x clients had to use multiple connections to achieve concurrency and reduce latency; HTTP/1.x did not compress request and response headers, leading to unnecessary network traffic; HTTP/1.x did not allow efficient prioritization of resources, resulting in inefficient use of underlying TCP connections, among other issues.

These limitations were not critical, but as the scope, complexity, and importance of web applications in our daily lives grew, they increasingly burdened web developers and users—a problem HTTP/2 aims to address:

HTTP/2 introduces header field compression and allows multiple concurrent exchanges on the same connection, making more efficient use of network resources and reducing latency perception. Specifically, it allows interleaving of request and response messages on the same connection, using efficient encoding for HTTP header fields. It also allows prioritizing requests, enabling more critical requests to complete more quickly, thus further enhancing performance.

The resulting protocol is more network-friendly because it uses fewer TCP connections compared to HTTP/1.x. This means less competition among streams and longer connection durations, thus better utilization of available network capacity. Finally, HTTP/2 also improves message handling efficiency through binary message framing. (HyperText Transfer Protocol Version 2, Draft 17)

Note that HTTP/2 is an extension of previous HTTP standards, not a replacement. The application semantics of HTTP, such as methods, status codes, URIs, and header fields, remain unchanged. These changes are clearly outside the scope of HTTP/2’s work. That said, understanding how the low-level changes address performance limitations of previous protocols remains critical. Let’s briefly delve into the binary framing layer and its functions.

Binary Framing Layer

The core of all performance enhancements in HTTP/2 is the new binary framing layer, which dictates how HTTP messages are encapsulated and transmitted between client and server.

HTTP/2 Frame

The “layer” refers to a design choice that introduces a new, optimized encoding mechanism between the socket interface and the higher-level HTTP API provided to applications: HTTP semantics (e.g., verbs, methods, headers) are unaffected, but their encoding during transmission is different. Unlike HTTP/1.x protocols, which use plaintext forms separated by newline characters, all HTTP/2 communications are split into smaller messages and frames, each encoded in binary format.

Thus, clients and servers must use this new binary encoding mechanism to understand each other: HTTP/1.x clients cannot comprehend servers that support only HTTP/2, and vice versa. Fortunately, our applications can easily grasp all these changes, as the client and server will handle all necessary framing on our behalf.

Binary protocol versus text protocol isn’t really about how binary blobs are encoded. The difference is really whether the protocol is oriented around data structures or around text strings. Let me give an example: HTTP. HTTP is a text protocol, even though when it sends a jpeg image, it just sends the raw bytes, not a text encoding of them.

Streams, Messages, and Frames

HTTP/2 Frame

The new binary framing mechanism alters how data is exchanged between client and server. To describe this process, we first need to become familiar with HTTP/2 terminology:

  • Stream: A bidirectional flow of bytes within an established connection, capable of carrying one or more messages.
  • Message: A complete sequence of frames that map to a logical request or response message.
  • Frame: The smallest communication unit in HTTP/2, each containing a frame header that at least identifies the stream to which it belongs.

The relationships among these terms can be summarized as follows:

  • All communications are completed over a single TCP connection, which can carry an arbitrary number of bidirectional streams.
  • Each stream has a unique identifier and optional priority information, used to carry bidirectional messages.
  • Each message is a logical HTTP message (e.g., a request or response), consisting of one or more frames.
  • Frames are the smallest communication units, carrying specific types of data, such as HTTP headers, payload, etc. Frames from different streams can be interleaved and then reassembled using embedded

CodeWave

CodeWave: A navigation hub for offline developer conferences, connecting you to the latest trends and opportunities in the tech world.

Conference Homepages

Domestic

  • GIAC Global Internet Architecture Conference - Focuses on the trends in internet architecture, inviting top architects in the industry to share their experiences and insights.

  • QCon Global Software Development Conference - Focuses on the latest trends and technologies in software development, providing a platform for developers to learn and exchange ideas.

  • D2 Front-end Technology Conference - Organized by Alibaba, focusing on technological innovation and practical exchange in the field of front-end and mobile development.

  • Rare Earth Developers Conference - Aimed at a wide range of developers, sharing the latest tech trends and development experiences.

  • GMTC Global Front-end Technology Conference - Focuses on the latest technologies and practical applications in the front-end domain, aiming to promote innovation and development in front-end technologies.

  • ArchSummit Global Architect Summit - For the software architecture domain, inviting renowned architects to share best practices and experiences in architecture design.

  • Early Morning Chat Conference - A platform for sharing and exchange aimed at the front-end community, promoting the sharing of front-end technologies and experiences.

  • VueConf - Aimed at developers and enthusiasts of the Vue.js community, sharing the latest developments and application cases of Vue.js.

  • CssConf - Focuses on CSS-related technologies, tools, and best practices, aiming to promote the development of CSS technology.

  • Web Frontier Technology Forum - Organized by W3C, discussing the latest standards and trends in Web technology.

  • China Software R&D Management Industry Technology Summit - Focused on the software R&D management domain, sharing management practices and innovative methods.

  • China DevOps Community, Recent Activities - Dedicated to promoting DevOps culture and practices, organizing related activities and exchanges.

  • Elastic Meetup - Regular offline exchange events organized by the Elastic official Chinese community - For Elasticsearch users and developers, sharing experiences and best practices.

  • JS World - The world’s largest JavaScript conference, covering all aspects of JavaScript, inviting speakers from well-known companies and organizations, providing technical updates and case studies. The most recent event was held on 2024.2.28.

  • VueJS Amsterdam - The largest Vue conference, gathering global participants, interacting with Vue creators and maintainers, establishing connections and gaining unforgettable experiences. The most recent event was held on 2024.2.28.

  • VueConf US - An annual conference organized by the Vue.js community, hosted by the creator and core team of Vue.js, gathering Vue.js developers and enthusiasts from around the world, sharing the latest technologies and experiences. The most recent event was held on 2023.5.24.

  • React Summit, React Summit US - The largest React conference in the world, gathering React developers, engineers, and experts to share technology and industry trends related to React. The most recent events were held on 2023.5.24 and 2023.11.13.

  • React Live - Join 500 React developers for a day of celebration of React, diving deep into the latest topics related to React. The most recent event was held on 2023.9.29.

  • DEV WORLD - Ranked as the world’s number one developers conference, offering the opportunity to interact face-to-face with 7500 developers, covering multiple technology areas. The most recent event was held on 2024.2.29.

  • Vite Conf - An immersive interactive online event for front-end teams, exploring the construction of the next generation of the web using Vite. The most recent event was held on

  • CSS Day - An advanced CSS conference providing a relaxed atmosphere and in-depth discussions. Last held on June 8, 2024.

  • FEday

  • ReactNext - The largest React framework conference in Israel, bringing together local and international speakers to share advanced topics. Last held on June 24, 2024.

  • JSHeroes - A non-profit community-organized conference that brings together JS and Web/Frontend development enthusiasts from around the world for talks and networking events. Last held on May 23, 2024.

  • iJS - An international JavaScript conference focusing on the latest trends and changes in JavaScript. Last held on October 23, 2023.

  • ng-conf - The largest annual tech summit of the Angular community, inviting well-known speakers to share experiences and best practices related to Angular. Last held on June 14, 2023.

  • GOPS 2023 Global Operations Conference - The annual conference in the global operations field, focusing on the latest operations technologies and practices.

  • DTCC China Database Technology Conference - Focused on the exchange and sharing of database technology, bringing together many experts and enthusiasts in the database field.

  • Gdevops Global Agile Operations Summit - Discussing best practices and cutting-edge technologies in agile operations, aimed at improving operational efficiency and quality.

  • ArchSummit Global Architect Summit - Bringing together top architects from around the world to share the latest concepts and technologies in architectural design.

  • KubeCon + CloudNativeCon - The annual gathering of the Kubernetes and cloud-native communities, sharing the latest advancements in cloud-native technologies.

  • 2019 Product Manager Conference - A professional conference for product managers, discussing the philosophy, tools, and best practices of product management.

  • WOT Global Artificial Intelligence Technology Summit - Focusing on the forefront of artificial intelligence technology, bringing together researchers and practitioners in the AI field.

  • NSC China Network Security Conference - Focused on the exchange and sharing in the field of network security, aimed at enhancing network security awareness and skills.

  • DOIS 2019 Operations and Development International Summit - Discussing the integration of operations and development to promote the development of DevOps culture and practices.

  • GTLC Global Technology Leadership Conference - Focusing on the cultivation and development of technology leadership, providing a platform for technology leaders to exchange and learn.

Event Publishing Platforms

Organizations

Recommended Resources

Product User Experience Optimization

A common challenge in independent development is, “How to promote and acquire customers?” However, most individuals posing this question have already released their products without much prior consideration.

The reason for this issue lies in unresolved preceding problems. Standing at the end of the problem chain, many issues become unsolvable. It’s akin to the story of Rupert’s drop; pounding it with a hammer futilely is less effective than clipping its tail with pliers.

Often, the solution to a problem isn’t answering the problem itself but addressing the core contradiction from an upstream perspective.

If your independent product aims to quickly find 100 passionate users and achieve rapid growth through them, please firmly remember these four things and continually question yourself around them to find solutions:

1. Define target users, outline their profiles, and understand the problems they currently face
2. Provide new solutions, identify core features to solve core pain points
3. Packaging, write ad copy, create landing pages
4. Cold start, find 100 passionate users

Choosing the Track, Defining Target Users:

  1. Who are your users? What are their specific profiles? Do they have purchasing power?
  2. Is now the best time to do this? Is there a time when it’s easier to do than now?
  3. Are there any policy supports or policy risks?
  4. Can this product only earn money for you? How can others also earn money through your product?
  5. Is this something only you can do? What additional advantages do you have in doing this?
  6. Are there ready-made channel resources for cooperation in sales after your product goes online?
  7. Do you think your product is a direct value proposition product? Or does it need to educate users to realize the value of the product?
  8. How many competitors are there doing the same thing? How are they doing?
  9. What are users complaining about in the negative reviews of competitors?

Defining Product Core Features:

  1. What does your product help users do? How do they currently complete this process?
  2. What percentage of users in your user profile are currently continuously completing this process?
  3. If they don’t use your product, what other alternatives are there to achieve the same effect? How much difference in efficiency compared to using your product?
  4. If you only have one core feature or chain, for which users pay, what is that feature?
  5. Are there any ready-made tools to help you quickly build this chain? (Or complete initial testing)

Determining Marketing Packaging:

  1. Which point of your product do users actually pay for? How can you highlight it to make users feel it’s useful for them?
  2. Please use a sentence to impress customers to pay for your product, what is this sentence?
  3. What are the selling points of the competitor’s packaging? Is there differentiation with yours?
  4. If there is no difference, what are the disadvantages of the competitor? Can you convert its disadvantages into your advantages? Carry out precise strikes? Do users care about this point?

Cold Start and Expansion:

  1. Where do your target users gather?
  2. How do you find them initially?
  3. What resources or people can you rely on to indirectly reach them?
  4. When they want to find products like yours, where are they most likely to discover from? What are the search keywords?
  5. Where do competitors advertise?
  6. Who is most likely to help you sell your product?

Angel Investment Selection: Focus on Technological Transformation and Application Scenarios

If I were to do angel investment, what types of projects would I consider now?

Angel investment is the hardest to do, with many fund DPIs less than 1, meaning if you don’t invest well, you basically won’t raise money. So if it were me, how would I choose?

I consulted a friend, who told me a story about a technological transformation cycle.

Starting from the previous Apple cycle, initially, there were some achievements by researchers, which led to revolutionary progress in underlying technologies. Then came the iPhone era. Following that was a series of network infrastructure construction, as well as the development of some underlying development ecosystems, migrating web-era scenes to mobile terminals. As more and more scene migrations were completed, things began to stagnate, and people started innovating in new scenes, leading to the emergence of giants like TikTok and Pinduoduo. When the application side couldn’t progress anymore, people began focusing on content, with countless individuals entering to innovate in content creation.

This trajectory can also be applied to AI. The advent of new technological changes, like when GPT3.5 appeared, initially focused on model, RAG, and infra, so those working on underlying infrastructure would be considered for investment. Because in the long run, the ecosystem needs it. In each track, there are always 1 or 2 top players who continue to develop.

However, we haven’t yet entered the period of migrating old scenes. It’s estimated that the current application layer is far from meeting the requirements of true utility. So, we won’t consider investing in this area for the time being. It’s very likely that when the technological momentum arrives, redoing the migration of old scenes will be much faster than it is now. So what entrepreneurs are doing now will often become technical debt, and it will be difficult to change course for a big ship. So, we won’t invest in projects in this area for now.

I feel that everyone’s thoughts are quite similar. What I consider is that AI applications are immature, so I would choose to directly monetize AI traffic or provide B2B service solutions, rather than creating something myself.

But in fact, AI applications can also be broken down, often with underlying application categories. For example, those closely integrated with the infra layer, with strong abstraction capabilities to adapt to changes, are also worth considering.

This line of thought also applies to the spatial computing transformation brought about by visionOS, but it feels like visionOS has just started to embark on the new technological transformation -> underlying infrastructure construction.

Foreword

One of my goals for the year 24 was to engage with the open-source community, and getting started can be challenging. I chose VueCore and ElementUI as my starting points, submitting a PR to VueCore which, unfortunately, addressed an issue that had been fixed a week prior, leaving it without follow-up.

However, an interesting issue arose in ElementUI, let’s delve into the details:

The Problem

The issue looked like this: Sharp Teeth

Here is also an SFC link: SFC

The bug occurs when there are numerous menu items in the component; ElementUI condenses the lengthy menu into an expandable section:

As shown in the above figure, hovering over or clicking on the ellipsis area reveals an expansion panel containing all menu items.

The issue arises when clicking the expansion panel: if there are too many menu items, the length of the expansion panel becomes excessively long, causing the page to extend vertically, introducing a scrollbar and compressing the view width of the content below.

While the compression may be expected behavior, since the expansion panel naturally expands to accommodate more menu items, the problem lies in a throttling function:

const getIndexPath = (index: string) => subMenus.value[index].indexPath;

// Common computer monitor FPS is 60Hz, implying 60 redraws per second. Calculation formula: 1000ms/60 ≈ 16.67ms. To avoid potential repeated triggering during `resize`, set wait to 16.67 * 2 = 33.34ms.
const debounce = (fn: () => void, wait = 33.34) => {
  let timmer: ReturnType<typeof setTimeout> | null;
  return () => {
    timmer && clearTimeout(timmer);
    timmer = setTimeout(() => {
      fn();
    }, wait);
  };
};

let isFirstTimeRender = true;
const handleResize = () => {
  if (sliceIndex.value === calcSliceIndex()) return;
  const callback = () => {
    sliceIndex.value = -1;
    nextTick(() => {
      sliceIndex.value = calcSliceIndex();
    });
  };

  // Execute the callback directly during the first resize event to avoid shaking.
  isFirstTimeRender ? callback() : debounce(callback)();
  isFirstTimeRender = false;
};

This function is triggered when the viewport width changes, executing handleResize. This function calculates the current menu length and invokes a debounced function, which executes the callback only once within a specified time frame. The callback recalculates the menu length and assigns it to sliceIndex, thus determining the expansion state of the expansion panel.

The amusingly problematic part: the scrollbar introduced triggers the throttled function so frequently that it causes the page to jitter. Since the throttling delay is 33.34ms and the scrollbar trigger frequency is around 16.67ms, the throttled function is repeatedly called, leading to the jittering effect.

Solution

To solve this issue:

Initially, I considered modifying the SCSS styles, but since the style adjusts based on the menu length, changing the styles wasn’t a viable solution.

I then realized that the throttling function’s purpose was likely to address the destruction and recreation of the component during window resizing. Was it necessary to invoke this function so frequently? Could we trigger it only when the number of components changes?

So, I added a line to the original code:

if (sliceIndex.value === calcSliceIndex()) return;

Although this issue was relatively simple, I found it intriguing enough to document. Submitting this PR allowed me to review Git operations and experience the pull request process and standards in an open-source project, which was indeed enlightening.

Next milestone: Aim to submit PRs to Vue and ElementUI, and hopefully, contribute to the core team!

Introduction

In a project, there was a need for a rich text editor with support for formula editing. However, many rich text editors lacked robust support for formula editing. To address this, I developed a small plugin using easy-formula-editor and wangeditor. It is a Latex rich text formula editor based on Vue3 and MathJax rendering. It supports easy formula editing for users with zero experience, allows customization of the editor’s configuration and style, supports re-editing of formulas, and can be used as a standalone plugin or integrated with rich text editors.

  • Easy formula editing for users with zero experience
  • Customizable editor configuration and style
  • Support for re-editing formulas
  • Can be used as a standalone plugin or integrated with rich text editors

MathJax

Installation and Usage

NPM

npm i easy-formula-editor

or

import formulaEditor from "easy-formula-editor";
const editor = new formulaEditor();
editor.create('#test');

CDN

<script type="text/javascript" src="../dist/formula-editor.min.js"></script>
<script type="text/javascript">
  const editor = new formulaEditor();
  editor.create('#test');
</script>

Export

// Latex formula
editor.latex.text()

// HTML formula
editor.$textSvgElem.html()

Extending Rich Text Editor Menu Bar

Registering Menus

[Note] It is recommended to use a global approach to register menus. If there are multiple editors with different custom menus, use the instance method to register menus.

Global Approach

// Menu key, each menu must be unique
const menuKey = 'alertMenuKey' 

// Register the menu
E.registerMenu(menuKey, AlertMenu)

const editor = new E('#div1')
editor.create()

const editor2 = new E('#div2')
editor2.create()

Instance Approach

// Menu key, each menu must be unique
const menuKey = 'alertMenuKey' 
const menuKey2 = 'alertMenuKey2'

const editor = new E('#div1')
// Register the menu
editor.menus.extend(menuKey, AlertMenu)

// Add the menu to editor.config.menus    const menuKey = 'alertMenuKey' 
// Menu order can also be adjusted through configuration, refer to the documentation on "Configuring Menus"    editor.config.menus.push(menuKey)
editor.config.menus = editor.config.menus.concat(menuKey)

// After registering the menu, create the editor, order matters!!
editor.create()

const editor2 = new E('#div2')
editor2.menus.extend(menuKey2, AlertMenu)
editor2.config.menus.push(menuKey2)
editor2.create()

Real Project Integration Example

import E from "wangeditor";
import formulaEditor from "easy-formula-editor";
import createPanelConf from "./create-panel-conf";

const { PanelMenu, Panel } = E;

class AlertMenu extends PanelMenu {
  constructor(editor) {
    // The data-title attribute indicates a tooltip for the button when the mouse hovers over it
    const $elem = E.$(
      `<div class="w-e-menu" data-title="Math Formula">
        <span>Formula</span>
      </div>`
    );
    super($elem, editor);
  }

  /**
   * Menu click event
   */
  clickHandler() {
    const formula = new formulaEditor();
    const conf = createPanelConf(this.editor, formula);
    const panel = new Panel(this, conf);
    panel.create();

    formula.create("#edit-content");
  }

  tryChangeActive() {}
}

const menuKey = "alertMenuKey";

// Register the menu
E.registerMenu(menuKey, AlertMenu);

export default E;
//create-panel-conf.ts
export default function (wangEditor, formulaEditor) {
    const btnOkId = 'btn-ok'
  
    /**
     * Insert formula
     */
    function insertFomule() {
      const formula = formulaEditor.latex.text()
      // Ensure that there are spaces on both sides when inserting into wangEditor, otherwise it may lead to focus issues
      wangEditor.txt.append('<p>'+formula+'</p>')
      return true
    }
  
    // Tabs configuration
    const tabsConf = [
      {
        // Tab title
        title: "Insert Math Formula",
        // Template
        tpl: `<div>
                <div id="edit-content"></div>
                <div class="w-e-button-container">
                  <button type="button" id="${btnOkId}" class="right">Insert</button>
                </div>
              </div>`,
        // Event bindings
        events: [
          // Insert formula
          {
            selector: '#' + btnOkId,
            type: 'click',
            fn: insertFomule,
            bindEnter: true,
          },
        ],
      }, // Tab end
    ]
  
    return {
        width: 660,
        height: 0,
        // Panel can contain multiple tabs
        tabs: tabsConf, // Tabs end
      }
}

Using the above code, you can add a formula editor menu to the rich text editor:

<template>
  <div class="formula-container">
    <v-card elevation="0" class="formula-card" title="Output Area" subtitle="Output">
      <div id="formula" class="formula-content">
        {{ renderedFormula ? `$${renderedFormula}$` : '' }}
      </div>
    </v-card>
    <div class="editor-area">
      <div id="wang-editor" class="editor"></div>
    </div>
  </div>
</template>


<script setup>
import E from "../utils/formula-menu-conf";
import { ref, onMounted, nextTick, defineProps, watchEffect } from "vue";

// Define props
const props = defineProps({
  initMessage: {
    type: String,
    default: "",
  }
});

watchEffect(() => {
  props.initMessage;
});

const editor = ref(null);
const renderedFormula = ref("");

function convert() {
  MathJax.texReset();
  MathJax.typesetClear();
  MathJax.typesetPromise();
}

function updateFormula() {
  renderedFormula.value = editor.value.txt.text();
  nextTick(convert);
}

onMounted(() => {
  editor.value = new E("#wang-editor");
  editor.value.config.height = 360;
  editor.value.config.menus = ['head', 'bold', 'underline', 'strikeThrough','emoticon', 'undo', 'redo'];
  editor.value.config.onchange = updateFormula;
  editor.value.config.onchangeTimeout = 500;
  editor.value.create();
  editor.value.txt.html(props.initMessage);
});


</script>


This setup allows seamless integration of the formula editor with a rich text editor, as depicted in the following image:

![MathJax](/img/mathjax/mathjax-2.png)

Here's a link to the official documentation for WangEditor: [www.wangeditor.com/v4](https://www.wangeditor.com/v4)

Feel free to reach out if you have any further questions or need additional clarification.

Preface

This article mainly introduces the concept of state in React.

Comparison between Declarative UI and Imperative UI

When designing UI interactions, you may think about how the UI responds to changes based on user actions. Imagine a form that allows users to submit an answer:

  • As you input data into the form, the “Submit” button becomes enabled.

  • When you click “Submit,” the form and the submit button become disabled, and a loading animation appears.

  • If the network request is successful, the form hides, and a “Submission Successful” message appears.

  • If the network request fails, an error message appears, and the form becomes enabled again.

In imperative programming, the above process tells you directly how to implement the interaction. You have to write explicit commands to manipulate the UI based on what should happen.

Both Vue.js and React follow a declarative programming approach.

Thinking Declaratively About UI in React

From the example above, you’ve seen how to implement a form. To better understand how to think in React, you generally need to follow these steps to reimplement this UI in React:

  1. Identify different view states in your component.

  2. Determine what triggers the changes in these states.

  3. Represent the state in memory (using useState).

  4. Remove any unnecessary state variables.

  5. Connect event handling functions to set state.

State Management in React

In React, state management is a crucial concept, and it is achieved through state. state is an internal object in a React component used to store the component’s internal state. It is a regular JavaScript object, accessible through this.state.

React builds a render tree for the UI components.

When you add state to a component, you might think that the state “exists” within the component. However, in reality, React keeps track of each state by associating it with the correct component based on its position in the render tree.

This is different from Vue.js, where the reactive system is isolated from components, while React’s state is bound to components.

We embed the state into React components as part of the component’s vnode information. When React’s state updates, it implies that the component’s information updates, triggering a re-render.

Understanding this, we can easily grasp how React’s reactivity works. React’s state is bound to components, and when the state updates, the component also updates. This is the reactive system in React.

Let’s take a specific example:

import { useState } from 'react';

export default function App() {
  const counter = <Counter />;
  return (
    <div>
      {counter}
      {counter}
    </div>
  );
}

function Counter() {
  const [score, setScore] = useState(0);
  const [hover, setHover] = useState(false);

  let className = 'counter';
  if (hover) {
    className += ' hover';
  }

  return (
    <div
      className={className}
      onPointerEnter={() => setHover(true)}
      onPointerLeave={() => setHover(false)}
    >
      <h1>{score}</h1>
      <button onClick={() => setScore(score + 1)}>
        Add One
      </button>
    </div>
  );
}

The tree structure for these components looks like this:

vue-react

These are two independent counters because they are rendered at their respective positions in the tree. In general, you don’t need to consider these positions when using React, but knowing how they work can be useful.

They have their own states because each component instance has its own state. You can use multiple state variables in a component. When I update the state, it triggers a re-render of the component. Here, you can see that the states of the two counters are independent and do not affect each other.

Preserving and Resetting State in React

Same Component at the Same Position Retains State

import { useState } from 'react';

export default function App() {
  const [isFancy, setIsFancy] = useState(false);
  return (
    <div>
      {isFancy ? (
        <Counter isFancy={true} /> 
      ) : (
        <Counter isFancy={false} /> 
      )}
      <label>
        <input
          type="checkbox"
          checked={isFancy}
          onChange={e => {
            setIsFancy(e.target.checked)
          }}
        />
        Use Fancy Style
      </label>
    </div>
  );
}

function Counter({ isFancy }) {
  const [score, setScore] = useState(0);
  const [hover, setHover] = useState(false);

  let className = 'counter';
  if (hover) {
    className += ' hover';
  }
  if (isFancy) {
    className += ' fancy';
  }

  return (
    <div
      className={className}
      onPointerEnter={() => setHover(true)}
      onPointerLeave={() => setHover(false)}
    >
      <h1>{score}</h1>
      <button onClick={() => setScore(score + 1)}>
        Add One
      </button>
    </div>
  );
}

vue-react

Different Components at the Same Position Reset State

This is intuitive as changing components at the same position would reset the state. Consider replacing <Counter> with a <p>:

vue-react

When Counter is replaced with p, Counter is removed, and p is added.

vue-react

When switching back, p is removed, and Counter is added.

Reference in the React documentation: State and Lifecycle - Preserving State in the Tree

Extracting State Logic into a Reducer

For components requiring updates to multiple states, scattered event handlers may become overwhelming. In such cases, you can consolidate all state update logic into a function called a “reducer” outside the component. Event handlers become concise as they only need to specify user “actions.” At the bottom of the file, the reducer function specifies how the state should be updated in response to each action!

useReducer is a React Hook for managing component state logic. It provides an organized way to handle more complex state logic, suitable for those with multiple sub-values or states that need to be updated based on previous states. The usage of useReducer is similar to the reducer concept in Redux.

Here’s a basic example of useReducer:

import React, { useReducer } from 'react';

// Reducer function, takes current state and action, returns new state
const reducer = (state, action) => {
  switch (action.type) {
    case 'INCREMENT':
      return { count: state.count + 1 };
    case 'DECREMENT':
      return { count: state.count - 1 };
    default:
      return state;
  }
};

const initialState = { count: 0 };

const Counter = () => {
  // Use useReducer, pass in reducer and initial state
  const [state, dispatch] = useReducer(reducer, initialState);

  return (
    <div>
      Count: {state.count}
      <button onClick={() => dispatch({ type: 'INCREMENT' })}>Increment</button>
      <button onClick={() => dispatch({ type: 'DECREMENT' })}>Decrement</button>
    </div>
  );
};

export default Counter;

Key steps include:

  1. Define the reducer function: This function takes the current state state and an action describing the action. It then executes the corresponding logic based on the action type and returns a new state.

  2. Initialize state: Create state and dispatch function by calling useReducer(reducer, initialState).

  3. Use state and dispatch in the component: Access the current state value through state and trigger the reducer with dispatch.

Deep Data Transfer Using Context

Usually, information is passed from parent to child components through props. However, if you need to deeply pass some prop in the component tree, or if many components in the tree need to use the same prop, passing props can become cumbersome. Context allows a parent component to provide some information to any lower-level component without the need for props to be passed layer by layer.

import React, { createContext, useContext, useState } from 'react';

// Create a Context
const MyContext = createContext();

// Create a component with Provider and Consumer
const MyProvider = ({ children }) => {
  const [data, setData] = useState('Hello from Context');

  return (
    <MyContext.Provider value={{ data, setData }}>
      {children}
    </MyContext.Provider>
  );
};

// Use useContext to get values from Context
const ChildComponent = () => {
  const { data, setData } = useContext(MyContext);

  return (
    <div>
      <p>{data}</p>
      <button onClick={() => setData('Updated Context')}>Update Context</button>
    </div>
  );
};

// Wrap components that need to share data with Provider in the application
const App = () => {
  return (
    <MyProvider>
      <ChildComponent />
    </MyProvider>
  );
};

export default App;

Extending State with Reducer and Context

Reducer helps consolidate state update logic in components, and Context helps pass information deeper into other components.

You can combine reducers and context to manage the state of complex applications.

Based on this idea, use a reducer to manage the state of a parent component with complex state. Other components at any depth in the component tree can read its state through context. You can also dispatch some actions to update the state.

Using Reducer and Context intelligently can help you manage state better and make your code more concise.

Compared to Vue.js’s reactive system based on Proxy, using proxies, and the use of provide and inject, Vue.js’s state management is done in a separate WeakMap. When the variable state changes, it can trigger effect side functions and update the value. React’s state management is bound to components, and when the state updates, the component also updates. However, when dealing with global state management, it needs to be defined in the parent component.

Understanding how to define React state based on specific situations allows for better state management.

Introduction

This article focuses on how React’s JSX is compiled into VNodes.

Vue’s Render Function

Before diving into React’s JSX, let’s recall how Vue declares components using the Vue template method. Vue templates are compiled by the Vue compiler into render functions. The render function returns VNodes, and these VNodes are then rendered into real DOM through the patch function.

Details of the renderer have been discussed in previous chapters and will not be reiterated here.

React’s JSX

React maps JSX written in components to the screen, and when the state within components changes, React updates these “changes” on the screen.

JSX is ultimately transformed into a form like React.createElement by babel. As for how babel transforms JSX into React.createElement, we can use babel’s online compiler to check.

<div>
  <img src="avatar.png" className="profile" />
  <Hello />
</div>

Will be transformed by babel into:

React.createElement(
  "div",
  null,
  React.createElement("img", {
    src: "avatar.png",
    className: "profile"
  }),
  React.createElement(Hello, null)
);

Babel provides an online REPL compiler that can convert ES6 code to ES5 code online. The transformed code can be directly inserted into a webpage and run as ES5 code. Here’s a link: Babel Online Compiler

vue-react

During the transformation process, babel at compile time judges the first letter of the component in JSX:

When the first letter is lowercase, it is recognized as a native DOM tag, and the first variable of createElement is compiled into a string.

When the first letter is uppercase, it is recognized as a custom component, and the first variable of createElement is compiled into an object.

In the end, both will be mounted through the ReactDOM.render(...) method, as shown below:

ReactDOM.render(<App />, document.getElementById("root"));

How is React’s JSX Transformed?

In React, nodes can be roughly divided into four categories:

  • Native tag nodes
  • Text nodes
  • Function components
  • Class components

As shown below:

class ClassComponent extends Component {
  static defaultProps = {
    color: "pink"
  };
  render() {
    return (
      <div className="border">
        <h3>ClassComponent</h3>
        <p className={this.props.color}>{this.props.name}</p>
      </div>
    );
  }
}

function FunctionComponent(props) {
  return (
    <div className="border">
      FunctionComponent
      <p>{props.name}</p>
    </div>
  );
}

const jsx = (
  <div className="border">
    <p>xx</p>
    <a href=" ">xxx</a>
    <FunctionComponent name="Function Component" />
    <ClassComponent name="Class Component" color="red" />
  </div>
);

These categories will ultimately be transformed into the form of React.createElement.

vue-react

function createElement(type, config, ...children) {
    if (config) {
        delete config.__self;
        delete config.__source;
    }
    // Detailed handling is done in the source code, such as filtering out key, ref, etc.
    const props = {
        ...config,
        children: children.map(child =>
            typeof child === "object" ? child : createTextNode(child)
        )
    };
    return {
        type,
        props
    };
}

function createTextNode(text) {
    return {
        type: TEXT,
        props: {
            children: [],
            nodeValue: text
        }
    };
}

export default {
    createElement
};

The createElement function makes decisions based on the passed node information:

  • If it’s a native tag node, the type is a string, such as div, span.
  • If it’s a text node, the type is not present, here it is TEXT.
  • If it’s a function component, the type is the function name.
  • If it’s a class component, the type is the class name.

The virtual DOM is rendered into real DOM using ReactDOM.render, with the following usage:

ReactDOM.render(element, container[, callback])

When called for the first time, all DOM elements within the container node are replaced. Subsequent calls use React’s diff algorithm for efficient updates.

If an optional callback function is provided, it will be executed after the component is rendered or updated.

The render function implementation is roughly as follows:

function render(vnode, container) {
    console.log("vnode", vnode); // Virtual DOM object
    // vnode -> node
    const node = createNode(vnode, container);
    container.appendChild(node);
}

// Create a real DOM node
function createNode(vnode, parentNode) {
    let node = null;
    const { type, props } = vnode;
    if (type === TEXT) {
        node = document.createTextNode("");
    } else if (typeof type === "string") {
        node = document.createElement(type);
    } else if (typeof type === "function") {
        node = type.isReactComponent
            ? updateClassComponent(vnode, parentNode)
            : updateFunctionComponent(vnode, parentNode);
    } else {
        node = document.createDocumentFragment();
    }
    reconcileChildren(props.children, node);
    updateNode(node, props);
    return node;
}

// Traverse through child vnodes, convert them to real DOM nodes, and then insert into the parent node
function reconcileChildren(children, node) {
    for (let i = 0; i < children.length; i++) {
        let child = children[i];
        if (Array.isArray(child)) {
            for (let j = 0; j < child.length; j++) {
                render(child[j], node);
            }
        } else {
            render(child, node);
        }
    }
}

function updateNode(node, nextVal) {
    Object.keys(nextVal)
        .filter(k => k !== "children")
        .forEach(k => {
            if (k.slice(0, 2) === "on") {
                let eventName = k.slice(2).toLocaleLowerCase();
                node.addEventListener(eventName, nextVal[k]);
            } else {
                node[k] = nextVal[k];
            }
        });
}

// Return a real DOM node
// Execute the function
function updateFunctionComponent(vnode, parentNode) {
    const { type, props } = vnode;
    let vvnode = type(props);
    const node = createNode(vvnode, parentNode);
    return node;
}

// Return a real DOM node
// Instantiate first, then execute the render function
function updateClassComponent(vnode, parentNode) {
    const { type, props } = vnode;
    let cmp = new type(props);
    const vvnode = cmp.render();
    const node = createNode(vvnode, parentNode);
    return node;
}

export default {
    render
};

In the React source code, the overall process of converting virtual DOM to real DOM is shown in the following diagram:

vue-react

The rendering process is illustrated as follows:

  • Use React.createElement or write React components with JSX. In reality, all JSX code is eventually transformed into React.createElement(...) with the help of Babel.

  • The createElement function handles special props such as key and ref, assigns default props with defaultProps, and processes the passed children nodes, ultimately constructing a virtual DOM object.

  • ReactDOM.render renders the generated virtual DOM onto the specified container. It employs mechanisms such as batch processing, transactions, and performance optimizations for specific browsers, ultimately transforming into real DOM.

Introduction

Recently, I interviewed for the Spring Youth Training Camp at Dewu, where proficiency in React was required for the project. Having previously worked with Next.js for a while, my understanding of JSX was somewhat one-sided. As a developer transitioning from Vue.js to React, my plan is to first compare the features of Vue.js and React. Then, I’ll dive into React based on the project requirements.

Similarities between Vue.js and React

vue-react

Vue and React share many similarities:

  • Both use Virtual DOM.
  • Both follow a component-based approach with a similar flow.
  • Both are reactive and advocate for a unidirectional data flow (Vue’s v-model directive allows two-way data binding on form elements).
  • Both have mature communities and support server-side rendering.

Vue and React have similar implementation principles and processes, both using Virtual DOM + Diff algorithm.

Whether it’s Vue’s template + options API (using the Single File Component system) or React’s Class or Function (with class syntax in JavaScript also being a form of a function), the underlying goal is to generate a render function.

The render function produces a VNode (Virtual DOM tree). With each UI update, a new VNode is generated based on the render function. This new VNode is then compared with the cached old VNode using the Diff algorithm (the core of the framework), and the real DOM is updated accordingly (Virtual DOM is a JS object structure, while the real DOM is in the browser rendering engine, making operations on the Virtual DOM much less resource-intensive).

Common flow in Vue and React:

vue template/react JSX -> render function -> generate VNode -> when there are changes, diff between old and new VNode -> update the real DOM using the Diff algorithm.

The core is still Virtual DOM, and the advantages of VNode are numerous:

  • Reduces direct manipulation of the DOM. The framework provides a way to shield the underlying DOM writing, reducing frequent updates to the DOM and making data drive the view.

  • Provides the possibility for functional UI programming (core idea in React).

  • Enables cross-platform rendering beyond the DOM (e.g., React Native, Weex).

vue-react

Vue calls itself a framework because the official documentation provides a complete set of tools from declarative rendering to build tools.

React calls itself a library because the official package only includes the core React.js library. Routing, state management, and other features are provided by third-party libraries from the community, ultimately integrated into a solution.

Differences between Vue and React

Different Component Implementations

Vue.js Implementation

Vue’s source code attaches options to the Vue core class and then uses new Vue({options}) to get an instance (the script exported by Vue components is just an object filled with options). This makes the this in the options API refer to the internal Vue instance, which is opaque to the user. Therefore, documentation is needed to explain APIs like this.$slot and this.$xxx. Additionally, Vue plugins are built on top of the Vue prototype class, which is why Vue plugins use Vue.install to ensure that the Vue object of third-party libraries and the current application’s Vue object are the same.

React Implementation

React’s internal implementation is relatively simple; it directly defines a render function to generate a VNode. React internally uses four major component classes to wrap VNodes, and different types of VNodes are handled by the corresponding component class, with clear and distinct responsibilities (the subsequent Diff algorithm is also very clear). React class components all inherit from the React.Component class, and their this refers to the user-defined class, making it transparent to the user.

Different Reactivity Principles

Vue.js Implementation

  • Vue uses dependency collection, automatic optimization, and mutable data.
  • Vue recursively listens to all properties of data and directly modifies them.
  • When data changes, it automatically finds the referencing components to re-render.

React Implementation

  • React is based on a state machine, manual optimization, immutable data, and requires setState to drive new state replacement for the old state.
  • When data changes, the entire component tree is considered as the root, and by default, all components are re-rendered.

Different Diff Algorithms

Vue is based on the snabbdom library, which has good speed and a modular mechanism. Vue Diff uses a doubly linked list, comparing and updating the DOM simultaneously.

React primarily uses a diff queue to save which DOM elements need updating, obtaining a patch tree, and then performing a batch update of the DOM.

Different Event Mechanisms

Vue.js Implementation

  • Vue uses standard web events for native events.
  • Vue has a custom event mechanism for components, forming the basis of parent-child communication.
  • Vue makes reasonable use of the snabbdom library’s module plugins.

React Implementation

  • React’s native events are wrapped, and all events bubble up to the top-level document for listening. They are then synthesized here. Based on this system, the event mechanism can be used cross-platform, not tightly bound to the Web DOM.
  • React components have no events; parent-child communication is done using props.