Introduction

After reading numerous articles on WebAssembly and conducting some performance tests, I’d like to share my insights on this technology.

Is WASM Equivalent to Assembly-Level Performance?

Certainly not. The assembly in WASM does not mean actual assembly code; it is a new bytecode with its own conventions that need an interpreter to run. This interpreter is much faster than a JavaScript interpreter but still falls short of native machine code performance.

As a reference point, when JavaScript is optimized with Just-In-Time (JIT) compilation, its overall performance is roughly 1/20th of machine code. In comparison, WASM can achieve about 1/3rd of machine code performance (these figures vary depending on the context and are for reference purposes only). Even if you write code in languages like C++ and Rust, the performance you get is comparable to Java and C#, not native machine code. This explains why WASM does not demonstrate overwhelming performance advantages in all application scenarios: if you know how to optimize JS to run efficiently, it can compete with Rust in the browser environment.

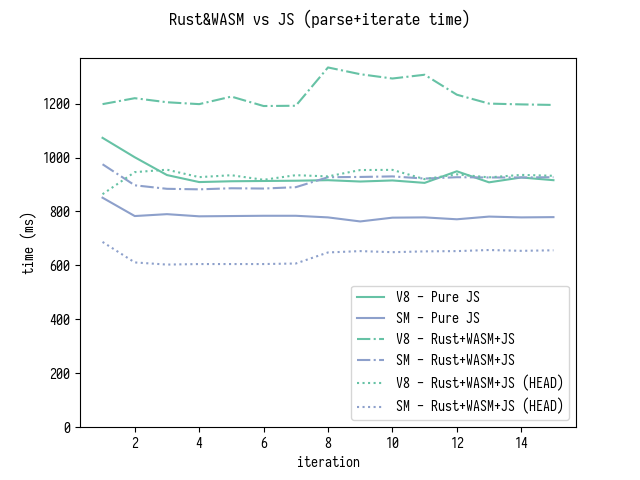
A classic case of performance comparison between WASM and JS occurred in a debate between Mozilla developers and V8 developers. Mozilla Hacks published an article titled “Optimizing Source Maps Performance with Rust and WebAssembly”, optimizing the performance of the source-map JavaScript package by five times. V8 core developer Vyacheslav Egorov responded with an article titled “You Might Not Need Rust and WebAssembly to Speed Up Your JS”, achieving astonishing optimizations in pure JS that outperformed Rust. The debate was intense, and the performance comparison chart after three rounds clearly showed Rust’s superiority, although JS managed to outperform in one round:

Rust&Js

Additionally, Milo Yip conducted performance tests on different languages for ray tracing (a highly intensive computation task), supporting the conclusion about performance comparisons between languages and machine code. C++, Java, and JS, without specific optimizations, can represent three typical performance levels:

Language Rendering Comparison (C++/C#/F#/Java/JS/Lua/Python/Ruby)

Is WASM Faster Than JS, So It Should Be Used for Compute-Intensive Applications?

This assumption is a bit biased. WASM is still processed on the CPU. For tasks that can be highly parallelized, using WebGL for GPU acceleration is often much faster. For instance, algorithms for image processing, as I discussed in my article [“Practical WebGL Image Processing Introduction”](link to the article), can easily be several tens of times faster by using WebGL than by looping through canvas pixels in JS.

Rewriting such a nested loop in WASM to achieve a few times improvement over JS is already considered quite good. Regarding AI computations in the browser, community evaluations show that WebGL and WebMetal offer the highest performance levels, followed by WASM. Refer to this article: “Browser-Based AI Evaluations”

However, WebGL acceleration has precision issues. For example, the core of the frontend image resizing library Pica uses the Lanczos sampling algorithm. I implemented this algorithm with WebGL shaders; it is not complicated. The early version of Pica once included optional WebGL optimizations, but now it has shifted to WASM. The reason is that WASM can ensure consistent computation results with JS for the same parameters, whereas WebGL cannot. For related discussions, see Issue #114 · nodeca/pica

Moreover, there are not many compute-intensive scenarios in frontend development. Tasks like encryption, compression, and mining are not high-frequency requirements. As for potentially essential AI applications in the future, I personally have confidence in WebGPU, the next-generation standard that can fully unleash GPU potential. However, WASM is already a good alternative.

Does Embedding a WASM Function in JS Automatically Improve Performance?

Not necessarily. Modern JS engines have powerful tools for performance optimization, namely JIT (Just-In-Time compilation). Simply put, if a function like the add function in the code const add = (a, b) => a + b consistently performs integer addition, the JS engine will automatically compile machine code to compute int a + int b, replacing the original JS function. This optimization significantly enhances the performance of frequent calls to this function. This is the magic of JIT (Just-In-Time) compilation.

So, don’t assume that JS is slow and think of manually replacing such JS functions with C compiled to WASM to improve performance. Modern JS engines automatically “translate JS to C” like this for you! If you can rewrite a JS function into equivalent C code, it’s highly likely that this function, when inlined, will achieve similar performance through JIT compilation. This is probably why V8 developers confidently challenged Rust with JS in the debate I mentioned earlier.

In the article “Calls between JavaScript and WebAssembly are Finally Fast 🎉”, Lin Clark eloquently discusses the optimization process. In the end, function calls between JS and WASM are faster than non-inlined JS function calls. However, the comparison between these calls and JS functions that are inlined by JIT is not mentioned in the article.

It’s worth mentioning that Mozilla often promotes their massively optimized work, much of which might have stemmed from apparent design issues (let’s be honest; we all have our moments). For instance, the significant power-saving optimization in Firefox 70 for Mac was rooted in what exactly? A rough understanding is that the previous version of Firefox on Mac updated the window pixels for every frame! Of course, these articles contain substantial information, and I highly recommend reading the original texts after building a good foundation. It opens up a broader world and often inspires insights into software architecture design.

If WASM supports garbage collection (GC) in the future, managing object lifecycles between JS and WASM may become more complicated. For example, I recently attempted to synchronize large objects between Dart in Flutter and Java in Android, hoping to “embed some Android platform capabilities into the Flutter ecosystem.” However, this approach led to a lot of verbose and low-performance glue code. Objects had to be deep-copied asynchronously through messages, with very low controllability. Although WASM currently does not have GC, once it’s added, I have reasons to suspect that managing object lifecycles between WASM and JS will face similar challenges. However, this problem mainly concerns Mozilla and Google developers; it’s not something we need to worry about.

Is WASM Just Like Calling C from Python in Terms of Simplicity?

This question can only be answered by practical experience. For example, I have recently attempted the following:

  • Calling C++ from Java classes in Android
  • Calling C from Dart in Flutter
  • Calling C/C++ from QuickJS, an embedded JS engine

All of these cases involve creating native objects in the engine and passing them to C/C++ functions by reference. This method is generally referred to as FFI (Foreign Function Interface), allowing native code to be embedded in language runtimes. However, if you are dealing with two different runtimes, things are not that simple. For instance, in the Quack project, which aims to bind QuickJS with Java, marshaling (similar to serialization and deserialization like JSON) has to be done between JS and Java objects; you cannot simply pass references.

So, how does it work with WASM? Essentially, WASM’s linear memory can be freely read and written by JS, without the hassle of deep copying. However, WASM does present some challenges in terms of data flow. It only supports basic data types such as integers and floats; there is no support for complex data structures like strings. Thus, for slightly more complex objects, it’s challenging to manually define corresponding structures on both the JS and WASM sides. This difficulty makes it complicated to directly perform complex object transformations using WASM. Currently, this dirty work is left to tools like wasm-bindgen, which handles complex object transformations between languages. wasm-pack uses another tool called wasm-bindgen to bridge JavaScript and Rust, among other types. However, this process is not the same as directly embedding C/C++ functions in JS runtime, as with traditional FFI compiled to machine code.

For example, if you frequently manipulate JS objects with WASM, it can almost certainly impact performance. A typical pitfall in this regard is porting OpenGL applications to WASM. For example, a function like glTexImage2D in C++ now needs to go through two layers: first, it goes from WASM to JS in the glue layer, and then from JS to WebGL API like gl.texImage2D through C++ binding. This adds an extra layer of complexity compared to directly writing the equivalent JS code. Can this approach match the performance of writing JS directly instead of two layers of glue code?

Of course, Mozilla is aware of this issue. Hence, they are exploring how to better expose Web IDL (the bindings of browser-native APIs) to WASM. In this process, they introduced the concept of WASM Interface Types: since WASM is already an intermediate bytecode, why not establish a universal Intermediate Representation (IR) specification that can unify all types across programming language runtimes? However, this specification hopes to solve problems mainly through protocolization and structured deep copying, with only the anyref type allowing passing by reference. anyref behaves somewhat like file descriptors in Unix; I won’t delve into this here.

Js2WASM

Is WASM Part of the Frontend Ecosystem?

I do not agree with this statement. It’s essential to note that the toolchains for compiling WASM applications and the libraries they depend on have little to do with JS.

A toolchain that supports cross-compilation typically comes with libraries supporting the target platform. For example, after including <GLES2/gl2.h>, the glTexImage2D API you call is provided by the dynamic library. This API can run consistently on x86, ARM, MIPS, WASM, etc., platforms (similar to .so files in Android). Emscripten provides a set of dynamic libraries specifically for the WASM platform, compiling them into JS format. However, it only guarantees that these APIs are available; performance is a different story. Emscripten also provides many optimization suggestions for porting WebGL applications.

So, I’d like to reiterate that the dependencies and toolchains required to compile WASM applications are almost entirely unrelated to JS. JS is just a format produced by these toolchains, similar to machine code. From the perspective of JS developers, these toolchains may seem quite unfamiliar. Still, from the perspective of native application developers, everything is quite standard.

Conclusion

WebAssembly is undoubtedly a revolutionary technology, representing a new cross-platform direction, especially valuable for native application developers. However, for frontend developers, it’s just a bytecode virtual machine embedded in the browser.

I hope this article clarifies some misconceptions and provides a better understanding of WebAssembly’s capabilities and limitations. While it’s a powerful tool, it’s essential to use it judiciously and consider its advantages and trade-offs within the context of your specific use case. Remember, WebAssembly is not a magic solution that automatically improves performance in all scenarios. It’s another option in the toolkit, providing a balance between performance, development cost, and effectiveness. As the technology evolves, it will be interesting to see how it integrates further into the broader web ecosystem.


Note: This article is a translated version of the original post. For the most accurate and up-to-date information, please refer to the original source.
```

Introduction

Explore the differences between reactive and shallowReactive, delving into the concepts of deep reactivity and shallow reactivity in Vue.js.

Shallow Reactivity vs Deep Reactivity

const obj = reactive({ foo: { bar: 1 } })
effect(() =>{ 
console.log(obj.foo.bar)
})
// Modifying obj.foo.bar value does not trigger reactivity
obj.foo.bar = 2

Initially, an object obj is created with a property foo containing another object { bar: 1 }. When accessing obj.foo.bar inside an effect function, it is noticed that modifying obj.foo.bar does not trigger the effect function again. Why does this happen? Let’s take a look at the current implementation:

function reactive(obj) {
  return new Proxy(obj ,{
    get(target, key, receiver) {
      if (key === 'raw') 
        return target;
    track(target, key);
// When reading the property value, return it directly
    return Reflect.get(target, key, receiver)
}
// Other trapping functions are omitted
})
}

In the given code, when accessing obj.foo.bar, it first reads the value of obj.foo. Here, Reflect.get is used to directly return the result of obj.foo. Since the result obtained through Reflect.get is a plain object, namely { bar: 1 }, it is not a reactive object. Therefore, when accessing obj.foo.bar inside the effect function, no reactivity is established. To address this, the result returned by Reflect.get needs to be wrapped:

function reactive(obj) {
  return new Proxy(obj, {
    get(target, key, receiver) {
      const result = Reflect.get(target, key, receiver);
      // If the result is an object, make it reactive
      if (typeof result === 'object') {
        return reactive(result);
      }
      return result;
    },
    // Other traps...
  });
}

In this code snippet, the reactive function is defined. It takes an object as a parameter and returns a proxy of that object. The proxy uses a get trap function that triggers when accessing a property of the object. In the get trap, Reflect.get is used to retrieve the property value. If the result is an object, it is made reactive by calling the reactive function recursively. This ensures that nested objects also possess reactive properties, allowing modifications to trigger the reactivity system.

Shallow Reactivity

However, there are scenarios where deep reactivity is not desired, leading to the concept of shallowReactive or shallow reactivity. Shallow reactivity means that only the top-level properties of an object are reactive. For example:

Suppose we have an object with a nested object as its property:

let obj = {
  innerObj: {
    key: 'value'
  }
}

If we apply deep reactivity to obj:

let reactiveObj = reactive(obj);

Any modifications to obj or innerObj properties will trigger the reactivity system:

reactiveObj.innerObj.key = 'new value'; // Triggers reactivity

However, if we want only the top-level properties of obj to be reactive, meaning modifications to obj trigger reactivity but modifications to innerObj do not, we use the shallowReactive function:

let shallowReactiveObj = shallowReactive(obj);

With shallowReactive, only modifications to obj will trigger reactivity:

shallowReactiveObj.innerObj = {}; // Triggers reactivity
shallowReactiveObj.innerObj.key = 'new value'; // Does not trigger reactivity

Vue.js and reactive vs shallowReactive

In Vue.js, both reactive and shallowReactive functions are used to create reactive objects. Let’s explore their differences.

The reactive function creates deeply reactive objects. This means that both the object itself and all its nested objects become reactive. Any modifications to the object or its nested objects’ properties will trigger the reactivity system.

On the other hand, the shallowReactive function creates shallowly reactive objects. This means that only the top-level properties of the object are reactive. If the object contains nested objects, modifications to those nested objects’ properties will not trigger the reactivity system.

let obj = {
  innerObj: {
    key: 'value'
  }
}

let reactiveObj = Vue.reactive(obj);
reactiveObj.innerObj.key = ‘new value’; // Triggers reactivity

let shallowReactiveObj = Vue.shallowReactive(obj);
shallowReactiveObj.innerObj.key = ‘new value’; // Does not trigger reactivity

Readonly and Shallow Readonly

After discussing reactivity and shallow reactivity, let’s talk about readonly and shallow readonly:

Vue.js provides readonly and shallowReadonly functions to create readonly reactive objects.

The readonly function creates deeply readonly reactive objects. This means that both the object itself and all its nested objects are readonly. Any attempts to modify the object or its nested objects’ properties will fail.

The shallowReadonly function creates shallow readonly reactive objects. This means that only the top-level properties of the object are readonly. If the object contains nested objects, properties of these nested objects can be modified.

let obj = {
  innerObj: {
    key: 'value'
  }
}

let readonlyObj = Vue.readonly(obj);
readonlyObj.innerObj.key = 'new value'; // This will fail because the object is readonly

let shallowReadonlyObj = Vue.shallowReadonly(obj);
shallowReadonlyObj.innerObj.key = 'new value'; // This will succeed because only top-level properties are readonly

Note: This article is a translated version of the original post. For the most accurate and up-to-date information, please refer to the original source.
```

Introduction

Since Vue.js 3’s reactive data is based on Proxy, it’s essential to understand Proxy and its associated concept, Reflect. What is Proxy? In simple terms, Proxy allows you to create a proxy object. It can proxy other objects, emphasizing that Proxy can only proxy objects and not non-object values like strings, booleans, etc. So, what does proxying mean? Proxying refers to the act of creating a basic semantic representation of an object. It allows us to intercept and redefine the basic operations on an object.

Create object proxies with Proxy

Built-in object Reflect

When we talk about “basic semantics” in programming languages, we mean the fundamental operations for reading and modifying data. In JavaScript, these operations typically include reading property values and setting property values. For example, given an object obj, the following operations are considered basic semantics:

  1. Read property value: obj.foo (reads the value of property foo)
  2. Set property value: obj.foo = newValue (sets the value of property foo)

In the above code, Proxy objects allow us to intercept (or redefine) these basic semantic operations. The Proxy constructor takes two parameters: the object being proxied and an object containing interceptors (also known as traps). In the interceptor object, we can define the get method to intercept property read operations and the set method to intercept property set operations. This way, we can execute custom logic when these operations occur.

Understanding these basic semantic operations and how to use Proxy and Reflect to intercept and handle them is crucial for implementing reactive data in JavaScript. In reactive data, we can use Proxy and Reflect to track reads and modifications of object properties, enabling reactive updates of data.

Basic Usage of Proxy

When we talk about basic semantics, we refer to fundamental operations in JavaScript, such as reading object property values and setting object property values. Consider the following object obj:

const obj = { foo: 1 };

Here, obj.foo is a basic semantic operation for reading property values, and obj.foo = newValue is a basic semantic operation for setting property values.

Now, we can use Proxy to intercept these basic semantic operations.

const handler = {
  get(target, key) {
    console.log(`Reading property ${key}`);
    return target[key];
  },
  set(target, key, value) {
    console.log(`Setting property ${key} to ${value}`);
    target[key] = value;
  }
};

const proxyObj = new Proxy(obj, handler);

proxyObj.foo; // Outputs: Reading property foo
proxyObj.foo = 2; // Outputs: Setting property foo to 2

In the above code, we created a handler object that defines get and set methods to intercept property reads and sets. Then, we created a proxy object proxyObj using the Proxy constructor, which intercepts read and set operations on the obj object. When we access proxyObj.foo, the get method is triggered, outputting the corresponding message. When we set the value of proxyObj.foo, the set method is triggered, again outputting the corresponding message.

This way, Proxy allows us to execute custom logic when basic semantic operations occur, without directly manipulating the original object. In practical applications, this capability can be used to implement reactive data, data validation, logging, and more.

When intercepting object property reads with Proxy, special attention is required for accessor properties because accessor properties are defined using getter functions. The this keyword inside these getter functions changes based on the method of invocation.

To solve this issue, we use Reflect.get(target, key, receiver) instead of target[key] when accessing property values. This ensures that the receiver parameter correctly points to the proxy object, not the original object. Consequently, within the getter function of accessor properties, the this keyword refers to the proxy object, establishing the correct reactive relationship.

Here is the corrected code using Reflect.get:

const handler = {
  get(target, key, receiver) {
    track(target, key); // Reactive data dependency tracking
    return Reflect.get(target, key, receiver); // Use Reflect.get to get property value
  },
  // Other interceptor methods...
};

const proxyObj = new Proxy(obj, handler);

effect(() => {
  console.log(proxyObj.bar); // Access the bar property inside the side effect function
});

proxyObj.foo++; // Triggers re-execution of the side effect function

In this code, we use Reflect.get with the receiver parameter to ensure that this points to the proxy object within the get interceptor function. This establishes the correct reactive relationship, allowing proper dependency tracking when accessing object properties.

Usage of Reflect in Reactivity

In interceptor functions, we aim to establish a connection between side-effect functions and reactive data. This ensures that when properties are accessed, the correct dependencies are tracked, enabling re-execution of side-effect functions when properties change. However, if we directly use target[key] to access property values, the this keyword inside the getter function of accessor properties points to the original object, not the proxy object. This prevents the establishment of the correct reactive relationship.

To address this issue, we use Reflect.get(target, key, receiver) instead of target[key]. By doing so, the receiver parameter correctly points to the proxy object, allowing the this keyword inside the getter function to refer to the proxy object. This establishes the proper reactive relationship.

Here is an example demonstrating the use of the receiver parameter and comparing it with the scenario where the receiver parameter is not used:

1. Using the receiver parameter:

const data = {
  foo: 1
};

const proxy = new Proxy(data, {
  get(target, key, receiver) {
    // Use Reflect.get to ensure `this` points to the proxy object
    const result = Reflect.get(target, key, receiver);
    // Additional processing, such as triggering update operations, can be performed in practical applications
    console.log(`Accessed ${key} property with value ${result}`);
    return result;
  }
});

console.log(proxy.foo); // Outputs: Accessed foo property with value 1

In this example, we use the receiver parameter passed to Reflect.get to ensure that this inside the get interceptor function refers to the proxy object proxy. When you access proxy.foo, the get interceptor function is triggered, and this points to the proxy object.

2. Not using the receiver parameter:

const data = {
  foo: 1
};

const proxy = new Proxy(data, {
  get(target, key) {
    // Without using the receiver parameter, 'this' refers to the original object 'data'
    
    const result = target[key];
    // In practical applications, additional processing might be required, such as triggering update operations
    console.log(`Accessed ${key} property with value ${result}`);
    return result;
  }
});

console.log(proxy.foo); // Output: Accessed foo property with value 1

In this example, we did not use the receiver parameter. Since the receiver parameter was not passed, this inside the get interceptor function points to the original object data. Although the proxy object proxy is used, the this inside the get interceptor function does not refer to proxy but instead refers to the original object data. Therefore, in this scenario, the reactive relationship is not established.

While the output of the two functions is the same, it’s evident that without using the receiver parameter, the reactive relationship is not established. This means that within the effect function, the object will not receive the correct reactivity.


Note: This article is a translated version of the original post. For the most accurate and up-to-date information, please refer to the original source.
```

Introduction

When we talk about race conditions, it typically refers to a concurrency problem in multi-process or multi-threaded programming. However, in frontend development, we might not directly encounter multi-threaded programming frequently, but we often face similar situations related to race conditions. A common example is in asynchronous programming, especially when dealing with asynchronous events, callback functions, or Promises.

For instance, consider the following asynchronous code:

let data;

function fetchData() {
  setTimeout(() => {
    data = 'Fetched data';
  }, 1000);
}

fetchData();
console.log(data); // Outputs undefined

In this example, the fetchData function is asynchronous, and it assigns the data to the data variable after 1 second. However, due to JavaScript’s single-threaded nature, the fetchData function waits in the main thread’s event queue for 1 second. Within this 1 second, the console.log(data) statement executes immediately, and at that point, the value of data is undefined because the fetchData function has not completed yet.

In asynchronous programming, due to the non-blocking nature of the code, similar race condition issues can arise. When dealing with asynchronous operations, it’s crucial to ensure data consistency and correctness, avoiding accessing or modifying related data before the asynchronous operation is completed.

Race Conditions and Reactivity

So, how are race conditions related to reactivity?

Consider the following example:

let finalData;
watch(obj, async () => {
  // Send and wait for a network request
  const res = await fetch('/path/to/request');
  // Assign the request result to data
  finalData = res;
});

In this code snippet, we use the watch function to observe changes to the obj object. Every time the obj object changes, a network request, such as an API call, is sent. After the data request is successful, the result is assigned to the finalData variable. At first glance, this code might seem fine. However, upon closer inspection, you’ll realize that this code can lead to race condition problems. Let’s assume we modify a field of the obj object for the first time, triggering the callback function and sending the first request A. As time passes, before the result of request A returns, we modify a field of the obj object again, triggering the second request B. Now, both request A and request B are in progress. Which request will return its result first? We don’t know. If request B completes before request A, the finalData variable will store the result of request B, making request A’s result outdated.

Comparison

However, because request B was sent later, we consider its data as the “latest.” Request A is deemed “expired,” and its result should be invalidated. By ensuring that request B’s result is considered the latest, we can prevent errors caused by race conditions. Essentially, what we need is a way to expire side effects. To illustrate this concept further, let’s replicate the scenario using the watch function in Vue.js to see how Vue.js helps developers address this problem. Later, we’ll attempt to implement this functionality ourselves.

watch(obj, async (newValue, oldValue, onInvalidate) => {
  // Define a flag to indicate whether the current side effect has expired, initially set to false (not expired)
  let expired = false;
  
  // Call the onInvalidate() function to register an expiration callback
  onInvalidate(() => {
    // When expired, set the expired flag to true
    expired = true;
  });

  // Send a network request
  const res = await fetch('/path/to/request');

  // Perform subsequent operations only if the side effect has not expired
  if (!expired) {
    finalData = res;
    // Subsequent operations...
  }
});

As shown in the code above, before sending the request, we define an expired flag variable to indicate whether the current side effect has expired. We then call the onInvalidate function to register an expiration callback. When the side effect expires, the expired flag is set to true. Finally, we use the request result only if the side effect has not expired, effectively avoiding the issue described earlier.

Comparison


Note: This article is a translated version of the original post. For the most accurate and up-to-date information, please refer to the original source.
```

Introduction

Previously, we discussed the effect function, which is used to register side-effect functions. It allows specifying options parameters, such as the scheduler to control the timing and manner of side-effect function execution. We also explored the track function for dependency tracking and the trigger function to re-execute side-effect functions. Combining these concepts, we can implement a fundamental and distinctive feature of Vue.js – computed properties.

Computed Properties and the lazy Option

In Vue.js, the effect function is used to create reactive side-effect functions. By default, side-effect functions passed to effect are executed immediately. For example, in the code below, the side-effect function passed to the effect function is executed immediately:

effect(() => {
  console.log(obj.foo);
});

However, in certain cases, we want the side-effect function to execute only when needed, not immediately. A typical scenario is with computed properties. To achieve this delayed execution, we can add a lazy property to the options object and set it to true. When lazy is true, the side-effect function is not executed during initialization but only when necessary. The modified code looks like this:

effect(
  // This function will not execute immediately
  () => {
    console.log(obj.foo);
  },
  // options
  {
    lazy: true
  }
);

In the implementation, the side-effect function effectFn is returned as the result of the effect function. This means that when we call the effect function, we get the corresponding side-effect function and can manually execute it when needed. This mechanism gives us more control, allowing us to decide when to trigger the execution of the side-effect function rather than executing it immediately.

This design pattern is particularly suitable for specific scenarios like computed properties. In computed properties, we might want to trigger the side-effect function’s execution at a specific moment rather than immediately during initialization. By returning the side-effect function from the effect function, we can flexibly control when the side-effect function is executed to meet different requirements in various scenarios.

function effect(fn, options = {}) {
  const effectFn = () => {
    cleanup(effectFn);
    activeEffect = effectFn;
    effectStack.push(effectFn);
    fn();
    effectStack.pop();
    activeEffect = effectStack[effectStack.length - 1];
  };

  // Set options and dependencies for the side-effect function
  effectFn.options = options;
  effectFn.deps = [];

  // Execute the side-effect function only if it's not lazy
  if (!options.lazy) {
    effectFn();
  }

  // Return the side-effect function as the result
  return effectFn;
}

In this code, the effect function’s second parameter is an options object, where the lazy property is set to true. This means that the side-effect function passed to effect will be executed only when necessary, such as when accessing a computed property. The lazy property allows us to control the immediate execution of the side-effect function.

Now that we have achieved lazy computation through computed properties, how do we implement data caching?

function computed(getter) {
  // value is used to cache the last computed value
  let value;
  // dirty flag indicates whether a recalculation is needed; if true, it means "dirty" and needs computation
  let dirty = true;

  const effectFn = effect(getter, {
    lazy: true
  });

  const obj = {
    get value() {
      // Compute the value only if it's "dirty," and cache the computed value in the value variable
      if (dirty) {
        value = effectFn();
        // Set dirty to false, so the cached value can be used directly next time
        dirty = false;
      }
      return value;
    }
  };

  return obj;
}

With lazy computation resolved, the value is calculated only when it is truly needed, executing effectFn only when necessary. Additionally, a dirty flag is introduced to indicate whether the current computation needs to be recalculated. If dirty is true, the value is recalculated, and the dirty flag is set to false so that the cached value can be used directly next time.

Implementation Principle of watch

The concept of watch essentially involves observing a reactive data and executing the corresponding callback function when the data changes. For example:

watch(obj, () => {
  console.log('Data changed');
})
// Modifying the reactive data triggers the execution of the callback function
obj.foo++

Suppose obj is a reactive data, watched using the watch function with a provided callback function. When modifying the reactive data’s value, the callback function is triggered. In fact, the implementation of watch essentially utilizes the effect and the options.scheduler option, as shown in the following code:

effect(() => {
  console.log(obj.foo)
}, {
scheduler() {
// The scheduler function is executed when obj.foo's value changes
}
})

In a side-effect function accessing the reactive data obj.foo, based on the previous discussion, we know that this establishes a connection between the side-effect function and the reactive data. When the reactive data changes, the side-effect function is re-executed. However, there is an exception: if the side-effect function has a scheduler option, when the reactive data changes, the scheduler function is executed instead of directly triggering the side-effect function. From this perspective, the scheduler function acts as a callback function, and the implementation of watch utilizes this characteristic.

Below is the simplest implementation of the watch function:

// The watch function receives two parameters: source (reactive data) and cb (callback function)
function watch(source, cb) {
  effect(
    // Trigger a read operation to establish a connection
    () => source.foo,
    {
      scheduler: scheduler(),
      // Call the callback function cb when the data changes
      fn: () => {
        cb();
      },
    }
  );
}

In this code, we first define an original data object named data, which contains a property foo with an initial value of 1. Next, we create a proxy object obj using Proxy, intercepting operations on the data.

When obj.foo++ is executed, the set interceptor of Proxy is triggered. In the set interceptor, we first set the property value on the target object and then call the watch function, passing obj and a callback function. In the watch function, we use a hypothetical effect function (which might be provided by a framework) to listen for data changes.


Note: This article is a translated version of the original post. For the most accurate and up-to-date information, please refer to the original source.
```

Introduction

Effect functions can be nested. But why is this design choice made?

Nested Effects

effect(function effectFn1() {
  effect(function effectFn2() { /* ... */ })
    /* ... */
})

In the code above, effectFn1 is nested within effectFn2. The execution of effectFn1 will trigger the execution of effectFn2. So, when do we encounter nested effects? Take Vue.js, for example; Vue.js’s rendering function is executed within an effect.

When components are nested, for instance, when the Foo component renders the Bar component:

// Bar component
const Bar = {
  render() {/* ... */ },
}

// Foo component renders the Bar component
const Foo = {
  render() {
    return <Bar /> }// JSX syntax
}

Nested effects occur in this scenario. It can be visualized as follows:

effect(() => {
  Foo.render()
// Nested
  effect(() => {
    Bar.render()}
)}
)

The effect function can be nested, meaning an effect function can contain another effect function. When an outer effect function depends on reactive data created inside an inner effect function, the inner effect function is automatically tracked, ensuring that the outer effect function is executed when the inner effect function changes.

This nested structure of effect functions establishes a dependency chain, ensuring that when reactive data changes, all the effect functions dependent on it are triggered, thereby maintaining the responsiveness of the application.

The “effect stack” in Vue 3’s internal implementation is crucial. Vue uses an effect stack to track the currently executing effect functions, similar to a function call stack. This stack manages the execution order and dependency relationships of effect functions.

Now, let’s consider an example of a nested effect function without using a stack structure. However, it cannot achieve the desired nesting functionality. Let’s assume we have two reactive data, count1 and count2, where the value of count2 depends on the value of count1. We can use nested effect functions to establish this dependency relationship.

// Original data
const data = { foo: true, bar: true };

// Proxy object
const obj = new Proxy(data, {
  get(target, key) {
    console.log(`Reading property: ${key}`);
    return target[key];
  }
});

// Global variables
let temp1, temp2;

// effectFn1 is nested within effectFn2
effect(function effectFn1() {
  console.log('effectFn1 executed');

  effect(function effectFn2() {
    console.log('effectFn2 executed');
    // Access obj.bar property within effectFn2
    temp2 = obj.bar;
  });

  // Access obj.foo property within effectFn1
  temp1 = obj.foo;
});

effectFn1 is the outer effect function, which depends on the value of obj.foo. It contains an innerEffect within it. The inner effect function, effectFn2, depends on the value of obj.bar. When we modify obj.foo, the outer effect function should be triggered and output the value of obj.foo. When we modify obj.bar, the inner effect function should be triggered and output the value of obj.bar.

We use the global variable activeEffect to store the effect functions registered through the effect function. This means that at any given time, activeEffect stores only one effect function.

// Use a global variable to store the currently active effect function
let activeEffect;

function effect(fn) {
  // Define the effect function
  const effectFn = () => {
    // Call the cleanup function; specific implementation needs to be provided based on requirements
    cleanup(effectFn);
    // Assign the effect function to activeEffect
    activeEffect = effectFn;
    // Execute the effect function
    fn();
    // Store the dependencies of the current effect function in effectFn.deps (Needs to be implemented based on the actual logic)
    effectFn.deps = []; // Set dependencies collection based on the actual logic
  };
  
  // Execute the effect function
  effectFn();
}

However, by only using a single variable for storage without employing a stack structure, when nested effects occur, the execution of the inner effect function will overwrite the value of activeEffect. It will never be restored to its original value. If there is a reactive data performing dependency collection, even if it is read within the outer effect function, the collected effect functions will all be from the inner effect function. In other words, when I read obj.foo, activeEffect still refers to the value of innerEffect, and only the innerEffect is triggered.

To solve this issue, we need an effect function stack called effectStack. When an effect function is executed, the current effect function is pushed onto the stack. After the execution of the effect function is completed, it is popped from the stack. The activeEffect is always set to the top effect function on the stack. This ensures that a reactive data will only collect the effect function that directly reads its value, preventing mutual interference:

// Use a global variable to store the currently active effect function
let activeEffect;

// Effect stack
const effectStack = [];

function effect(fn) {
  const effectFn = () => {
    cleanup(effectFn); // Call the cleanup function; specific implementation needs to be provided based on requirements
    activeEffect = effectFn;

    // Push the current effect function onto the stack
    effectStack.push(effectFn);

    fn();

    // After the execution of the current effect function is completed, pop it from the stack, and restore activeEffect to its previous value
    effectStack.pop();
    activeEffect = effectStack[effectStack.length - 1];
  };

  // Initialize the dependencies collection of the effect function
  effectFn.deps = [];

  // Execute the effect function
  effectFn();
}

Note: This article is a translated version of the original post. For the most accurate and up-to-date information, please refer to the original source.


Introduction

The concept of reactivity is not difficult to understand. It refers to triggering certain events when JavaScript operates on an object or a value. This is achieved by implementing a reactive system, where operations elicit specific responses.

Reactive Data and Side Effect Functions

Side effect functions refer to functions that produce side effects. Consider the following code snippet:

function effect() {
  document.body.innerText = 'hello vue3';
}

When the effect function is executed, it sets the text content of the body. Any function other than effect can read or modify the body’s text content. In other words, the execution of the effect function directly or indirectly affects the execution of other functions, indicating that the effect function has side effects.

Side effect functions are common and can impact various aspects, such as the effectiveness of “tree shaking” in webpack, a topic we discussed earlier. I won’t delve into this here.

Side effects can easily occur; for example, if a function modifies a global variable, it creates a side effect, as shown in the following code:

// Global variable
let val = 1;
function effect() {
  val = 2; // Modifying a global variable creates a side effect
}

Understanding side effect functions, let’s now discuss reactive data. Suppose a property of an object is read within a side effect function:

const obj = { text: 'hello world' };
function effect() {
  // The execution of the effect function reads obj.text
  document.body.innerText = obj.text;
}

The side effect function effect sets the innerText property of the body element to obj.text. When the value of obj.text changes, we want the side effect function effect to re-execute.

Our approach is as follows: we want to store the effect function in a bucket when reading the obj.text value, and when setting the obj.text value, we want to retrieve the effect function from the bucket and execute it.

Basic Implementation of Reactive Data

How can we make obj reactive data? By observing, we find that:

  • When the side effect function effect is executed, it triggers the read operation of the obj.text property.
  • When the obj.text value is modified, it triggers the write operation of the obj.text property.

We need to intercept the read and write operations of an object property.

Before ES2015, this could only be done using the Object.defineProperty function, which was also the approach used in Vue.js 2. In ES2015 and later, we can use the Proxy object to achieve this, and this is the approach adopted in Vue.js 3.

function createReactiveObject(target, proxyMap, baseHandlers) {
  // The core is the proxy
  // The goal is to detect user get or set actions
  const existingProxy = proxyMap.get(target);
  
  if (existingProxy) {
    return existingProxy;
  }

  const proxy = new Proxy(target, baseHandlers);

  // Store the created proxy,
  proxyMap.set(target, proxy);
  return proxy;
}

Here, we create a reactive object based on the Proxy object. We have a proxyMap, which is a container for storing various types of proxies. We define get and set intercept functions to intercept read and write operations.

Designing a Comprehensive Reactive System

From the above examples, it’s clear that the workflow of a reactive system is as follows:

  • When a read operation occurs, collect the side effect functions into a “bucket”.
  • When a write operation occurs, retrieve the side effect functions from the “bucket” and execute them.

Next, I’ll explain the principles through a simple implementation of a reactive system.

We know that the Proxy object can accept an object with getters and setters for handling get or set operations. Therefore, we can create a baseHandlers to manage getters and setters.

// baseHandlers
function createGetter(isReadonly = false, shallow = false) {
  return function get(target, key, receiver) {
    const res = Reflect.get(target, key, receiver);

    if (!isReadonly) {
      // Collect dependencies when triggering get
      track(target, "get", key);
    }

    return res;
  };
}

function createSetter() {
  return function set(target, key, value, receiver) {
    const result = Reflect.set(target, key, value, receiver);

    // Trigger dependencies when setting values
    trigger(target, "set", key);

    return result;
  };
}

We also need to establish a clear link between side effect functions and the target fields being operated upon. For instance, when reading a property, it doesn’t matter which property is being read; all side effect functions should be collected into the “bucket.” Similarly, when setting a property, regardless of which property is being set, the side effect functions from the “bucket” should be retrieved and executed. There is no explicit connection between side effect functions and the operated fields. The solution is simple: we need to establish a connection between side effect functions and the operated fields. This requires redesigning the data structure of the “bucket” and cannot be as simple as using a Set type for the “bucket.”

We use WeakMap to implement the bucket for storing effects as discussed earlier. If you are not familiar with the characteristics of the WeakMap class, you can learn more about it here.

WeakMap

// Map to store different types of proxies
export const reactiveMap = new WeakMap();
export const readonlyMap = new WeakMap();
export const shallowReadonlyMap = new WeakMap();

Once we have defined the buckets as above, we can proceed to implement the core part of the reactive system, which is the proxy:

function createReactiveObject(target, proxyMap, baseHandlers) {
  // The core is the proxy
  // The goal is to detect user get or set actions

  const existingProxy = proxyMap.get(target);
  
  if (existingProxy) {
    return existingProxy;
  }
  
  const proxy = new Proxy(target, baseHandlers);

  // Store the created proxy
  proxyMap.set(target, proxy);
  return proxy;
}

For the previous track and trigger functions:

export function track(target, type, key) {
  if (!isTracking()) {
    return;
  }
  console.log(`Trigger track -> target: ${target} type:${type} key:${key}`);
  // 1. Find the corresponding dep based on the target
  // Initialize depsMap if it's the first time
  let depsMap = targetMap.get(target);
  if (!depsMap) {
    // Initialize depsMap logic
    depsMap = new Map();
    targetMap.set(target, depsMap);
  }

  let dep = depsMap.get(key);

  if (!dep) {
    dep = createDep();
    depsMap.set(key, dep);
  }

  trackEffects(dep);
}

export function trigger(target, type, key) {
  // 1. Collect all deps and put them into deps array,
  // which will be processed later
  let deps: Array<any> = [];

  const depsMap = targetMap.get(target);

  if (!depsMap) return;
  // Currently only GET type is implemented
  // for get type, just retrieve it
  const dep = depsMap.get(key);

  // Collect into deps array
  deps.push(dep);

  const effects: Array<any> = [];
  deps.forEach((dep) => {
    // Destructure dep to get the stored effects
    effects.push(...dep);
  });
  // The purpose here is to have only one dep that contains all effects
  // Currently, it should be reused for the triggerEffects function
  triggerEffects(createDep(effects));
}

Note: This article is a translated version of the original post. For the most accurate and up-to-date information, please refer to the original source.
```

Introduction

A loader is a node module exported as a function. This function is called when transforming resources in the loader. The given function will utilize the Loader API and can be accessed through the this context.

Here is an official link on loader usage and examples, including local development and testing of custom loaders.

Simple Usage of Webpack Loader

When a loader is used in a resource, it can only take one parameter - a string containing the content of the resource file.

Synchronous loaders can return a single value representing the transformed module.

Loaders can return one or two values. The first value is a string or buffer containing JavaScript code. The optional second value is a SourceMap, which is a JavaScript object.

Here’s a simple example of using a loader. It matches all JavaScript files and processes them using loader.js:

// webpack.config.js
const path = require('path');
module.exports = {
  //...
  module: {
    rules: [
      {
        test: /\.js$/,
        use: [
          {
            loader: path.resolve('path/to/loader.js'),
            options: {
              /* ... */
            },
          },
        ],
      },
    ],
  },
};

From the above, we can understand how loaders are used. But this only scratches the surface. What does a specific loader look like?

For example, a simple loader could be like this:

module.exports = function (content) {
	// content is the source content string passed in
  return content
}

A loader is just a node module exposing a function that can only receive one parameter: a string containing the content of the resource file. The function’s return value is the processed content.

Creating a Custom Webpack Loader

Guidelines for Using Custom Loaders

When writing loaders, you should follow these guidelines. They are listed in order of importance, and some apply only to specific scenarios. Please read the detailed sections below for more information.

  • Keep it simple.
  • Use chaining.
  • Output should be modular.
  • Ensure it’s stateless.
  • Use loader utilities.
  • Record loader dependencies.
  • Resolve module dependencies.
  • Extract common code.
  • Avoid absolute paths.
  • Use peer dependencies.

Step 1: Create Project Directory and Files

First, create the following files in a folder within your webpack project directory:

  • src/loader/custom-loader.js: The source file for your custom loader.
  • src/index.js: JavaScript entry file for testing the custom loader.

Step 2: Write the Custom Loader

In the custom-loader.js file, write your custom loader code. This loader adds a comment at the top of each loaded JavaScript file.

// src/loader/custom-loader.js
module.exports = function(source) {
    // Add a custom comment at the top of the source code
    const updatedSource = `/** Custom Comment added by Custom Loader */\n${source}`;
    return updatedSource;
};

Step 3: Configure Webpack

Create a Webpack configuration file webpack.config.js in the project root directory. Use the custom loader you just created in the configuration file.

// webpack.config.js
const path = require('path');

module.exports = {
    entry: './src/index.js',
    output: {
        filename: 'bundle.js',
        path: path.resolve(__dirname, 'dist'),
    },
    module: {
        rules: [
            {
                test: /\.js$/,
                use: ['custom-loader'], // Use the custom loader to process .js files
                exclude: /node_modules/,
            },
        ],
    },
};

This configuration achieves a simple functionality. Now let’s discuss how to test the local loader. There are two ways to do this: one is through Npm link for testing, a convenient method where you can create a symbolic link for local testing. Here is a link to npm-link. Another way is to configure the path directly in the project:

Single Loader Configuration

// webpack.config.js
{
  test: /\.js$/
  use: [
    {
      loader: path.resolve('path/to/custom-loader.js'),
      options: {/* ... */}
    }
  ]
}

Multiple Loader Configuration

You can also configure it using an array:

// webpack.config.js
resolveLoader: {
  // Look for loaders first in the node_modules directory; if not found, search in the loaders directory
  modules: [
    'node_modules',
    path.resolve(__dirname, 'custom-loader')
  ]
}

Step 4: Test the Custom Loader

In the index.js file, write some JavaScript code, for example:

// src/index.js
console.log('Hello, Webpack Loader!');

Step 5: Run Webpack Build

Run the following command to build your project:

npx webpack --config webpack.config.js

After the build is complete, you will find the generated bundle.js file in the dist folder. In this file, you can see JavaScript code with a custom comment added at the top.


## Simple Usage of Webpack Plugin

Plugins provide complete control over the webpack engine for third-party developers. By introducing custom behaviors into the webpack build process through stage-based build callbacks, developers can customize webpack's behavior.

Here's the simplest example:

```javascript
// webpack.config.js
const HtmlWebpackPlugin = require('html-webpack-plugin');

module.exports = {
    entry: './src/index.js',
    output: {
        filename: 'bundle.js',
        path: __dirname + '/dist',
    },
    plugins: [
        new HtmlWebpackPlugin({
            template: './src/index.html', // Specify the HTML template file
            filename: 'index.html', // Generated HTML file name
        }),
        // You can add more plugins here
    ],
};

In this example, the HtmlWebpackPlugin is used. It generates a new HTML file based on the specified HTML template and automatically adds the bundled JavaScript file to the generated HTML file.

A basic webpack plugin consists of the following components:

  • A JavaScript named function or JavaScript class.

  • Define an apply method on the plugin function’s prototype. The apply method is called when webpack loads the plugin and is passed the compiler object.

  • Specify an event hook bound to webpack itself.

  • Process specific data from webpack’s internal instances.

  • Call the callback provided by webpack after the functionality is completed.

A plugin structure looks like this:

class HelloWorldPlugin {
  apply(compiler) {
    compiler.hooks.done.tap(
      'Hello World Plugin',
      (
        stats /* After binding the done hook, stats is passed as a parameter. */
      ) => {
        console.log('Hello World!');
      }
    );
  }
}

module.exports = HelloWorldPlugin;

Compiler and Compilation

The two most important resources in plugin development are the compiler and compilation objects. Plugin development revolves around hooks on these objects.

The compiler object is essentially bound to the entire webpack environment. It contains all the environment configurations, including options, loaders, and plugins. When webpack starts, this object is instantiated and it is globally unique. The parameters passed into the apply method are properties of this object.

The compilation object is created each time resources are built. It represents the current module resources, compiled generated resources, changed files, and tracked dependency status. It also provides many hooks.

Creating a Custom Webpack Plugin

Step 1: Create Project Directory and Files

First, create the following file in a folder within your webpack project directory:

  • src/plugins/CustomPlugin.js: Source file for your custom plugin.

Step 2: Write the Custom Plugin

In the CustomPlugin.js file, write a plugin that outputs a message when the webpack build process is completed.

// src/plugins/CustomPlugin.js
class CustomPlugin {
    apply(compiler) {
        compiler.hooks.done.tap('CustomPlugin', () => {
            console.log('CustomPlugin: Webpack build process is done!');
        });
    }
}

module.exports = CustomPlugin;

Step 3: Configure Webpack

In the configuration file, use the custom plugin you just created.

// webpack.config.js
const CustomPlugin = require('./src/plugins/CustomPlugin');

module.exports = {
    entry: './src/index.js',
    output: {
        filename: 'bundle.js',
        path: __dirname + '/dist',
    },
    plugins: [
        new CustomPlugin(),
        // You can add more plugins here
    ],
};

Step 4: Run Webpack Build

Now, run the webpack build:

npx webpack --config webpack.config.js

Note: This article is a translated version of the original post. For the most accurate and up-to-date information, please refer to the original source.
```

Introduction

When configuring redirects on a website, especially in the following scenarios, issues can arise:

Redirecting from HTTP to HTTPS: Suppose you’ve set up an SSL certificate to upgrade your website from HTTP to HTTPS. If problems occur during this process, rendering the site inaccessible, you might consider reverting to the HTTP version. However, the challenge arises once a permanent 301 redirection is in place. Even if you remove the redirection on the server, browsers retain this information. Consequently, users’ browsers continue to enforce the HTTPS redirection, preventing them from accessing the HTTP version.

Changing the Website Domain: When migrating a website from one domain (such as old-domain.com) to another (such as new-domain.com), a permanent 301 redirection is often employed. This informs search engines and browsers that the site has permanently moved to a new domain. However, if complications arise during this process, you may wish to undo the redirection, allowing users to access the old domain again. Unfortunately, due to browser hard caching of 301 redirections, users become permanently redirected to the new domain, unable to revisit the old one.

To avoid such situations, it is advisable to use a temporary 302 redirection initially, ensuring everything functions correctly. Unlike a 301 redirection, a 302 redirection is not permanently cached by browsers. This means that if necessary, you can revert the redirection without users being permanently locked into the new URL. This approach eliminates the need for users to manually clear their browser caches, enhancing the overall user experience.

  • 301 Redirection: Indicates that a resource (page) has permanently moved to a new location. The client/browser should not attempt to request the original location but use the new location from now on.

  • 302 Redirection: Indicates that the resource is temporarily located elsewhere, and the client/browser should continue requesting the original URL.

A 301 redirection is permanent, meaning that even if removed from the server, browsers will perpetually redirect resources to the new domain or HTTPS due to hard caching.

On the other hand, a 302 redirection is not hard-cached by browsers. If you remove the redirection from your server (website), you can still access the old version.

Clearing 301/302 redirection cache typically involves clearing browser cache or the operating system’s DNS cache. Here’s how to do it on different platforms:

Clearing Browser Cache (Applicable to Windows, macOS, Linux)

Google Chrome:

  1. Open the Chrome browser.
  2. Click the three vertical dots in the upper right corner and select “More tools.”
  3. Choose “Clear browsing data.”
  4. In the popup window, select the “Advanced” tab.
  5. Set the time range to “All time.”
  6. Check the “Cached images and files” option.
  7. Click the “Clear data” button.

Mozilla Firefox:

  1. Open the Firefox browser.
  2. Click the three horizontal lines in the upper right corner and select “Privacy & Security.”
  3. In the “Cookies and Site Data” section, click “Clear Data.”
  4. Ensure the “Cache” option is checked.
  5. Click “Clear.”

Microsoft Edge:

  1. Open the Edge browser.
  2. Click the three horizontal dots in the upper right corner and select “Settings.”
  3. Scroll down and click “View advanced settings.”
  4. In the “Privacy and services” section, click “Clear browsing data.”
  5. Check the “Cached images and files” option.
  6. Click the “Clear” button.

Clearing Operating System’s DNS Cache (Applicable to Windows, macOS)

Windows:

  1. Open Command Prompt (search for “cmd” in the Start menu and open it).
  2. Enter the following command and press Enter:
    ipconfig /flushdns

macOS:

  1. Open Terminal (find it in Applications > Utilities folder).
  2. Enter the following command and press Enter:
    sudo dscacheutil -flushcache
    Then enter your administrator password and press Enter again.

Please note that clearing browser cache might lead to loss of login sessions on websites. Ensure you have backed up essential information in case you need to log in again.


Note: This article is a translated version of the original post. For the most accurate and up-to-date information, please refer to the original source.
```

Webpack v4 introduced a new feature called sideEffects, which allows you to declare in your package.json whether a package/module contains side effects or not. This declaration provides more optimization space for tree-shaking.

In the conventional understanding of side effects, if we are certain that the modules within our package have no side effects, we can mark the package in npm with "sideEffects": false in package.json. This allows us to offer a better bundling experience for consumers. The principle behind this is that Webpack can transform imports like import {a} from xx into import {a} from 'xx/a' for packages marked as side-effects-free, automatically trimming unnecessary imports, similar to babel-plugin-import.

Tree Shaking and Side Effects

Tree shaking, first introduced and implemented by Rollup in the frontend community, has been a topic of discussion in various articles about optimizing bundling.

Principles of Tree Shaking

ES6 module imports are statically analyzable, meaning the compiler can accurately determine what code is loaded during compilation. The program flow is analyzed to identify unused or unreferenced variables, which are then removed from the code.

The principle sounds perfect, so why do we sometimes find that unnecessary code in our projects isn’t eliminated? The reason is side effects.

Side Effects

For those familiar with functional programming, the term “side effect” is not unfamiliar. It can be broadly understood as any action of a function that might or might not affect variables outside its scope.

For example, consider this function:

function go(url) {
  window.location.href = url;
}

This function modifies the global variable location and even triggers a browser redirect, making it a function with side effects.

// components.js
export class Person {
  constructor({ name }) {
    this.className = 'Person';
    this.name = name;
  }
  getName() {
    return this.name;
  }
}
export class Apple {
  constructor({ model }) {
    this.className = 'Apple';
    this.model = model;
  }
  getModel() {
    return this.model;
  }
}
// main.js
import { Apple } from './components';

const appleModel = new Apple({
  model: 'IphoneX'
}).getModel();

console.log(appleModel);

In this code, the Person class is clearly unused. However, why can other tools like Rollup successfully eliminate unused code, while Webpack cannot?

The answer lies in Babel compilation + Webpack bundling.

I’ll provide a link here that explains in detail how Babel compilation + Webpack bundling might prevent effective code elimination: Your Tree-Shaking Isn’t Working.

If you don’t want to read the article, here’s a brief explanation: Babel compilation wraps the Person class in an IIFE (Immediately Invoked Function Expression) and returns a constructor, introducing a side effect.

There’s an issue related to this: Class declarations inside IIFEs are considered side effects.

When I declare a class inside an IIFE and don’t use the class, UglifyJS doesn’t remove it because it’s considered a side effect.

var V6Engine = (function () {
    function V6Engine() {
    }
    V6Engine.prototype.toString = function () {
        return 'V6';
    };
    return V6Engine;
}());

During compilation, you might receive this warning: WARN: Side effects in initialization of unused variable V6Engine [./dist/car.bundle.js:74,4].

The reason is that UglifyJS doesn’t perform complete program flow analysis. It doesn’t remove code because you noticed a side effect. If you want a more sophisticated tree shaking, go check out Rollup!

Summarizing some key points from the issue:

  • If a function’s parameter is a reference type, any operations on its properties could potentially have side effects. This is because it’s a reference type, and any modification to its properties affects data outside the function. Additionally, accessing or modifying its properties triggers getter or setter, which are opaque and may have side effects.

  • UglifyJS lacks complete program flow analysis. It can simple judge whether a variable is later referenced or modified but cannot determine the complete modification process of a variable. It doesn’t know if it points to an external variable, so many potentially side-effect-causing code cannot be removed.

  • Rollup has the ability to perform program flow analysis, making it better at determining whether code truly has side effects.

However, these issues were prevalent in older versions. The current Webpack tree shaking has undergone many optimizations and can perform sufficient program flow analysis for tree shaking.

The purpose of Webpack’s tree shaking is to mark unused exported members as unused and not export them in the modules where they are re-exported. It sounds complicated, but looking at the code makes it clearer:

// a.js
export function a() {}
// b.js
export function b(){}
// package/index.js
import a from './a'
import b from './b'
export { a, b }
// app.js
import {a} from 'package'
console.log(a)

When using app.js as the entry point, the code after tree shaking becomes:

// a.js
export function a() {}
// b.js is no longer exported: function b(){}
function b() {}
// package/index.js does not export module b anymore
import a from './a'
import './b'
export { a }
// app.js
import {a} from 'package'
console.log(a)

After combining Webpack’s scope hoisting and uglify, all traces of module b will be completely eliminated.

But what if module b contains some side effects, such as a simple log:

// b.js
export function b(v) { return v }
console.log(b(1))
After webpack, the content of module `b` becomes:

// b.js
console.log(function (v){return v}(1))

Although the export of module b is ignored, the code with side effects is retained.

Due to various strange operations introduced by the transformer after compilation, which may cause side effects, we often find that even with tree shaking, our bundle size doesn’t significantly decrease.

Usually, we expect that if module b is not being used, none of its code should be included.

This is where the role of sideEffects becomes apparent: if the imported package/module is marked as "sideEffects: false", regardless of whether it truly has side effects, as long as it’s not being referenced, the entire module/package will be completely removed.

Taking mobx-react-devtools as an example, we often use it like this:

import DevTools from 'mobx-react-devtools';

class MyApp extends React.Component {
  render() {
    return (
      <div>
        ...
        { process.env.NODE_ENV === 'production' ? null : <DevTools /> }
      </div>
    );
  }
}

This is a common scenario of importing modules on demand. However, without the sideEffects: false configuration, even if NODE_ENV is set to production, the bundled code will still include the mobx-react-devtools package. Although we haven’t used any of its exported members, mobx-react-devtools will still be imported because it “might” have side effects.

But when we add sideEffects: false, tree shaking can safely remove it entirely from the bundle.

Use Cases of sideEffects

As mentioned earlier, it’s often difficult to guarantee whether packages/modules published on npm contain side effects (it could be the code’s fault or the transformer’s fault). However, we can usually ensure whether a package/module will affect objects outside of it, such as modifying properties on the window object or overwriting native object methods. If we can guarantee this, we can determine whether a package can have "sideEffects: false". Whether it truly has side effects is not that important for Webpack; it’s acceptable as long as it’s marked.

This explains why packages with inherent side effects, like vue, can still have "sideEffects: false" applied.

So, in Webpack, "sideEffects: false" doesn’t mean that the module truly has no side effects. It’s just a way to tell Webpack during tree shaking: “I designed this package with the expectation that it has no side effects, even if it ends up having side effects after being bundled.”


Note: This article is a translated version of the original post. For the most accurate and up-to-date information, please refer to the original source.
```