FE

Preface

In fact, browsers come with many built-in events, and many events automatically trigger certain behaviors in the browser.

For example:

  • Clicking a link triggers navigation to the URL.
  • Clicking the submit button in a form triggers submission to the server.
  • Pressing and dragging the mouse button on text selects the text.

When handling an event with JavaScript, we usually don’t want the corresponding browser behavior to occur. Instead, we want to implement alternative behaviors.

Preventing Browser Behavior

There are two ways to tell the browser that we don’t want it to execute default behavior:

  • The common way is to use the event object, which has a event.preventDefault() method.
  • If the handler is assigned using on<event> (rather than addEventListener), returning false is also effective.

In the example below, clicking the link will not trigger navigation, and the browser will not perform any action:

<a href="/" onclick="return false">Click here</a>
or
<a href="/" onclick="event.preventDefault()">here</a>

Click here
or
here


It’s important to note that using on<event> and returning false is not a good practice.

Returning false from the handler is an exception. The return value of event handlers is usually ignored. The only exception is returning false from a handler assigned using on<event>.

Handler Option “passive”

The optional passive: true option in addEventListener signals to the browser that the handler will not call preventDefault().

Why is this necessary?

On mobile devices, some events like touchmove (when the user moves their finger on the screen) can lead to scrolling by default, which can be prevented using preventDefault() in the handler.

So, when the browser detects such events, it must first process all handlers. If preventDefault is not called anywhere, the page can continue scrolling. However, this may cause unnecessary delays and “jitter” in the UI.

The passive: true option informs the browser that the handler will not cancel scrolling. The browser then immediately scrolls the page to provide a smoother experience and somehow processes the event.

For certain browsers (such as Firefox and Chrome), touchstart and touchmove events have passive set to true by default.

event.defaultPrevented

If the default behavior is prevented, the event.defaultPrevented property is true; otherwise, it is false.

Here’s an interesting use case.

Do you remember our discussion on event.stopPropagation() in the Bubbling and Capturing chapter and why stopping propagation is not good?

Sometimes, we can use event.defaultPrevented as an alternative to notify other event handlers that the event has been handled.

Let’s look at a practical example.

By default, the browser displays a context menu with standard options on the contextmenu event (right-click). We can prevent it and display our custom menu like this:

<button>Right-click shows browser context menu</button>

<button oncontextmenu="alert('Draw our menu'); return false">
  Right-click shows our context menu
</button>


Now, in addition to this context menu, let’s implement a document-wide context menu.

When right-clicking, it should display the nearest context menu:

<p>Right-click here for the document context menu</p>
<button id="elem">Right-click here for the button context menu</button>

<script>
  elem.oncontextmenu = function(event) {
    event.preventDefault();
    alert("Button context menu");
  };

  document.oncontextmenu = function(event) {
    event.preventDefault();
    alert("Document context menu");
  };
</script>

Right-click here for the document context menu


Issue and Solutions

The problem arises when clicking on elem, and we get two menus: the button-level menu and the document-level menu due to event bubbling.

One solution is to prevent the event from bubbling up when handling the right-click event in the button. We can achieve this using event.stopPropagation():

<p>Right-click for the document menu</p>
<button id="elem">Right-click for the button menu (fixed with event.stopPropagation)</button>

<script>
  elem.oncontextmenu = function(event) {
    event.preventDefault();
    event.stopPropagation();
    alert("Button context menu");
  };

  document.oncontextmenu = function(event) {
    event.preventDefault();
    alert("Document context menu");
  };
</script>

Now, the button-level menu works as expected. However, this comes at a cost — we deny any external code access to right-click information, including counters for collecting statistics. This is not advisable.

Another alternative is to check whether the document handler has prevented the browser’s default behavior. If it has, the event has already been handled, and we don’t need to react to it:

<p>Right-click for the document menu (added a check for event.defaultPrevented)</p>
<button id="elem">Right-click for the button menu</button>

<script>
  elem.oncontextmenu = function(event) {
    event.preventDefault();
    alert("Button context menu");
  };

  document.oncontextmenu = function(event) {
    if (event.defaultPrevented) return;

    event.preventDefault();
    alert("Document context menu");
  };
</script>

Now everything works as expected. If we have nested elements, each with its own context menu, this approach will work. Just make sure to check event.defaultPrevented in each contextmenu handler.

event.stopPropagation() and event.preventDefault()
As we’ve seen, event.stopPropagation() and event.preventDefault() (also considered as return false) are two different things. They are unrelated to each other.

Nested Context Menu Structure
There are other ways to implement nested context menus. One approach is to have a global object with a document.oncontextmenu handler and a method to store other handlers. This object would capture any right-click, browse stored handlers, and run the appropriate one.

However, every piece of code needing a context menu should be aware of this object and use its assistance rather than having its own contextmenu handler.

Summary

There are many default browser behaviors:

  • mousedown — Starts selection (dragging the mouse for selection).
  • click on <input type="checkbox"> — Selects/deselects the input.
  • submit — Clicking <input type="submit"> or pressing Enter in form fields triggers this event, leading the browser to submit the form.
  • keydown — Pressing a key adds a character to a field or triggers other actions.
  • contextmenu — Event occurs on right-click, triggering the default behavior of showing the browser context menu.
  • …and many more…

If we want to handle events using JavaScript only, all default behaviors can be prevented.

To prevent default behavior, you can use event.preventDefault() or return false. The second method is only applicable to handlers assigned through on<event>.

The passive: true option of addEventListener informs the browser that the behavior will not be prevented. This is useful for certain mobile events (like touchstart and touchmove) to let the browser scroll without waiting for all handlers to finish.

If the default behavior is prevented, the value of event.defaultPrevented becomes true; otherwise, it is false.

Preface

Capturing and bubbling allow us to implement one of the most powerful event handling patterns, namely the Event Delegation pattern.

The idea is that if we have many elements being handled in a similar way, we don’t need to assign a handler for each element — instead, we place a single handler on their common ancestor.

In the handler, we access event.target to see where the event actually occurred and handle it accordingly.

Introduction to Event Delegation

<!DOCTYPE HTML>
<html>

<body>
  <link type="text/css" rel="stylesheet" href="bagua.css">

  <table id="bagua-table">
    <tr>
      <th colspan="3"><em>Bagua</em> Chart: Direction, Element, Color, Meaning</th>
    </tr>
    <tr>
      <td class="nw"><strong>Northwest</strong>
        <br>Metal
        <br>Silver
        <br>Elders
      </td>
      <td class="n"><strong>North</strong>
        <br>Water
        <br>Blue
        <br>Change
      </td>
      <td class="ne"><strong>Northeast</strong>
        <br>Earth
        <br>Yellow
        <br>Direction
      </td>
    </tr>
    <tr>
      <td class="w"><strong>West</strong>
        <br>Metal
        <br>Gold
        <br>Youth
      </td>
      <td class="c"><strong>Center</strong>
        <br>All
        <br>Purple
        <br>Harmony
      </td>
      <td class="e"><strong>East</strong>
        <br>Wood
        <br>Blue
        <br>Future
      </td>
    </tr>
    <tr>
      <td class="sw"><strong>Southwest</strong>
        <br>Earth
        <br>Brown
        <br>Tranquility
      </td>
      <td class="s"><strong>South</strong>
        <br>Fire
        <br>Orange
        <br>Fame
      </td>
      <td class="se"><strong>Southeast</strong>
        <br>Wood
        <br>Green
        <br>Romance
      </td>
    </tr>
  </table>

  <script>
    let table = document.getElementById('bagua-table');
    let selectedTd;

    table.onclick = function(event) {
      let target = event.target;

      while (target != this) {
        if (target.tagName == 'TD') {
          highlight(target);
          return;
        }
        target = target.parentNode;
      }
    }

    function highlight(node) {
      if (selectedTd) {
        selectedTd.classList.remove('highlight');
      }
      selectedTd = node;
      selectedTd.classList.add('highlight');
    }
  </script>

  <style>
    #bagua-table th {
      text-align: center;
      font-weight: bold;
    }

    #bagua-table td {
      width: 150px;
      white-space: nowrap;
      text-align: center;
      vertical-align: bottom;
      padding-top: 5px;
      padding-bottom: 12px;
    }

    #bagua-table .nw {
      background: #999;
    }

    #bagua-table .n {
      background: #03f;
      color: #fff;
    }

    #bagua-table .ne {
      background: #ff6;
    }

    #bagua-table .w {
      background: #ff0;
    }

    #bagua-table .c {
      background: #60c;
      color: #fff;
    }

    #bagua-table .e {
      background: #09f;
      color: #fff;
    }

    #bagua-table .sw {
      background: #963;
      color: #fff;
    }

    #bagua-table .s {
      background: #f60;
      color: #fff;
    }

    #bagua-table .se {
      background: #0c3;
      color: #fff;
    }

    #bagua-table .highlight {
      background: red;
    }
  </style>
</body>

</html>

Dynamic Event Handling with Event Delegation

This table has 9 cells, but it could have 99 or 9999 cells, and it wouldn’t matter. Our task is to highlight the clicked <td> when the user clicks on it.

Instead of assigning an onclick handler to each <td> (potentially many), we can set a “catch-all” handler on the <table> element. It uses event.target to determine the clicked element and highlights it.

The JavaScript code is as follows:

let selectedTd;

table.onclick = function(event) {
  let target = event.target; // Where was the click?

  if (target.tagName != 'TD') return; // Not on TD? We don't care then

  highlight(target); // Highlight it
};

function highlight(td) {
  if (selectedTd) {
    selectedTd.classList.remove('highlight');
  }
  selectedTd = td;
  selectedTd.classList.add('highlight'); // Highlight the new td
}

This code doesn’t care how many cells are in the table. We can dynamically add/remove <td>, and highlighting still works.

However, there is a flaw. Clicks might not happen on the <td> itself but inside it.

In our example, if we inspect the HTML internals, we can see nested tags within <td>, such as <strong>:

In the table.onclick handler, we should accept such event.target and determine if the click occurred inside a <td>.

Here is the improved code:

table.onclick = function(event) {
  let td = event.target.closest('td'); // (1)

  if (!td) return; // (2)

  if (!table.contains(td)) return; // (3)

  highlight(td); // (4)
};

Explanation:

  • elem.closest(selector) method returns the closest ancestor that matches the selector. In our case, we look for <td> starting from the target element.

  • If event.target is not within any <td>, the call returns immediately, as there’s nothing to do here.

  • For nested tables, event.target might be a <td> but outside the current table. So, we check if it’s a <td> within our table. If yes, we highlight it.

Delegation Example: Actions in Markup

Event delegation has other uses, like handling actions in markup.

For instance, let’s say we want to create a menu with buttons for “Save,” “Load,” and “Search.” There’s an object with methods like save, load, and search. How do we match them?

The initial idea might be to assign a separate handler for each button. But there’s a more elegant solution. We can add a handler to the entire menu and add a data-action attribute to buttons with method calls:

<button data-action="save">Click to Save</button>

The handler reads the attribute and executes the corresponding method. The working example is as follows:

<div id="menu">
  <button data-action="save">Save</button>
  <button data-action="load">Load</button>
  <button data-action="search">Search</button>
</div>

<script>
  class Menu {
    constructor(elem) {
      this._elem = elem;
      elem.onclick = this.onClick.bind(this); // (*)
    }

    save() {
      alert('saving');
    }

    load() {
      alert('loading');
    }

    search() {
      alert('searching');
    }

    onClick(event) {
      let action = event.target.dataset.action;
      if (action) {
        this[action]();
      }
    };
  }

  new Menu(menu);
</script>
<body>
  <div id="menu">
    <button data-action="save">Save</button>
    <button data-action="load">Load</button>
    <button data-action="search">Search</button>
  </div>

  <script>
    class Menu {
      constructor(elem) {
        this._elem = elem;
        elem.onclick = this.onClick.bind(this); // (*)
      }

      save() {
        alert('saving');
      }

      load() {
        alert('loading');
      }

      search() {
        alert('searching');
      }

      onClick(event) {
        let action = event.target.dataset.action;
        if (action) {
          this[action]();
        }
      };
    }

    new Menu(menu);
  </script>
</body>

Please note that this.onClick is bound to this in (*) line. This is crucial because otherwise, the inner this would refer to the DOM element (elem) instead of the Menu object, and this[action] wouldn’t be what we need.

So, what benefits does delegation bring us here?

  • We don’t need to write code to assign a handler for each button. Just create a method and place it in the markup.
  • The HTML structure is very flexible, and we can add/remove buttons at any time.

We could also use classes like .action-save, .action-load, but the data-action attribute is more semantically meaningful. We can also use it in CSS rules.

“Behavior” Pattern

We can also use event delegation to add “behavior” in a declarative way to elements with specific attributes and classes.

The behavior pattern consists of two parts:

  • We add custom attributes to elements describing their behavior.
  • A document-wide handler tracks events and executes the behavior if the event occurs on an element with a specific attribute.

Behavior: Counter

For example, the data-counter attribute here adds a “click to increase” behavior to buttons.

<script>
  document.addEventListener('click', function(event) {

    if (event.target.dataset.counter != undefined) { // If this attribute exists...
      event.target.value++;
    }

  });
</script>
Counter: One more counter:

Summary

Event delegation is really cool! It’s one of the most useful patterns for DOM events.

It’s commonly used to add the same handling for many similar elements, but not limited to that.

Algorithm

  • Place a handler on the container.
  • In the handler — check the source element event.target.
  • If the event happens within an element of interest, handle it.

Benefits

  • Simplifies initialization and saves memory: No need to add many handlers.
  • Less code: When adding or removing elements, no need to add/remove handlers.
  • DOM modifications: We can use innerHTML, etc., to add/remove elements in batches.

Event Delegation Limitations

Firstly, events must bubble. Some events do not bubble. Also, low-level handlers should not use event.stopPropagation().
Secondly, delegation might increase CPU load as the container-level handler responds to events anywhere in the container, regardless of whether we are interested in that event. However, the load is usually negligible, so we don’t consider it.

Preface

Let’s start with an example.

A handler is assigned to the <div>, but if you click on any nested tags (e.g., <em> or <code>), the handler will also run:

<div onclick="alert('The handler!')">
  <em>If you click on <code>EM</code>, the handler on <code>DIV</code> runs.</em>
</div>

So, if you click on EM, the handler on DIV runs.

Bubbling

The bubbling principle is straightforward.

When an event occurs on an element, it first runs the handler on that element, then runs the handler on its parent element, and continues up to handlers on other ancestors.

Suppose we have 3 layers of nesting FORM > DIV > P, each with its own handler:

<style>
  body * {
    margin: 10px;
    border: 1px solid blue;
  }
</style>

<form onclick="alert('form')">FORM
  <div onclick="alert('div')">DIV
    <p onclick="alert('p')">P</p>
  </div>
</form>

Now, what happens if you click on <p>?

  1. First, the handler runs on <p>.

  2. Then, it runs on <div>.

  3. Then, it runs on <form>.

  4. Finally, it runs on the document.

This behavior is called “event bubbling” because it bubbles up from the element like a bubble.

So, if we click on <p>, we will see 3 alerts: p → div → form.

event.target

The handler on a parent element can always access detailed information about where the event actually occurred.

The element that triggered the event, the deepest nested one, is called the target element, and it can be accessed through event.target.

Note the difference with this (which equals event.currentTarget):

  • this is the “current” element at the time the handler is running, and it remains the same.

  • event.target is the “target” element when the event happens, and it can be any element; it changes during the bubbling process.

Let’s illustrate this with an example!

For instance, if we have a handler form.onclick, it can “capture” all clicks inside the form. Regardless of where the click happens, it will bubble up to <form> and run the handler.

Note: Here, all events are bound to the form instead of individual elements.

In the form.onclick handler:

  • this (=event.currentTarget) is the <form> element because the handler runs on it.
  • event.target is the actual clicked element inside the form.
<!DOCTYPE HTML>
<html>
<head>
  <meta charset="utf-8">
</head>
<body>

  A click shows both <code>event.target</code> and <code>this</code> to compare:

  <form style="background-color: green;
      position: relative;
      width: 150px;
      height: 150px;
      text-align: center;
      cursor: pointer;">FORM
    <div style="background-color: blue;
      position: absolute;
      top: 25px;
      left: 25px;
      width: 100px;
      height: 100px;">DIV
      <p style="background-color: red;
      position: absolute;
      top: 25px;
      left: 25px;
      width: 50px;
      height: 50px;
      line-height: 50px;
      margin: 0;">P</p>
    </div>
  </form>

  <script>
    form=document.querySelector('form');
    form.onclick = function(event) {
      // Output the event target and the current element
      // (this=the current element=form, event.target=the clicked element)
      alert("target = " + event.target.tagName + ", this=" + this.tagName);
    };
  </script>
</body>
</html>

## Stopping Bubbling
Bubbling events ascend from the target element. Usually, they rise all the way up to `<html>`, then to the document object, and some events even reach the window, calling all handlers on their way.

However, any handler can decide that the event has been fully processed and stop the bubbling.

The method used to stop bubbling is `event.stopPropagation()`.

For example, if you click `<button>`, the `body.onclick` here won't work:

```html
<body onclick="alert(`the bubbling doesn't reach here`)">
  <button onclick="event.stopPropagation()">Click me</button>
</body>

Capturing

Another phase of event handling is called “capturing.”

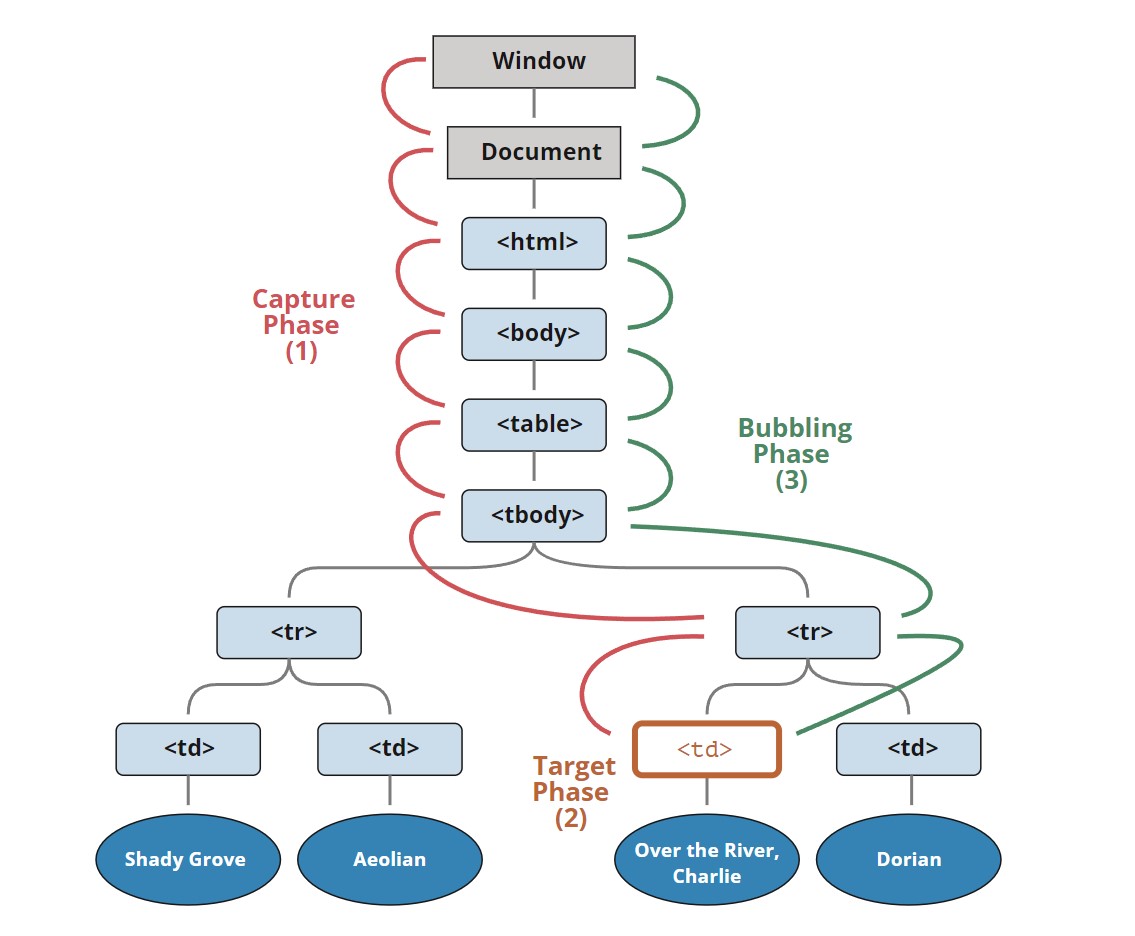
The DOM event standard describes the three phases of event propagation:

  1. Capturing phase — The event travels down the hierarchy of elements (from the window).
  2. Target phase — The event reaches the target element.
  3. Bubbling phase — The event starts to bubble up from the element.

Below is an illustration of clicking on <td> in a table, taken from the specification:

Event-Bubbling

In other words: Clicking on <td>, the event first descends through the ancestor chain to the element (capturing phase), then reaches the target (target phase), and finally ascends (bubbling phase), calling handlers along the way.

So far, we have only discussed bubbling because the capturing phase is rarely used. Typically, we don’t see it.

Handlers added with on<event> attributes or using HTML attributes or with addEventListener(event, handler) with two arguments have no knowledge of capturing; they run only in the second and third phases.

Summary

When an event occurs — the element nested deepest where the event happened is marked as the “target element” (event.target).

  • Then, the event moves down from the document root to the event.target, invoking handlers assigned with addEventListener(..., true) (where true is a shorthand for {capture: true}).
  • Next, the handler on the target element itself is called.
  • Finally, the event bubbles up from event.target to the root, calling handlers assigned with on<event>, HTML attributes, and addEventListener without a third parameter or with false/{capture: false}.

Each handler has access to properties of the event object:

  • event.target — The element deepest in the hierarchy that triggered the event.
  • event.currentTarget (=this) — The current element handling the event (the one with the handler).
  • event.eventPhase — The current phase (capturing=1, target=2, bubbling=3).

Any event handler can stop the event by calling event.stopPropagation(), but it’s not recommended because we might not be sure if we genuinely don’t need the event to bubble up for other purposes.

The capturing phase is rarely used, and usually, events are handled during the bubbling phase. There’s a reason for this logic.

Event handlers work the same way. Code that sets a handler on a specific element gains the most detailed information about that element. A handler specific to a <td> might be perfectly tailored for that <td>, knowing all about it. So, it should get the chance first. Then, its immediate parent also knows context-specific details but fewer, and so on, until handling general concepts and running the last handler on the topmost element.

Preface

Web Components is a collective term for a set of native web APIs that allow developers to create reusable custom elements.

Vue and Web Components are primarily complementary technologies. Whether integrating custom elements into existing Vue applications or building and distributing custom elements using Vue, Vue provides excellent support for both using and creating custom elements.

What are Custom Elements

A key feature of Web Components is the ability to create custom elements: HTML elements whose behavior is defined by web developers, extending the set of elements available in browsers.

There are two types of custom elements in Web Components:

  • Customized Built-in Elements: Inherit from standard HTML elements, such as HTMLImageElement or HTMLParagraphElement. Their implementation defines the behavior of standard elements.
  • Autonomous Custom Elements: Inherit from the HTML element base class HTMLElement. You have to implement their behavior from scratch.

Custom Element Lifecycle Callbacks

Custom Elements also have lifecycle callbacks.

Once your custom element is registered, the browser calls certain methods of your class when your custom element interacts with the page in specific ways. By providing implementations for these methods, known as lifecycle callbacks, you can run code to respond to these events.

The custom element lifecycle callbacks include:

  • connectedCallback(): Called whenever the element is added to the document. The specification recommends developers to set up custom element properties in this callback rather than in the constructor.
  • disconnectedCallback(): Called whenever the element is removed from the document.
  • adoptedCallback(): Called whenever the element is moved to a new document.
  • attributeChangedCallback(): Called when attributes are changed, added, removed, or replaced. For more detailed information about this callback, see Responding to attribute changes.

Here is a minimal example of a custom element that logs these lifecycle events:

// Create a class for this element
class MyCustomElement extends HTMLElement {
  static observedAttributes = ["color", "size"];

  constructor() {
    // Must call the super method first
    super();
  }

  connectedCallback() {
    console.log("Custom element added to the page.");
  }

  disconnectedCallback() {
    console.log("Custom element removed from the page.");
  }

  adoptedCallback() {
    console.log("Custom element moved to a new page.");
  }

  attributeChangedCallback(name, oldValue, newValue) {
    console.log(`Attribute ${name} has changed.`);
  }
}

customElements.define("my-custom-element", MyCustomElement);

Using Custom Elements in Vue

Using custom elements in a Vue application is largely similar to using native HTML elements, but a few points need to be kept in mind:

Skipping Component Resolution

By default, Vue tries to parse non-native HTML tags as registered Vue components and then render them as custom elements. This leads to Vue issuing a “Unknown custom element” warning during development. To inform Vue that certain elements should be treated as custom elements and skip component resolution, we can specify the compilerOptions.isCustomElement option.

If you are using Vue for build setup, this option should be passed through build configuration as it is a compile-time option.

Example of in-browser configuration:

// Only works if using in-browser compilation.
// If using build tools, see config examples below.
app.config.compilerOptions.isCustomElement = (tag) => tag.includes('-')

Vite Configuration Example

// vite.config.js
import vue from '@vitejs/plugin-vue'

export default {
  plugins: [
    vue({
      template: {
        compilerOptions: {
          // treat all tags with a dash as custom elements
          isCustomElement: (tag) => tag.includes('-')
        }
      }
    })
  ]
}

Vue CLI Configuration Example

// vue.config.js
module.exports = {
  chainWebpack: config => {
    config.module
      .rule('vue')
      .use('vue-loader')
      .tap(options => ({
        ...options, 

        
        compilerOptions: {
          // treat any tag that starts with ion- as custom elements
          isCustomElement: tag => tag.startsWith('ion-')
        }
      }))
  }
}

Building Custom Elements with Vue

The primary advantage of custom elements is their ability to be used with any framework or even without a framework. This makes them suitable for distributing components to end consumers who may not use the same frontend stack, or when you want to isolate the implementation details of the components used in the final application.

Defining Custom Elements

Vue supports creating custom elements using the same Vue component API with the defineCustomElement method. This method takes the same parameters as defineComponent but returns an extended custom element constructor HTMLElement:

Template:0

<my-vue-element></my-vue-element>
import { defineCustomElement } from 'vue'

const MyVueElement = defineCustomElement({
  // normal Vue component options here
  props: {},
  emits: {},
  template: `...`,

  // defineCustomElement only: CSS to be injected into shadow root
  styles: [`/* inlined css */`]
})

// Register the custom element.
// After registration, all `<my-vue-element>` tags
// on the page will be upgraded.
customElements.define('my-vue-element', MyVueElement)

// You can also programmatically instantiate the element:
// (can only be done after registration)
document.body.appendChild(
  new MyVueElement({
    // initial props (optional)
  })
)

When discussing custom elements and Vue components, we are essentially talking about two different approaches to building web applications. Custom elements are a web standard, akin to HTML elements, while Vue components are a more advanced building approach provided by the Vue.js framework.

Some argue that using only custom elements is a more “future-proof” approach, but this passage points out that such a view is overly simplistic. It lists reasons explaining why the Vue component model is more practical. Some key points include:

Vue components offer more features, such as a convenient template system, methods for managing state, and an efficient way to render components on the server. These features are essential for building complex applications.

Vue components support powerful composition mechanisms, while custom elements have some limitations in this regard. This means that with Vue, you can build flexible and powerful component structures more easily. Using Vue, you leverage a mature framework and a large community, without having to build and maintain an internal framework.

There is indeed some overlap in functionality between custom elements and Vue components: both allow us to define reusable components with data passing, event emitting, and lifecycle management. However, the Web Components API is relatively lower-level and simpler. To build actual applications, we need some additional features not covered by the platform:

  • Declarative and efficient template system;
  • A reactive state management system conducive to extracting and reusing logic across components;
  • A high-performance method for rendering components on the server (SSR) and composing them on the client side, crucial for Web Vitals metrics like SEO and LCP. Native custom elements SSR typically involves simulating the DOM in Node.js and then serializing the mutated DOM, while Vue SSR compiles as much as possible into string concatenation, which is more efficient.

defineCustomElement API Vue Component Transformation

Using the defineCustomElement API to transform Vue components into registerable custom element classes has several benefits:

  1. Cross-Framework Integration: By transforming Vue components into custom element classes, you can use these components in different frontend frameworks and libraries. This makes your components more versatile and integrable with other technology stacks.

  2. Independent Usage: After registering a Vue component as a custom element, it can be used independently of a Vue application. This means you can use the component without an entire Vue application, and introduce it into different build systems and module systems.

  3. Progressive Migration: If your application is gradually transitioning to Vue, you can achieve a progressive migration by transforming certain components into custom elements. This allows you to gradually introduce Vue components into an existing project without the need for a complete rewrite.

  4. Web Components Standard Compatibility: Registering Vue components as custom elements makes them compatible with the Web Components standard. This means you can leverage other tools and libraries in the Web Components ecosystem, enhancing the interoperability of your components.

In other words, the defineCustomElement API’s purpose is to compile Vue components into custom elements that can be used in the browser without relying on the Vue compiler for real-time compilation.

When using the defineCustomElement API, Vue components are pre-compiled into native custom elements, allowing them to be used directly in the browser without runtime compilation.

Overall, by using the defineCustomElement API, you can combine Vue components with custom elements, making these components usable and shareable in a broader context. This provides increased reusability and flexibility for components, especially in the context of cross-platform component development, where you can develop components as custom elements and use them in different environments. A typical example is the integration implementation mentioned earlier between Vue 2 and Vue 3, meaning you only need to compile Vue 3 components into custom elements and then use them in Vue 2.

Preface

Hot Module Replacement (HMR) is a major feature of Webpack. When you modify and save the code, Webpack repackages the code and sends the new module to the browser, which replaces the old module with the new one without refreshing the browser, allowing you to update the application without refreshing the browser.

For example, when developing a web page, if you click a button and a pop-up window appears, but the title of the pop-up window is not aligned, you can modify the CSS style and save it. Without refreshing the browser, the title style changes. It feels like directly modifying the element style in Chrome’s developer tools.

Hot Module Replacement (HMR)

The Hot Module Replacement (HMR) function replaces, adds, or deletes modules during application runtime without reloading the entire page. This significantly speeds up development in the following ways:

  • Preserve application state lost during a full page reload.

  • Only update the changed content to save valuable development time.

  • When CSS/JS changes occur in the source code, they are immediately updated in the browser, which is almost equivalent to directly changing the style in the browser devtools.

Why do we need HMR?

Before the webpack HMR function, there were many live reload tools or libraries, such as live-server. These libraries monitor file changes and notify the browser to refresh the page. So why do we still need HMR? The answer is actually mentioned in the previous text.

  • Live reload tools cannot save the application state (states). When the page is refreshed, the previous state of the application is lost. In the example mentioned earlier, when you click a button to display a pop-up window, the pop-up window disappears when the browser is refreshed. To restore the previous state, you need to click the button again. However, webapck HMR does not refresh the browser, but replaces the module at runtime, ensuring that the application state is not lost and improving development efficiency.

  • In the ancient development process, we may need to manually run commands to package the code and then manually refresh the browser page after packaging. All these repetitive work can be automated through the HMR workflow, allowing more energy to be devoted to business instead of wasting time on repetitive work.

  • HMR is compatible with most front-end frameworks or libraries on the market, such as React Hot Loader, Vue-loader, which can listen to changes in React or Vue components and update the latest components to the browser in real-time. Elm Hot Loader supports the translation and packaging of Elm language code through webpack, and of course, it also implements HMR functionality.

HMR Working Principle Diagram

When I first learned about HMR, I thought it was very magical, and there were always some questions lingering in my mind.

  • Webpack can package different modules into bundle files or several chunk files, but when I develop with webpack HMR, I did not find the webpack packaged files in my dist directory. Where did they go?

  • By looking at the package.json file of webpack-dev-server, we know that it depends on the webpack-dev-middleware library. So what role does webpack-dev-middleware play in the HMR process?

  • During the use of HMR, I know that the browser communicates with webpack-dev-server through websocket, but I did not find new module code in the websocket message. How are the new modules sent to the browser? Why are the new modules not sent to the browser through websocket with the message?

  • After the browser gets the latest module code, how does HMR replace the old module with the new one? How to handle the dependency relationship between modules during the replacement process?

  • During the module hot replacement process, is there any fallback mechanism if the replacement module fails?

With these questions in mind, I decided to delve into the webpack source code and find the underlying secrets of HMR.
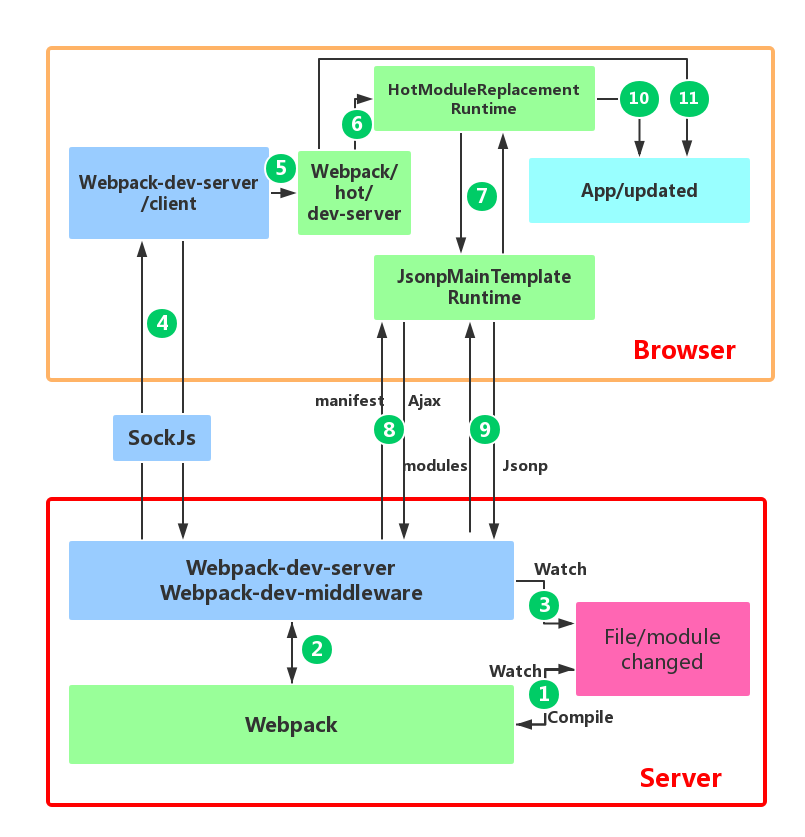
webpack-optimization

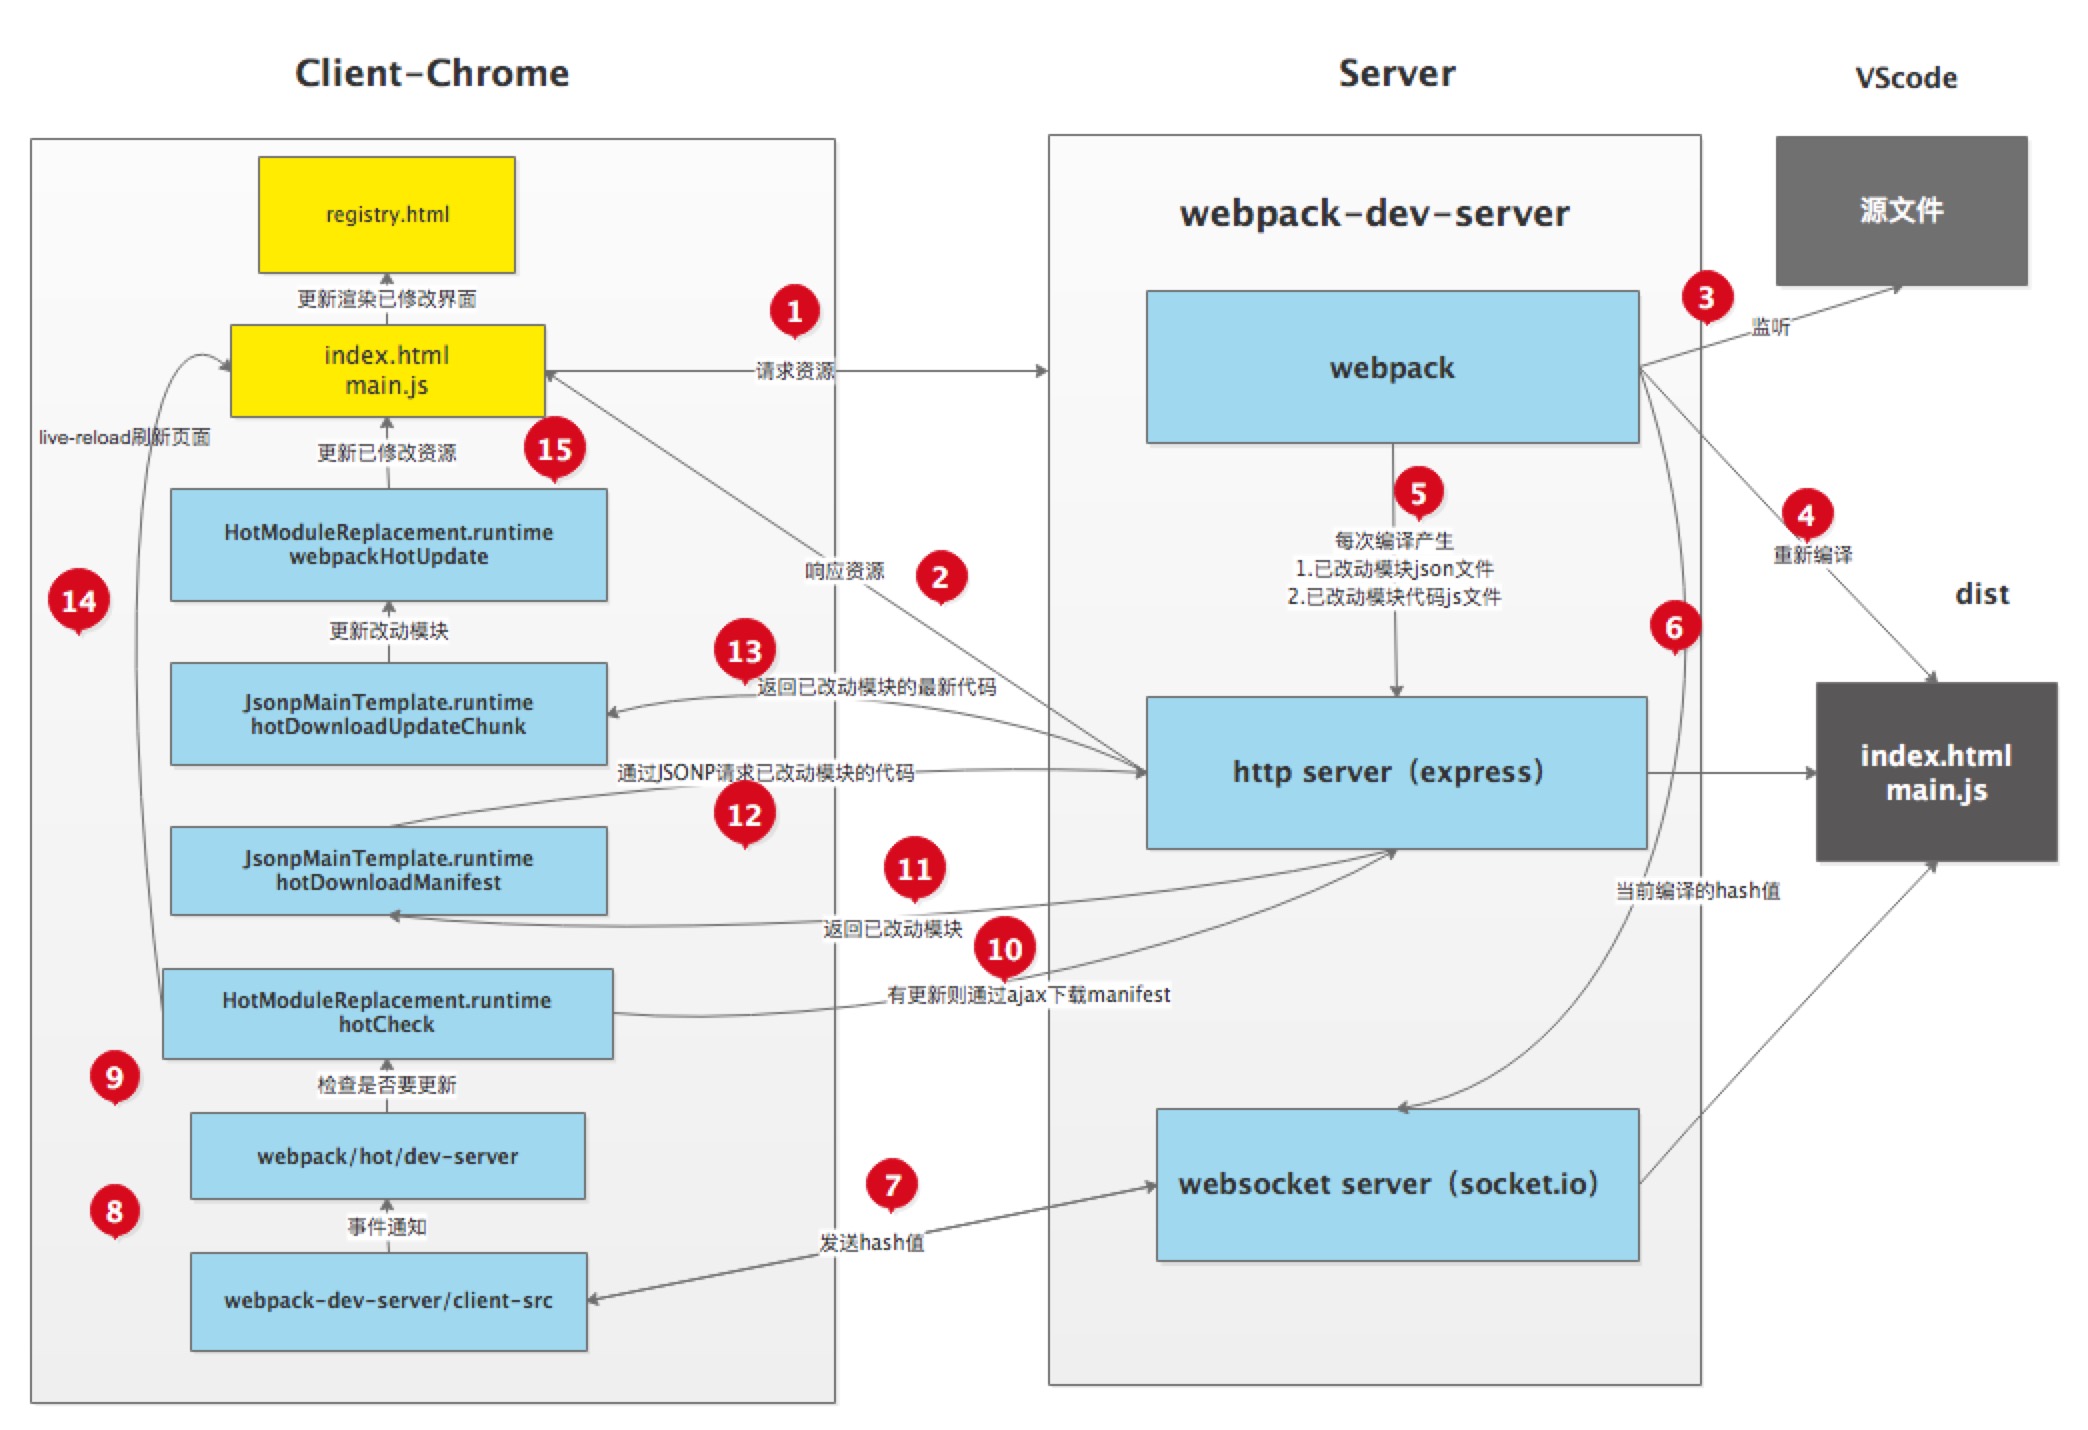
Figure 1: HMR workflow diagram

The above figure is a module hot update process diagram for application development using webpack with webpack-dev-server.

The red box at the bottom of the figure is the server, and the orange box above is the browser.

The green box is the area controlled by the webpack code. The blue box is the area controlled by the webpack-dev-server code. The magenta box is the file system, where file changes occur, and the cyan box is the application itself.

The figure shows a cycle from when we modify the code to when the module hot update is completed. The entire process of HMR is marked by Arabic numerals in dark green.

  • In the first step, in webpack’s watch mode, when a file in the file system is modified, webpack detects the file change, recompiles and packages the module according to the configuration file, and saves the packaged code in memory as a simple JavaScript object.

  • The second step is the interface interaction between webpack-dev-server and webpack. In this step, the main interaction is between the dev-server middleware webpack-dev-middleware and webpack. Webpack-dev-middleware calls webpack’s exposed API to monitor code changes and tells webpack to package the code into memory.

  • The third step is the monitoring of file changes by webpack-dev-server. This step is different from the first step, and it does not monitor code changes and repackage them. When we configure devServer.watchContentBase to true in the configuration file, the server will monitor changes in static files in these configured folders, and notify the browser to perform live reload of the corresponding application after the changes. Note that this is a different concept from HMR.

  • The fourth step is also the work of the webpack-dev-server code. In this step, the server establishes a websocket long connection between the browser and the server through sockjs (a dependency of webpack-dev-server), and informs the browser of the status information of various stages of webpack compilation and packaging, including the information of Server listening to static file changes in the third step. The browser performs different operations based on these socket messages. Of course, the most important information transmitted by the server is the hash value of the new module. The subsequent steps perform module hot replacement based on this hash value.

The webpack-dev-server/client side cannot request updated code or perform hot module replacement operations, but instead returns these tasks to webpack. The role of webpack/hot/dev-server is to determine whether to refresh the browser or perform module hot updates based on the information passed to it by webpack-dev-server/client and the configuration of dev-server. Of course, if it is only to refresh the browser, there will be no subsequent steps.

HotModuleReplacement.runtime is the hub of client HMR. It receives the hash value of the new module passed to it by the previous step, and sends an Ajax request to the server through JsonpMainTemplate.runtime. The server returns a json that contains the hash values of all modules to be updated. After obtaining the update list, the module requests the latest module code again through jsonp. This is steps 7, 8, and 9 in the above figure.

The tenth step is the key step that determines the success or failure of HMR. In this step, the HotModulePlugin compares the old and new modules and decides whether to update the module. After deciding to update the module, it checks the dependency relationship between the modules and updates the dependency references between the modules while updating the modules.

The last step is to fall back to live reload when HMR fails, that is, to refresh the browser to obtain the latest packaged code.

Simple Example of Using HMR

In the previous section, a HMR workflow diagram was presented to briefly explain the process of module hot updates. However, you may still feel confused, and some of the English terms that appear above may be unfamiliar (these English terms represent code repositories or file modules). Don’t worry, in this section, I will use the simplest and purest example to analyze in detail the specific responsibilities of each library in the HMR process through the webpack and webpack-dev-server source code.

Here, I will use a simple vue example to demonstrate. Here is a link to the repository github.com/ikkkp/webpack-vue-demo

Before starting this example, let me briefly explain the files in this repository. The files in the repository include:
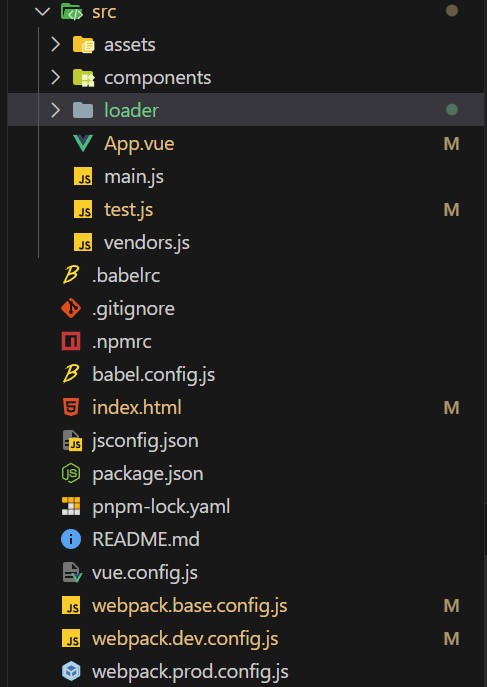
webpack-optimization

const path = require('path');
const HtmlWebpackPlugin = require('html-webpack-plugin');
const {
    VueLoaderPlugin
} = require('vue-loader');
const webpack = require('webpack'); // 引入 webpack
const AutoImport = require('unplugin-auto-import/webpack')
const Components = require('unplugin-vue-components/webpack')
const {
    ElementPlusResolver
} = require('unplugin-vue-components/resolvers')

/**
* @description 
* @version 1.0
* @author Huangzl
* @fileName webpack.base.config.js
* @date 2023/11/10 11:00:59
*/

module.exports = {
    entry: {
        main: './src/main',
        //单页应用开发模式禁用多入口
    },
    resolveLoader: {
        modules: [
            'node_modules',
            path.resolve(__dirname, './src/loader')
        ]
    },
    output: {
        filename: '[id].[fullhash].js', // 使用 [fullhash] 替代 [hash],这是新版本 webpack 的写法
        path: path.join(__dirname, 'dist'),
        publicPath: './'
    },
    module: {
        rules: [{
            test: /\.vue$/,
            loader: 'vue-loader'
        },
        {
            test: /\.css$/,
            use: [
                'style-loader',
                {
                    loader: 'css-loader',
                    options: {
                        importLoaders: 1
                    }
                },
                'postcss-loader'
            ]
        }, {
            test: /\.js$/,
            use: ['babel-loader', {
                loader: 'company-loader',
                options: {
                    sign: 'we-doctor@2021',
                },
            },],
            exclude: /node_modules/,
        },
        {
            test: /\.(ico|png|jpg|gif|svg|eot|woff|woff2|ttf)$/,
            loader: 'file-loader',
            options: {
                name: '[name].[ext]?[hash]'
            }
        },

        ]
    },

    plugins: [
        new HtmlWebpackPlugin({
            template: './public/index.html'
        }),
        new VueLoaderPlugin(),
        new webpack.DefinePlugin({
            BASE_URL: JSON.stringify('./') // 这里定义了 BASE_URL 为根路径 '/'
        }),
        AutoImport({
            resolvers: [ElementPlusResolver()],
        }),
        Components({
            resolvers: [ElementPlusResolver()],
        }),
    ],
    optimization: {
        splitChunks: {
            chunks: 'all', // 只处理异步模块
            maxSize: 20000000, // 设置最大的chunk大小为2MB
        },
    },
};

It is worth mentioning that HotModuleReplacementPlugin is not configured in the above configuration, because when we set devServer.hot to true and add the following script to package.json:

“start”: “webpack-dev-server –hot –open”

After adding the –hot configuration item, devServer will tell webpack to automatically introduce the HotModuleReplacementPlugin plugin, without us having to manually introduce it.

The above is the content of webpack.base.config.js. We will modify the content of App.vue below:

- <div>hello</div> // change the hello string to hello world
+ <div>hello world</div>

Step 1: webpack watches the file system and packages it into memory

webpack-dev-middleware calls webpack’s api to watch the file system. When the hello.js file changes, webpack recompiles and packages the file, then saves it to memory.

// webpack-dev-middleware/lib/Shared.js
if(!options.lazy) {
    var watching = compiler.watch(options.watchOptions, share.handleCompilerCallback);
    context.watching = watching;
}

You may wonder why webpack does not directly package files into the output.path directory. Where do the files go? It turns out that webpack packages the bundle.js file into memory. The reason for not generating files is that accessing code in memory is faster than accessing files in the file system, and it also reduces the overhead of writing code to files. All of this is thanks to memory-fs, a dependency of webpack-dev-middleware. Webpack-dev-middleware replaces the original outputFileSystem of webpack with a MemoryFileSystem instance, so the code is output to memory. The relevant source code of webpack-dev-middleware is as follows:
webpack-optimization

// webpack-dev-middleware/lib/Shared.js
var isMemoryFs = !compiler.compilers && compiler.outputFileSystem instanceof MemoryFileSystem;
if(isMemoryFs) {
    fs = compiler.outputFileSystem;
} else {
    fs = compiler.outputFileSystem = new MemoryFileSystem();
}

First, check whether the current fileSystem is an instance of MemoryFileSystem. If not, replace the outputFileSystem before the compiler with an instance of MemoryFileSystem. This way, the code of the bundle.js file is saved as a simple JavaScript object in memory. When the browser requests the bundle.js file, devServer directly retrieves the JavaScript object saved above from memory and returns it to the browser.

Step 2: devServer notifies the browser that the file has changed

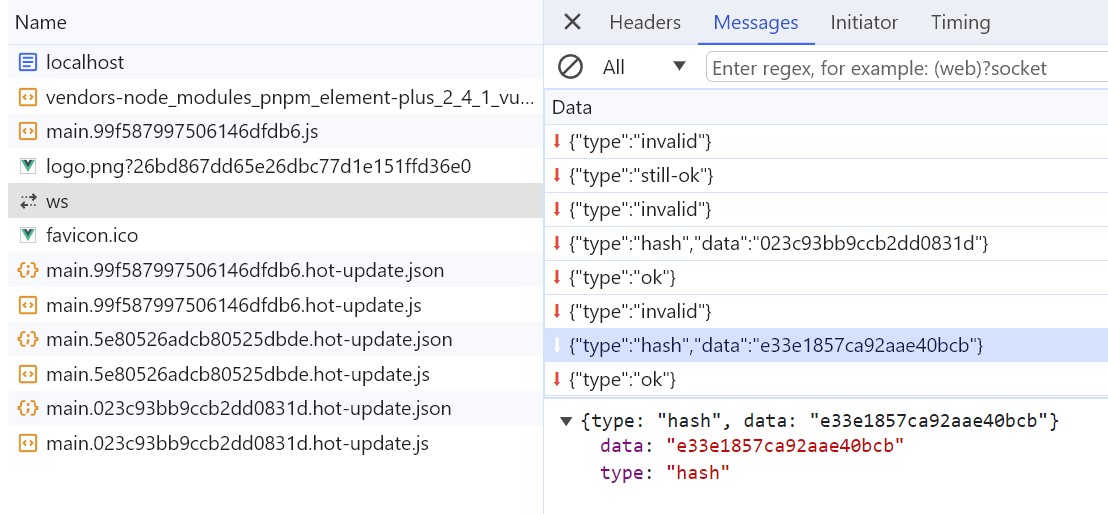
In this stage, sockjs is the bridge between the server and the browser. When devServer is started, sockjs establishes a WebSocket long connection between the server and the browser to inform the browser of the various stages of webpack compilation and packaging. The key step is still webpack-dev-server calling the webpack API to listen for the done event of the compile. After the compile is completed, webpack-dev-server sends the hash value of the newly compiled and packaged module to the browser through the _sendStatus method.

// webpack-dev-server/lib/Server.js
compiler.plugin('done', (stats) => {
  // stats.hash 是最新打包文件的 hash 值
  this._sendStats(this.sockets, stats.toJson(clientStats));
  this._stats = stats;
});
...
Server.prototype._sendStats = function (sockets, stats, force) {
  if (!force && stats &&
  (!stats.errors || stats.errors.length === 0) && stats.assets &&
  stats.assets.every(asset => !asset.emitted)
  ) { return this.sockWrite(sockets, 'still-ok'); }
  // 调用 sockWrite 方法将 hash 值通过 websocket 发送到浏览器端
  this.sockWrite(sockets, 'hash', stats.hash);
  if (stats.errors.length > 0) { this.sockWrite(sockets, 'errors', stats.errors); } 
  else if (stats.warnings.length > 0) { this.sockWrite(sockets, 'warnings', stats.warnings); }      else { this.sockWrite(sockets, 'ok'); }
};

Step 3: webpack-dev-server/client responds to server messages

You may wonder how the code in bundle.js receives websocket messages since you did not add any code to receive websocket messages in your business code or add a new entry file in the entry property of webpack.config.js. It turns out that webpack-dev-server modifies the entry property in webpack configuration and adds webpack-dev-client code to it. This way, the code in bundle.js will have the code to receive websocket messages.

When webpack-dev-server/client receives a hash message, it temporarily stores the hash value. When it receives an ok message, it performs a reload operation on the application. The hash message is received before the ok message.

webpack-optimization

In the reload operation, webpack-dev-server/client stores the hash value in the currentHash variable. When it receives an ok message, it reloads the App. If module hot updates are configured, it calls webpack/hot/emitter to send the latest hash value to webpack and then hands over control to the webpack client code. If module hot updates are not configured, it directly calls the location.reload method to refresh the page.

Step 4: webpack receives the latest hash value, verifies it, and requests module code

In this step, three modules (three files, with the English names corresponding to the file paths) in webpack work together. First, webpack/hot/dev-server (referred to as dev-server) listens for the webpackHotUpdate message sent by webpack-dev-server/client in step 3. It calls the check method in webpack/lib/HotModuleReplacement.runtime (referred to as HMR runtime) to check for new updates. In the check process, it uses two methods in webpack/lib/JsonpMainTemplate.runtime (referred to as jsonp runtime): hotDownloadUpdateChunk and hotDownloadManifest. The second method calls AJAX to request whether there are updated files from the server. If there are, it returns the list of updated files to the browser. The first method requests the latest module code through jsonp and returns the code to HMR runtime. HMR runtime further processes the returned new module code, which may involve refreshing the page or hot updating the module.
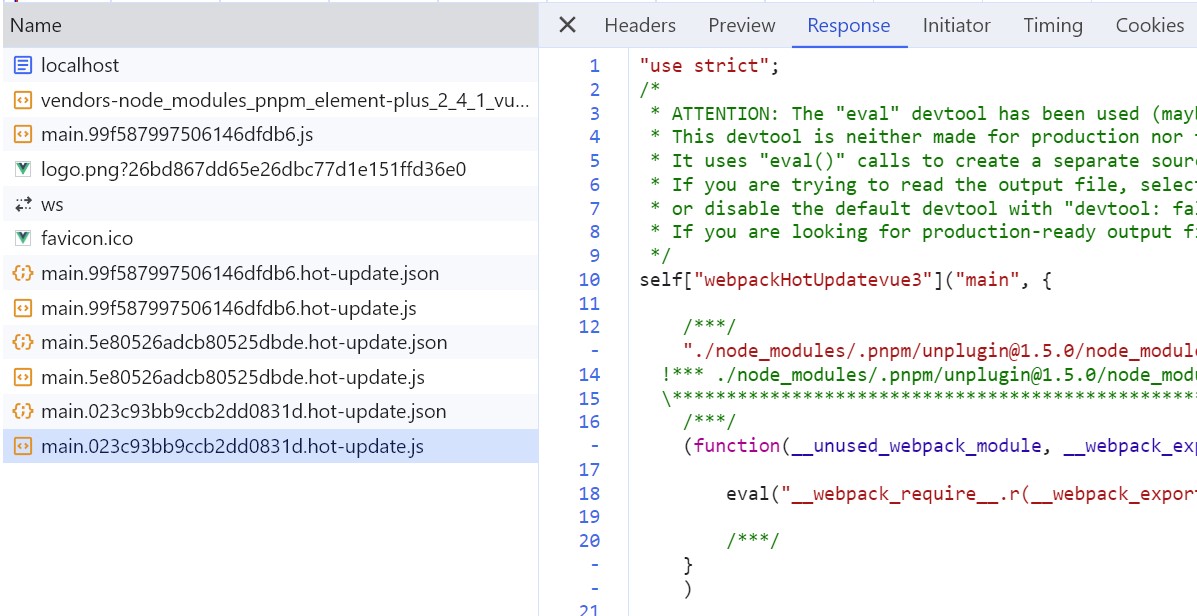
webpack-optimization

It is worth noting that both requests use the file name concatenated with the previous hash value. The hotDownloadManifest method returns the latest hash value, and the hotDownloadUpdateChunk method returns the code block corresponding to the latest hash value. Then, the new code block is returned to HMR runtime for module hot updating.

Step 5: HotModuleReplacement.runtime hot updates the module

This step is the key step of the entire module hot updating (HMR), and all module hot updates occur in the hotApply method of HMR runtime.

// webpack/lib/HotModuleReplacement.runtime
function hotApply() {
    // ...
    var idx;
    var queue = outdatedModules.slice();
    while(queue.length > 0) {
        moduleId = queue.pop();
        module = installedModules[moduleId];
        // ...
        // remove module from cache
        delete installedModules[moduleId];
        // when disposing there is no need to call dispose handler
        delete outdatedDependencies[moduleId];
        // remove "parents" references from all children
        for(j = 0; j < module.children.length; j++) {
            var child = installedModules[module.children[j]];
            if(!child) continue;
            idx = child.parents.indexOf(moduleId);
            if(idx >= 0) {
                child.parents.splice(idx, 1);
            }
        }
    }
    // ...
    // insert new code
    for(moduleId in appliedUpdate) {
        if(Object.prototype.hasOwnProperty.call(appliedUpdate, moduleId)) {
            modules[moduleId] = appliedUpdate[moduleId];
        }
    }
    // ...
}

From the hotApply method above, it can be seen that module hot replacement mainly consists of three stages. The first stage is to find outdatedModules and outdatedDependencies. I did not include this part of the code here, but if you are interested, you can read the source code yourself. The second stage is to delete expired modules and dependencies from the cache, as follows:

delete installedModules[moduleId];
delete outdatedDependencies[moduleId];

The third stage is to add the new module to the modules object. The next time the __webpack_require__ method (the require method rewritten by webpack) is called, the new module code will be obtained.

For error handling during module hot updates, if an error occurs during the hot update process, the hot update will fall back to refreshing the browser. This part of the code is in the dev-server code, and the brief code is as follows:

module.hot.check(true).then(function(updatedModules) {
    if(!updatedModules) {
        return window.location.reload();
    }
    // ...
}).catch(function(err) {
    var status = module.hot.status();
    if(["abort", "fail"].indexOf(status) >= 0) {
        window.location.reload();
    }
});

dev-server first verifies if there are any updates, and if there are no code updates, it reloads the browser. If an abort or fail error occurs during the hotApply process, the browser is also reloaded.
webpack-optimization

Introduction

When learning to write web pages, you usually start with HTML and CSS, which are responsible for creating and beautifying the layout. Once you have a solid foundation, you start learning JavaScript to create interactive effects. In addition to user and browser interactions, don’t forget about the interaction between the client and server, which means you must learn how to use JavaScript to retrieve data from the backend server. Otherwise, your web page data will be static.

The main target audience of this article is beginners in web front-end development. I hope that after reading this article, readers who do not understand how to exchange data with the server or how to connect to APIs can have a better understanding of how to connect to the backend.

Read More