React

Preface

This article mainly introduces the concept of state in React.

Comparison between Declarative UI and Imperative UI

When designing UI interactions, you may think about how the UI responds to changes based on user actions. Imagine a form that allows users to submit an answer:

  • As you input data into the form, the “Submit” button becomes enabled.

  • When you click “Submit,” the form and the submit button become disabled, and a loading animation appears.

  • If the network request is successful, the form hides, and a “Submission Successful” message appears.

  • If the network request fails, an error message appears, and the form becomes enabled again.

In imperative programming, the above process tells you directly how to implement the interaction. You have to write explicit commands to manipulate the UI based on what should happen.

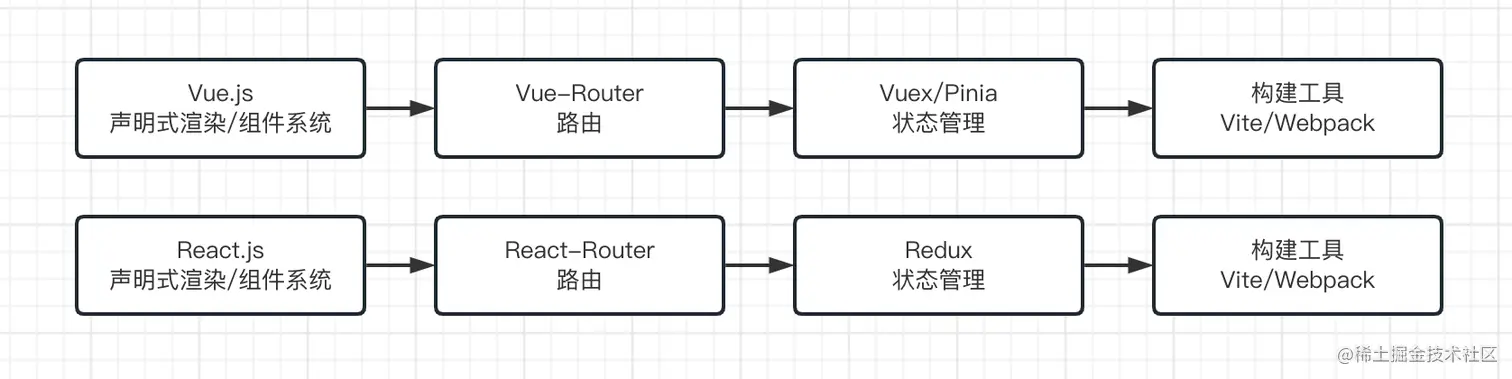
Both Vue.js and React follow a declarative programming approach.

Thinking Declaratively About UI in React

From the example above, you’ve seen how to implement a form. To better understand how to think in React, you generally need to follow these steps to reimplement this UI in React:

  1. Identify different view states in your component.

  2. Determine what triggers the changes in these states.

  3. Represent the state in memory (using useState).

  4. Remove any unnecessary state variables.

  5. Connect event handling functions to set state.

State Management in React

In React, state management is a crucial concept, and it is achieved through state. state is an internal object in a React component used to store the component’s internal state. It is a regular JavaScript object, accessible through this.state.

React builds a render tree for the UI components.

When you add state to a component, you might think that the state “exists” within the component. However, in reality, React keeps track of each state by associating it with the correct component based on its position in the render tree.

This is different from Vue.js, where the reactive system is isolated from components, while React’s state is bound to components.

We embed the state into React components as part of the component’s vnode information. When React’s state updates, it implies that the component’s information updates, triggering a re-render.

Understanding this, we can easily grasp how React’s reactivity works. React’s state is bound to components, and when the state updates, the component also updates. This is the reactive system in React.

Let’s take a specific example:

import { useState } from 'react';

export default function App() {
  const counter = <Counter />;
  return (
    <div>
      {counter}
      {counter}
    </div>
  );
}

function Counter() {
  const [score, setScore] = useState(0);
  const [hover, setHover] = useState(false);

  let className = 'counter';
  if (hover) {
    className += ' hover';
  }

  return (
    <div
      className={className}
      onPointerEnter={() => setHover(true)}
      onPointerLeave={() => setHover(false)}
    >
      <h1>{score}</h1>
      <button onClick={() => setScore(score + 1)}>
        Add One
      </button>
    </div>
  );
}

The tree structure for these components looks like this:

vue-react

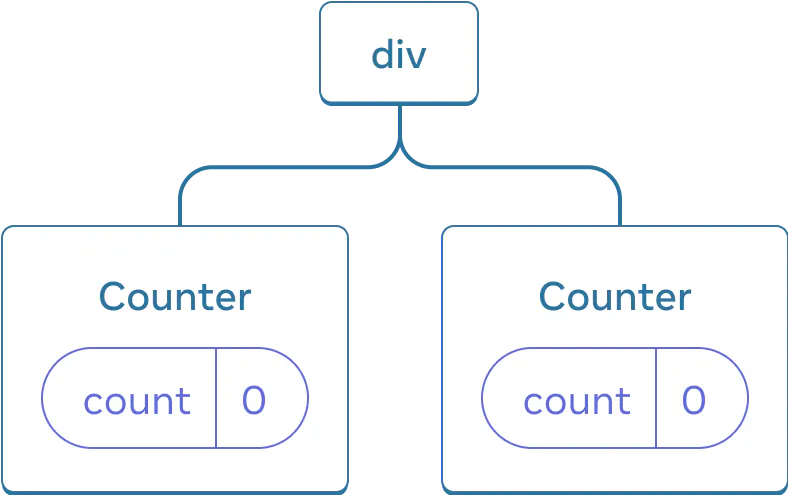
These are two independent counters because they are rendered at their respective positions in the tree. In general, you don’t need to consider these positions when using React, but knowing how they work can be useful.

They have their own states because each component instance has its own state. You can use multiple state variables in a component. When I update the state, it triggers a re-render of the component. Here, you can see that the states of the two counters are independent and do not affect each other.

Preserving and Resetting State in React

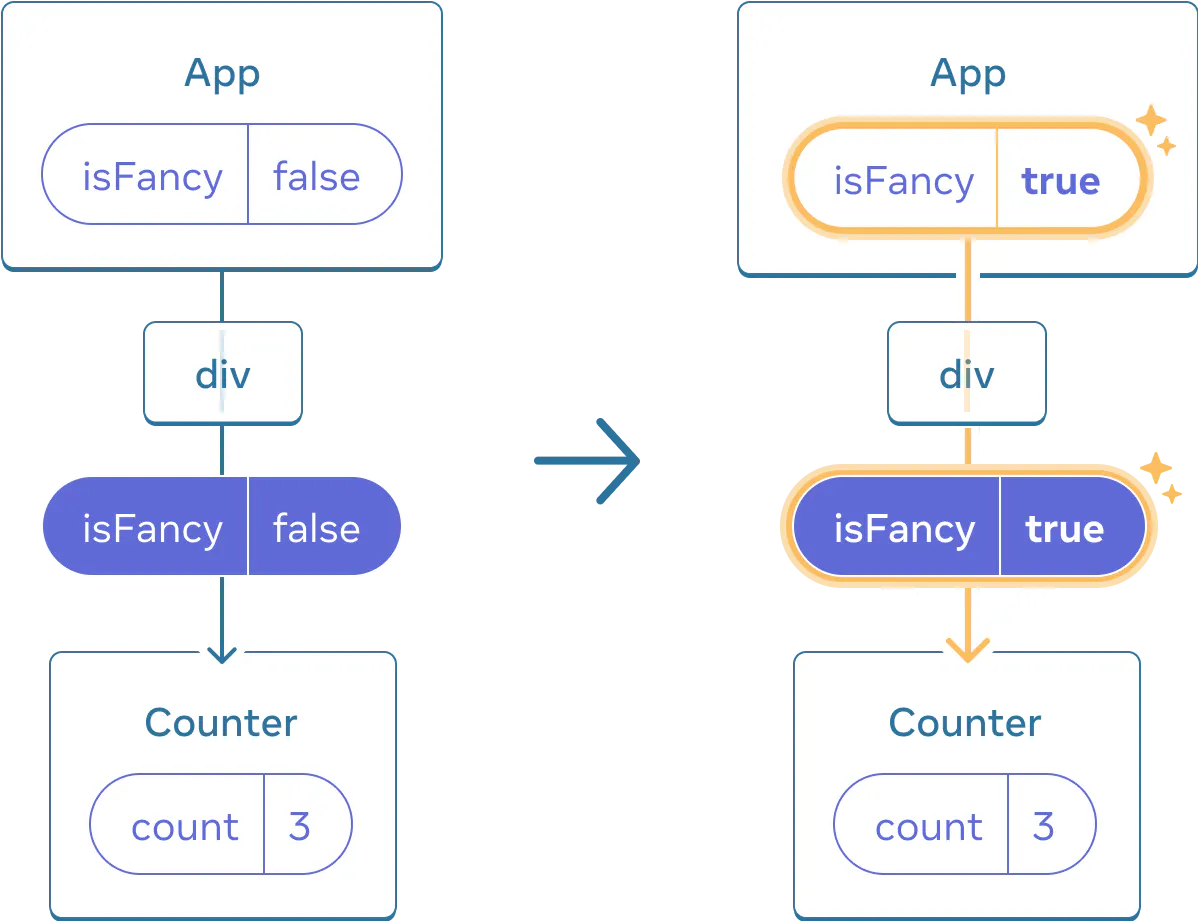
Same Component at the Same Position Retains State

import { useState } from 'react';

export default function App() {
  const [isFancy, setIsFancy] = useState(false);
  return (
    <div>
      {isFancy ? (
        <Counter isFancy={true} /> 
      ) : (
        <Counter isFancy={false} /> 
      )}
      <label>
        <input
          type="checkbox"
          checked={isFancy}
          onChange={e => {
            setIsFancy(e.target.checked)
          }}
        />
        Use Fancy Style
      </label>
    </div>
  );
}

function Counter({ isFancy }) {
  const [score, setScore] = useState(0);
  const [hover, setHover] = useState(false);

  let className = 'counter';
  if (hover) {
    className += ' hover';
  }
  if (isFancy) {
    className += ' fancy';
  }

  return (
    <div
      className={className}
      onPointerEnter={() => setHover(true)}
      onPointerLeave={() => setHover(false)}
    >
      <h1>{score}</h1>
      <button onClick={() => setScore(score + 1)}>
        Add One
      </button>
    </div>
  );
}

vue-react

Different Components at the Same Position Reset State

This is intuitive as changing components at the same position would reset the state. Consider replacing <Counter> with a <p>:

vue-react

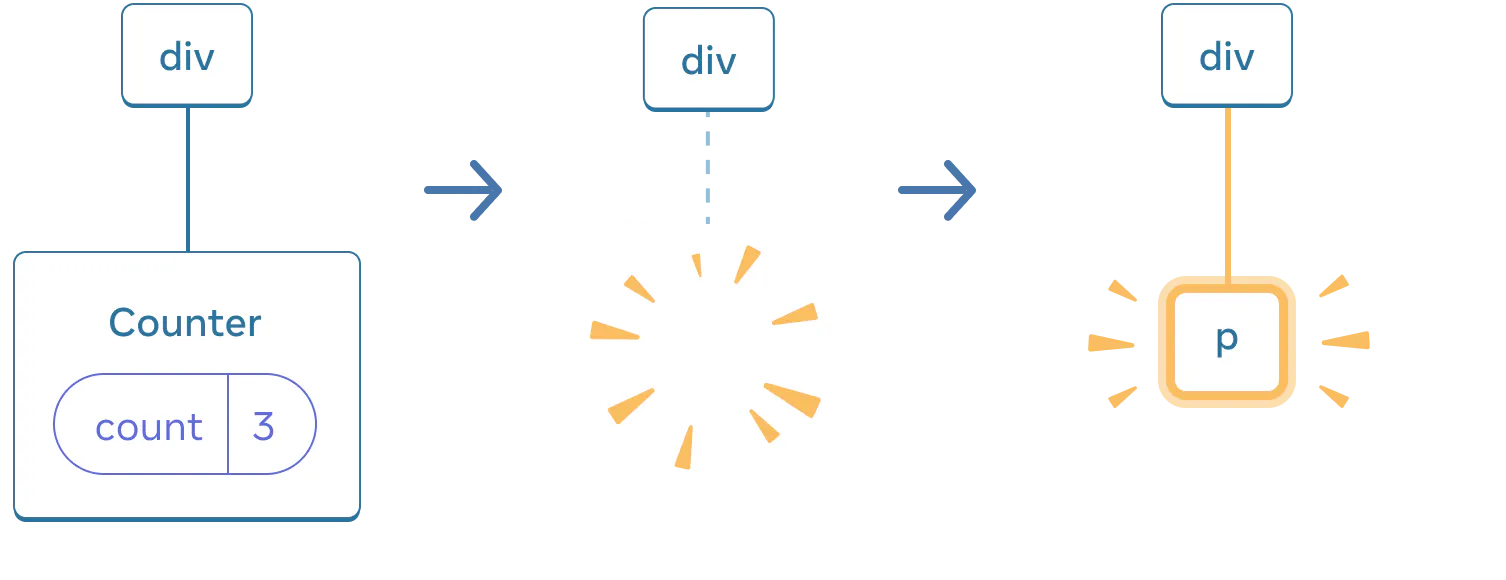
When Counter is replaced with p, Counter is removed, and p is added.

vue-react

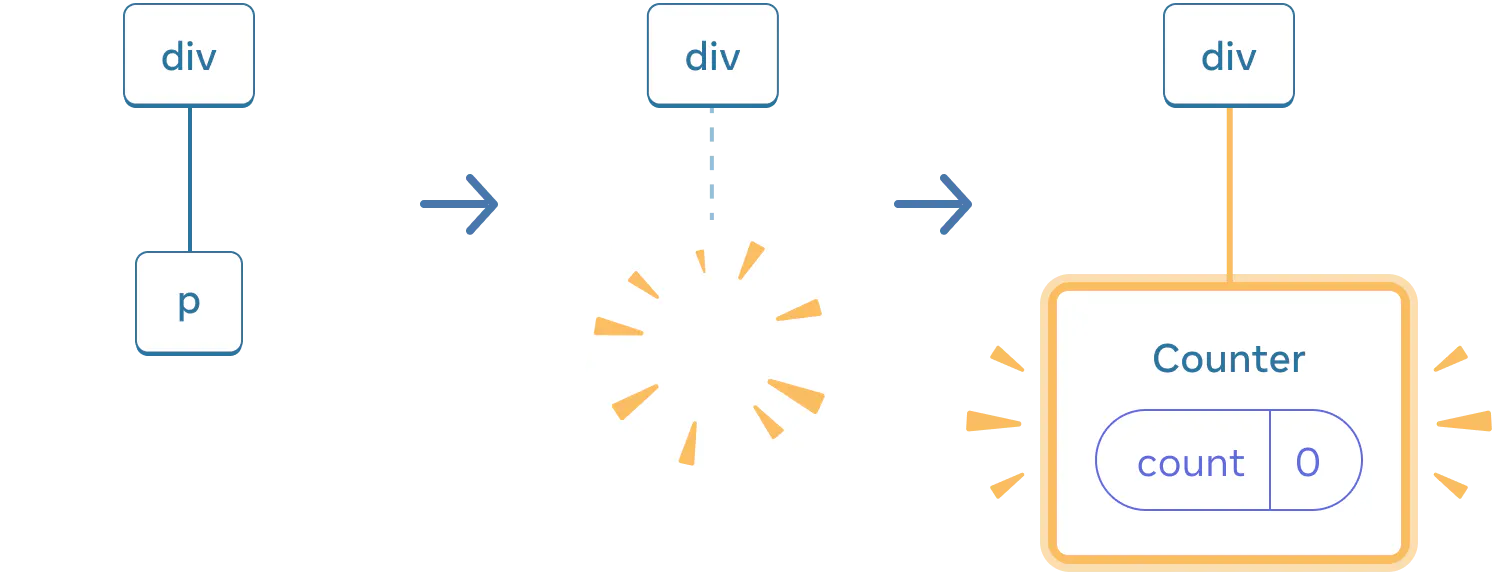
When switching back, p is removed, and Counter is added.

Reference in the React documentation: State and Lifecycle - Preserving State in the Tree

Extracting State Logic into a Reducer

For components requiring updates to multiple states, scattered event handlers may become overwhelming. In such cases, you can consolidate all state update logic into a function called a “reducer” outside the component. Event handlers become concise as they only need to specify user “actions.” At the bottom of the file, the reducer function specifies how the state should be updated in response to each action!

useReducer is a React Hook for managing component state logic. It provides an organized way to handle more complex state logic, suitable for those with multiple sub-values or states that need to be updated based on previous states. The usage of useReducer is similar to the reducer concept in Redux.

Here’s a basic example of useReducer:

import React, { useReducer } from 'react';

// Reducer function, takes current state and action, returns new state
const reducer = (state, action) => {
  switch (action.type) {
    case 'INCREMENT':
      return { count: state.count + 1 };
    case 'DECREMENT':
      return { count: state.count - 1 };
    default:
      return state;
  }
};

const initialState = { count: 0 };

const Counter = () => {
  // Use useReducer, pass in reducer and initial state
  const [state, dispatch] = useReducer(reducer, initialState);

  return (
    <div>
      Count: {state.count}
      <button onClick={() => dispatch({ type: 'INCREMENT' })}>Increment</button>
      <button onClick={() => dispatch({ type: 'DECREMENT' })}>Decrement</button>
    </div>
  );
};

export default Counter;

Key steps include:

  1. Define the reducer function: This function takes the current state state and an action describing the action. It then executes the corresponding logic based on the action type and returns a new state.

  2. Initialize state: Create state and dispatch function by calling useReducer(reducer, initialState).

  3. Use state and dispatch in the component: Access the current state value through state and trigger the reducer with dispatch.

Deep Data Transfer Using Context

Usually, information is passed from parent to child components through props. However, if you need to deeply pass some prop in the component tree, or if many components in the tree need to use the same prop, passing props can become cumbersome. Context allows a parent component to provide some information to any lower-level component without the need for props to be passed layer by layer.

import React, { createContext, useContext, useState } from 'react';

// Create a Context
const MyContext = createContext();

// Create a component with Provider and Consumer
const MyProvider = ({ children }) => {
  const [data, setData] = useState('Hello from Context');

  return (
    <MyContext.Provider value={{ data, setData }}>
      {children}
    </MyContext.Provider>
  );
};

// Use useContext to get values from Context
const ChildComponent = () => {
  const { data, setData } = useContext(MyContext);

  return (
    <div>
      <p>{data}</p>
      <button onClick={() => setData('Updated Context')}>Update Context</button>
    </div>
  );
};

// Wrap components that need to share data with Provider in the application
const App = () => {
  return (
    <MyProvider>
      <ChildComponent />
    </MyProvider>
  );
};

export default App;

Extending State with Reducer and Context

Reducer helps consolidate state update logic in components, and Context helps pass information deeper into other components.

You can combine reducers and context to manage the state of complex applications.

Based on this idea, use a reducer to manage the state of a parent component with complex state. Other components at any depth in the component tree can read its state through context. You can also dispatch some actions to update the state.

Using Reducer and Context intelligently can help you manage state better and make your code more concise.

Compared to Vue.js’s reactive system based on Proxy, using proxies, and the use of provide and inject, Vue.js’s state management is done in a separate WeakMap. When the variable state changes, it can trigger effect side functions and update the value. React’s state management is bound to components, and when the state updates, the component also updates. However, when dealing with global state management, it needs to be defined in the parent component.

Understanding how to define React state based on specific situations allows for better state management.

Introduction

This article focuses on how React’s JSX is compiled into VNodes.

Vue’s Render Function

Before diving into React’s JSX, let’s recall how Vue declares components using the Vue template method. Vue templates are compiled by the Vue compiler into render functions. The render function returns VNodes, and these VNodes are then rendered into real DOM through the patch function.

Details of the renderer have been discussed in previous chapters and will not be reiterated here.

React’s JSX

React maps JSX written in components to the screen, and when the state within components changes, React updates these “changes” on the screen.

JSX is ultimately transformed into a form like React.createElement by babel. As for how babel transforms JSX into React.createElement, we can use babel’s online compiler to check.

<div>
  <img src="avatar.png" className="profile" />
  <Hello />
</div>

Will be transformed by babel into:

React.createElement(
  "div",
  null,
  React.createElement("img", {
    src: "avatar.png",
    className: "profile"
  }),
  React.createElement(Hello, null)
);

Babel provides an online REPL compiler that can convert ES6 code to ES5 code online. The transformed code can be directly inserted into a webpage and run as ES5 code. Here’s a link: Babel Online Compiler

vue-react

During the transformation process, babel at compile time judges the first letter of the component in JSX:

When the first letter is lowercase, it is recognized as a native DOM tag, and the first variable of createElement is compiled into a string.

When the first letter is uppercase, it is recognized as a custom component, and the first variable of createElement is compiled into an object.

In the end, both will be mounted through the ReactDOM.render(...) method, as shown below:

ReactDOM.render(<App />, document.getElementById("root"));

How is React’s JSX Transformed?

In React, nodes can be roughly divided into four categories:

  • Native tag nodes
  • Text nodes
  • Function components
  • Class components

As shown below:

class ClassComponent extends Component {
  static defaultProps = {
    color: "pink"
  };
  render() {
    return (
      <div className="border">
        <h3>ClassComponent</h3>
        <p className={this.props.color}>{this.props.name}</p>
      </div>
    );
  }
}

function FunctionComponent(props) {
  return (
    <div className="border">
      FunctionComponent
      <p>{props.name}</p>
    </div>
  );
}

const jsx = (
  <div className="border">
    <p>xx</p>
    <a href=" ">xxx</a>
    <FunctionComponent name="Function Component" />
    <ClassComponent name="Class Component" color="red" />
  </div>
);

These categories will ultimately be transformed into the form of React.createElement.

vue-react

function createElement(type, config, ...children) {
    if (config) {
        delete config.__self;
        delete config.__source;
    }
    // Detailed handling is done in the source code, such as filtering out key, ref, etc.
    const props = {
        ...config,
        children: children.map(child =>
            typeof child === "object" ? child : createTextNode(child)
        )
    };
    return {
        type,
        props
    };
}

function createTextNode(text) {
    return {
        type: TEXT,
        props: {
            children: [],
            nodeValue: text
        }
    };
}

export default {
    createElement
};

The createElement function makes decisions based on the passed node information:

  • If it’s a native tag node, the type is a string, such as div, span.
  • If it’s a text node, the type is not present, here it is TEXT.
  • If it’s a function component, the type is the function name.
  • If it’s a class component, the type is the class name.

The virtual DOM is rendered into real DOM using ReactDOM.render, with the following usage:

ReactDOM.render(element, container[, callback])

When called for the first time, all DOM elements within the container node are replaced. Subsequent calls use React’s diff algorithm for efficient updates.

If an optional callback function is provided, it will be executed after the component is rendered or updated.

The render function implementation is roughly as follows:

function render(vnode, container) {
    console.log("vnode", vnode); // Virtual DOM object
    // vnode -> node
    const node = createNode(vnode, container);
    container.appendChild(node);
}

// Create a real DOM node
function createNode(vnode, parentNode) {
    let node = null;
    const { type, props } = vnode;
    if (type === TEXT) {
        node = document.createTextNode("");
    } else if (typeof type === "string") {
        node = document.createElement(type);
    } else if (typeof type === "function") {
        node = type.isReactComponent
            ? updateClassComponent(vnode, parentNode)
            : updateFunctionComponent(vnode, parentNode);
    } else {
        node = document.createDocumentFragment();
    }
    reconcileChildren(props.children, node);
    updateNode(node, props);
    return node;
}

// Traverse through child vnodes, convert them to real DOM nodes, and then insert into the parent node
function reconcileChildren(children, node) {
    for (let i = 0; i < children.length; i++) {
        let child = children[i];
        if (Array.isArray(child)) {
            for (let j = 0; j < child.length; j++) {
                render(child[j], node);
            }
        } else {
            render(child, node);
        }
    }
}

function updateNode(node, nextVal) {
    Object.keys(nextVal)
        .filter(k => k !== "children")
        .forEach(k => {
            if (k.slice(0, 2) === "on") {
                let eventName = k.slice(2).toLocaleLowerCase();
                node.addEventListener(eventName, nextVal[k]);
            } else {
                node[k] = nextVal[k];
            }
        });
}

// Return a real DOM node
// Execute the function
function updateFunctionComponent(vnode, parentNode) {
    const { type, props } = vnode;
    let vvnode = type(props);
    const node = createNode(vvnode, parentNode);
    return node;
}

// Return a real DOM node
// Instantiate first, then execute the render function
function updateClassComponent(vnode, parentNode) {
    const { type, props } = vnode;
    let cmp = new type(props);
    const vvnode = cmp.render();
    const node = createNode(vvnode, parentNode);
    return node;
}

export default {
    render
};

In the React source code, the overall process of converting virtual DOM to real DOM is shown in the following diagram:

vue-react

The rendering process is illustrated as follows:

  • Use React.createElement or write React components with JSX. In reality, all JSX code is eventually transformed into React.createElement(...) with the help of Babel.

  • The createElement function handles special props such as key and ref, assigns default props with defaultProps, and processes the passed children nodes, ultimately constructing a virtual DOM object.

  • ReactDOM.render renders the generated virtual DOM onto the specified container. It employs mechanisms such as batch processing, transactions, and performance optimizations for specific browsers, ultimately transforming into real DOM.

Introduction

Recently, I interviewed for the Spring Youth Training Camp at Dewu, where proficiency in React was required for the project. Having previously worked with Next.js for a while, my understanding of JSX was somewhat one-sided. As a developer transitioning from Vue.js to React, my plan is to first compare the features of Vue.js and React. Then, I’ll dive into React based on the project requirements.

Similarities between Vue.js and React

vue-react

Vue and React share many similarities:

  • Both use Virtual DOM.
  • Both follow a component-based approach with a similar flow.
  • Both are reactive and advocate for a unidirectional data flow (Vue’s v-model directive allows two-way data binding on form elements).
  • Both have mature communities and support server-side rendering.

Vue and React have similar implementation principles and processes, both using Virtual DOM + Diff algorithm.

Whether it’s Vue’s template + options API (using the Single File Component system) or React’s Class or Function (with class syntax in JavaScript also being a form of a function), the underlying goal is to generate a render function.

The render function produces a VNode (Virtual DOM tree). With each UI update, a new VNode is generated based on the render function. This new VNode is then compared with the cached old VNode using the Diff algorithm (the core of the framework), and the real DOM is updated accordingly (Virtual DOM is a JS object structure, while the real DOM is in the browser rendering engine, making operations on the Virtual DOM much less resource-intensive).

Common flow in Vue and React:

vue template/react JSX -> render function -> generate VNode -> when there are changes, diff between old and new VNode -> update the real DOM using the Diff algorithm.

The core is still Virtual DOM, and the advantages of VNode are numerous:

  • Reduces direct manipulation of the DOM. The framework provides a way to shield the underlying DOM writing, reducing frequent updates to the DOM and making data drive the view.

  • Provides the possibility for functional UI programming (core idea in React).

  • Enables cross-platform rendering beyond the DOM (e.g., React Native, Weex).

vue-react

Vue calls itself a framework because the official documentation provides a complete set of tools from declarative rendering to build tools.

React calls itself a library because the official package only includes the core React.js library. Routing, state management, and other features are provided by third-party libraries from the community, ultimately integrated into a solution.

Differences between Vue and React

Different Component Implementations

Vue.js Implementation

Vue’s source code attaches options to the Vue core class and then uses new Vue({options}) to get an instance (the script exported by Vue components is just an object filled with options). This makes the this in the options API refer to the internal Vue instance, which is opaque to the user. Therefore, documentation is needed to explain APIs like this.$slot and this.$xxx. Additionally, Vue plugins are built on top of the Vue prototype class, which is why Vue plugins use Vue.install to ensure that the Vue object of third-party libraries and the current application’s Vue object are the same.

React Implementation

React’s internal implementation is relatively simple; it directly defines a render function to generate a VNode. React internally uses four major component classes to wrap VNodes, and different types of VNodes are handled by the corresponding component class, with clear and distinct responsibilities (the subsequent Diff algorithm is also very clear). React class components all inherit from the React.Component class, and their this refers to the user-defined class, making it transparent to the user.

Different Reactivity Principles

Vue.js Implementation

  • Vue uses dependency collection, automatic optimization, and mutable data.
  • Vue recursively listens to all properties of data and directly modifies them.
  • When data changes, it automatically finds the referencing components to re-render.

React Implementation

  • React is based on a state machine, manual optimization, immutable data, and requires setState to drive new state replacement for the old state.
  • When data changes, the entire component tree is considered as the root, and by default, all components are re-rendered.

Different Diff Algorithms

Vue is based on the snabbdom library, which has good speed and a modular mechanism. Vue Diff uses a doubly linked list, comparing and updating the DOM simultaneously.

React primarily uses a diff queue to save which DOM elements need updating, obtaining a patch tree, and then performing a batch update of the DOM.

Different Event Mechanisms

Vue.js Implementation

  • Vue uses standard web events for native events.
  • Vue has a custom event mechanism for components, forming the basis of parent-child communication.
  • Vue makes reasonable use of the snabbdom library’s module plugins.

React Implementation

  • React’s native events are wrapped, and all events bubble up to the top-level document for listening. They are then synthesized here. Based on this system, the event mechanism can be used cross-platform, not tightly bound to the Web DOM.
  • React components have no events; parent-child communication is done using props.