Vue

Foreword

One of my goals for the year 24 was to engage with the open-source community, and getting started can be challenging. I chose VueCore and ElementUI as my starting points, submitting a PR to VueCore which, unfortunately, addressed an issue that had been fixed a week prior, leaving it without follow-up.

However, an interesting issue arose in ElementUI, let’s delve into the details:

The Problem

The issue looked like this: Sharp Teeth

Here is also an SFC link: SFC

The bug occurs when there are numerous menu items in the component; ElementUI condenses the lengthy menu into an expandable section:

As shown in the above figure, hovering over or clicking on the ellipsis area reveals an expansion panel containing all menu items.

The issue arises when clicking the expansion panel: if there are too many menu items, the length of the expansion panel becomes excessively long, causing the page to extend vertically, introducing a scrollbar and compressing the view width of the content below.

While the compression may be expected behavior, since the expansion panel naturally expands to accommodate more menu items, the problem lies in a throttling function:

const getIndexPath = (index: string) => subMenus.value[index].indexPath;

// Common computer monitor FPS is 60Hz, implying 60 redraws per second. Calculation formula: 1000ms/60 ≈ 16.67ms. To avoid potential repeated triggering during `resize`, set wait to 16.67 * 2 = 33.34ms.
const debounce = (fn: () => void, wait = 33.34) => {
  let timmer: ReturnType<typeof setTimeout> | null;
  return () => {
    timmer && clearTimeout(timmer);
    timmer = setTimeout(() => {
      fn();
    }, wait);
  };
};

let isFirstTimeRender = true;
const handleResize = () => {
  if (sliceIndex.value === calcSliceIndex()) return;
  const callback = () => {
    sliceIndex.value = -1;
    nextTick(() => {
      sliceIndex.value = calcSliceIndex();
    });
  };

  // Execute the callback directly during the first resize event to avoid shaking.
  isFirstTimeRender ? callback() : debounce(callback)();
  isFirstTimeRender = false;
};

This function is triggered when the viewport width changes, executing handleResize. This function calculates the current menu length and invokes a debounced function, which executes the callback only once within a specified time frame. The callback recalculates the menu length and assigns it to sliceIndex, thus determining the expansion state of the expansion panel.

The amusingly problematic part: the scrollbar introduced triggers the throttled function so frequently that it causes the page to jitter. Since the throttling delay is 33.34ms and the scrollbar trigger frequency is around 16.67ms, the throttled function is repeatedly called, leading to the jittering effect.

Solution

To solve this issue:

Initially, I considered modifying the SCSS styles, but since the style adjusts based on the menu length, changing the styles wasn’t a viable solution.

I then realized that the throttling function’s purpose was likely to address the destruction and recreation of the component during window resizing. Was it necessary to invoke this function so frequently? Could we trigger it only when the number of components changes?

So, I added a line to the original code:

if (sliceIndex.value === calcSliceIndex()) return;

Although this issue was relatively simple, I found it intriguing enough to document. Submitting this PR allowed me to review Git operations and experience the pull request process and standards in an open-source project, which was indeed enlightening.

Next milestone: Aim to submit PRs to Vue and ElementUI, and hopefully, contribute to the core team!

Introduction

In a project, there was a need for a rich text editor with support for formula editing. However, many rich text editors lacked robust support for formula editing. To address this, I developed a small plugin using easy-formula-editor and wangeditor. It is a Latex rich text formula editor based on Vue3 and MathJax rendering. It supports easy formula editing for users with zero experience, allows customization of the editor’s configuration and style, supports re-editing of formulas, and can be used as a standalone plugin or integrated with rich text editors.

  • Easy formula editing for users with zero experience
  • Customizable editor configuration and style
  • Support for re-editing formulas
  • Can be used as a standalone plugin or integrated with rich text editors

MathJax

Installation and Usage

NPM

npm i easy-formula-editor

or

import formulaEditor from "easy-formula-editor";
const editor = new formulaEditor();
editor.create('#test');

CDN

<script type="text/javascript" src="../dist/formula-editor.min.js"></script>
<script type="text/javascript">
  const editor = new formulaEditor();
  editor.create('#test');
</script>

Export

// Latex formula
editor.latex.text()

// HTML formula
editor.$textSvgElem.html()

Extending Rich Text Editor Menu Bar

Registering Menus

[Note] It is recommended to use a global approach to register menus. If there are multiple editors with different custom menus, use the instance method to register menus.

Global Approach

// Menu key, each menu must be unique
const menuKey = 'alertMenuKey' 

// Register the menu
E.registerMenu(menuKey, AlertMenu)

const editor = new E('#div1')
editor.create()

const editor2 = new E('#div2')
editor2.create()

Instance Approach

// Menu key, each menu must be unique
const menuKey = 'alertMenuKey' 
const menuKey2 = 'alertMenuKey2'

const editor = new E('#div1')
// Register the menu
editor.menus.extend(menuKey, AlertMenu)

// Add the menu to editor.config.menus    const menuKey = 'alertMenuKey' 
// Menu order can also be adjusted through configuration, refer to the documentation on "Configuring Menus"    editor.config.menus.push(menuKey)
editor.config.menus = editor.config.menus.concat(menuKey)

// After registering the menu, create the editor, order matters!!
editor.create()

const editor2 = new E('#div2')
editor2.menus.extend(menuKey2, AlertMenu)
editor2.config.menus.push(menuKey2)
editor2.create()

Real Project Integration Example

import E from "wangeditor";
import formulaEditor from "easy-formula-editor";
import createPanelConf from "./create-panel-conf";

const { PanelMenu, Panel } = E;

class AlertMenu extends PanelMenu {
  constructor(editor) {
    // The data-title attribute indicates a tooltip for the button when the mouse hovers over it
    const $elem = E.$(
      `<div class="w-e-menu" data-title="Math Formula">
        <span>Formula</span>
      </div>`
    );
    super($elem, editor);
  }

  /**
   * Menu click event
   */
  clickHandler() {
    const formula = new formulaEditor();
    const conf = createPanelConf(this.editor, formula);
    const panel = new Panel(this, conf);
    panel.create();

    formula.create("#edit-content");
  }

  tryChangeActive() {}
}

const menuKey = "alertMenuKey";

// Register the menu
E.registerMenu(menuKey, AlertMenu);

export default E;
//create-panel-conf.ts
export default function (wangEditor, formulaEditor) {
    const btnOkId = 'btn-ok'
  
    /**
     * Insert formula
     */
    function insertFomule() {
      const formula = formulaEditor.latex.text()
      // Ensure that there are spaces on both sides when inserting into wangEditor, otherwise it may lead to focus issues
      wangEditor.txt.append('<p>'+formula+'</p>')
      return true
    }
  
    // Tabs configuration
    const tabsConf = [
      {
        // Tab title
        title: "Insert Math Formula",
        // Template
        tpl: `<div>
                <div id="edit-content"></div>
                <div class="w-e-button-container">
                  <button type="button" id="${btnOkId}" class="right">Insert</button>
                </div>
              </div>`,
        // Event bindings
        events: [
          // Insert formula
          {
            selector: '#' + btnOkId,
            type: 'click',
            fn: insertFomule,
            bindEnter: true,
          },
        ],
      }, // Tab end
    ]
  
    return {
        width: 660,
        height: 0,
        // Panel can contain multiple tabs
        tabs: tabsConf, // Tabs end
      }
}

Using the above code, you can add a formula editor menu to the rich text editor:

<template>
  <div class="formula-container">
    <v-card elevation="0" class="formula-card" title="Output Area" subtitle="Output">
      <div id="formula" class="formula-content">
        {{ renderedFormula ? `$${renderedFormula}$` : '' }}
      </div>
    </v-card>
    <div class="editor-area">
      <div id="wang-editor" class="editor"></div>
    </div>
  </div>
</template>


<script setup>
import E from "../utils/formula-menu-conf";
import { ref, onMounted, nextTick, defineProps, watchEffect } from "vue";

// Define props
const props = defineProps({
  initMessage: {
    type: String,
    default: "",
  }
});

watchEffect(() => {
  props.initMessage;
});

const editor = ref(null);
const renderedFormula = ref("");

function convert() {
  MathJax.texReset();
  MathJax.typesetClear();
  MathJax.typesetPromise();
}

function updateFormula() {
  renderedFormula.value = editor.value.txt.text();
  nextTick(convert);
}

onMounted(() => {
  editor.value = new E("#wang-editor");
  editor.value.config.height = 360;
  editor.value.config.menus = ['head', 'bold', 'underline', 'strikeThrough','emoticon', 'undo', 'redo'];
  editor.value.config.onchange = updateFormula;
  editor.value.config.onchangeTimeout = 500;
  editor.value.create();
  editor.value.txt.html(props.initMessage);
});


</script>


This setup allows seamless integration of the formula editor with a rich text editor, as depicted in the following image:

![MathJax](/img/mathjax/mathjax-2.png)

Here's a link to the official documentation for WangEditor: [www.wangeditor.com/v4](https://www.wangeditor.com/v4)

Feel free to reach out if you have any further questions or need additional clarification.

Introduction

To explain the implementation of Vue.js component events and emit, it’s essential to first understand the application of component events and emit. This will provide a clearer understanding of how component events and emit are implemented.

For component events, we’ve previously discussed the browser’s event mechanism:

Browser Event Review

Browser events refer to various signals of interaction and state changes that occur on a web page. These events can be triggered by user actions, changes in the browser’s state, or other factors. Here are some common DOM events and their descriptions:

Mouse Events:

  • click: Triggered when the mouse clicks on an element. For touch-screen devices, it’s triggered when there’s a tap on the screen.
  • contextmenu: Triggered when the right mouse button clicks on an element.
  • mouseover / mouseout: Triggered when the mouse pointer enters or leaves an element.
  • mousedown / mouseup: Triggered when the mouse button is pressed or released over an element.
  • mousemove: Triggered when the mouse is moved.

Keyboard Events:

  • keydown and keyup: Triggered when a key is pressed down or released.

Form Element Events:

  • submit: Triggered when a visitor submits a <form>.
  • focus: Triggered when a visitor focuses on an element, such as an <input>.

Document Events:

  • DOMContentLoaded: Triggered when HTML is fully loaded and processed, and the DOM is completely constructed.

CSS Events:

  • transitionend: Triggered when a CSS animation is completed.

These events can be captured and processed using event listeners in JavaScript. By adding event listeners to elements, specific code can be executed when certain events occur. Events form the foundation of interaction and responsiveness in web development.

Now, how does component events differ from browser events?

In the context of events, we can understand them as specific occurrences at a given point in time, signaling that something has happened. An event is a signal that can be received and processed, and that’s what events are.

In the case of component events, it refers to the communication between Vue components, achieved through events. In this context, events serve as a means of communication between components, and this communication is implemented using events. Here, events specifically refer to what we call component events.

The primary mechanism for communication between Vue components using events is through the use of the emit and on methods. When a child component needs to communicate with a parent component, it triggers an event and uses the emit method to send the event. The parent component, in turn, uses the v-on directive in the template to listen for this event and execute the corresponding logic.

<!-- Child Component ChildComponent.vue -->
<template>
  <button @click="sendMessage">Notify Parent Component</button>
</template>

<script>
export default {
  methods: {
    sendMessage() {
      // Use emit to send a custom event
      this.$emit('child-event', 'Hello from child!');
    }
  }
}
</script>
<!-- Parent Component ParentComponent.vue -->
<template>
  <div>
    <child-component @child-event="handleChildEvent"></child-component>
    <p>Message received from child: {{ messageFromChild }}</p>
  </div>
</template>

<script>
import ChildComponent from './ChildComponent.vue';

export default {
  components: {
    ChildComponent
  },
  data() {
    return {
      messageFromChild: ''
    };
  },
  methods: {
    handleChildEvent(message) {
      // Listen to the child component's event using v-on
      this.messageFromChild = message;
    }
  }
}
</script>

Vue’s event mechanism is built on the publish/subscribe pattern. $emit is used to publish (trigger) an event, while v-on is used to subscribe (listen) to events. This enables decoupling between different components.

Firstly, we notice that the child component uses this.$emit('child-event', 'Hello from child!') to send a custom event named ‘child-event’. The parent component, on the other hand, listens to this event using @child-event="handleChildEvent". Here, ‘child-event’ is the custom event name, and ‘handleChildEvent’ is a method defined in the parent component to handle the message sent by the child component.

When using a custom MyComponent component, we can listen to the emitted custom event using the v-on directive:

You can see that the custom event ‘change’ is compiled into a property named ‘onChange’ and stored in the props data object. This is essentially a convention. As a framework designer, you can design the compilation result of events according to your expectations. In the actual implementation, emitting a custom event boils down to finding the corresponding event handling function in the props data object based on the event name, as shown in the following code:

Implementation of emit

// Definition of MyComponent component
const MyComponent = {
  name: 'MyComponent',
  setup(props, { emit }) {
    // Emit the 'change' event and pass two parameters to the event handler
    emit('change', 1, 2);

    return () => {
      // Render logic of the component
      return /* ... */;
    };
  }
};

The above code will be compiled into a node CompNode, with the type being the MyComponent component. The emit function is passed to the setup function of the component, as shown below:

// Definition of a Vue component node CompNode
const CompNode = {
  // Specify the type of the node as the MyComponent component
  type: MyComponent,

  // Props object passed to the component
  props: {
    // In the MyComponent component, there will be an onChange event handling function, whose value is handler
    onChange: handler
  }
}; 

As you can see, the custom event ‘change’ is compiled into a property named ‘onChange’ and stored in the props data object. This is essentially a convention. As a framework designer, you can design the compilation result of events according to your expectations.

In the actual implementation, emitting a custom event essentially involves finding the corresponding event handling function in the props data object based on the event name, as shown in the following code:

// Mounting the component
function mountComponent(vnode, container, anchor) {
  // Omitted code

  const instance = {
    state, // State
    props: shallowReactive(props), // Reactive handling of props
    isMounted: false,
    subTree: null
  };

  // Define the emit function, which takes two parameters
  // event: Event name
  // payload: Parameters passed to the event handling function
  function emit(event, ...payload) {
    // Process the event name according to the convention, e.g., change --> onChange
    const eventName = `on${event[0].toUpperCase()}${event.slice(1)}`;

    // Find the corresponding event handling function in props based on the processed event name
    const handler = instance.props[eventName];

    if (handler) {
      // Call the event handling function and pass the parameters
      handler(...payload);
    } else {
      console.error('Event does not exist');
    }
  }

  // Add the emit function to setupContext
  const setupContext = { attrs, emit };

  // Omitted code
}

// Function to parse props data, with special handling for event-type props
function resolveProps(options, propsData) {
  const props = {};
  const attrs = {};

  for (const key in propsData) {
    // Add props starting with 'on' as strings to props data, otherwise add to attrs
    if (key in options || key.startsWith('on')) {
      props[key] = propsData[key];
    } else {
      attrs[key] = propsData[key];
    }
  }

  return [props, attrs];
}

The implementation principle of emit involves two aspects: the injection of setupContext and the convention-based transformation of event names.

  1. Injection of setupContext: In Vue components, the setup function receives two parameters: props and context. context includes a series of properties and methods, one of which is the emit function. In Vue 3 components, the setup function returns an object, and you can add the emit function to setupContext so that users can access it within the component using setupContext.emit.

    Here’s a simple example demonstrating how to add emit to setupContext in the setup function:

    setup(props, context) {
      // Add emit to setupContext
      context.emit = emit;
    
      // Other setup logic
      // ...
    
      // Return the object returned by setup
      return {};
    }

    This way, users can call the emit function within the component using setupContext.emit.

  2. Convention-based transformation of event names: Inside the emit function, to match event handling functions in the component template, event names need to be conventionally transformed. Vue uses a convention of converting event names to camelCase. For example, the change event becomes onChange. This allows users to listen to events in the component template using camelCase.

    Here’s a simple example illustrating the convention-based transformation of event names:

    function emit(event, ...payload) {
      // Process the event name according to the convention, e.g., change --> onChange
      const eventName = `on${event[0].toUpperCase()}${event.slice(1)}`;
    
      // Find the corresponding event handling function in props based on the processed event name
      const handler = instance.props[eventName];
    
      if (handler) {
        // Call the event handling function and pass the parameters
        handler(...payload);
      } else {
        console.error('Event does not exist');
      }
    }

    In this example, the emit function transforms the event name into camelCase with “on” at the beginning. For instance, change becomes onChange. It then looks for the corresponding event handling function in instance.props and executes it.

It’s important to note that event-type props are not found in instance.props, so they are stored in attrs. To address this, when parsing props data, event-type props are specially handled to ensure they are correctly added to props instead of attrs. This allows the emit function to correctly find event handling functions in instance.props.

Preface

In a previous discussion, we explored the Vue renderer, where the renderer is primarily responsible for rendering the virtual DOM into the real DOM. We only need to use the virtual DOM to describe the final content to be rendered.

However, when creating more complex pages, the code for the virtual DOM used to describe the page structure becomes larger, or we can say that the page template becomes more extensive. In such cases, the ability to modularize components becomes essential.

With components, we can break down a large page into multiple parts, each part serving as an independent component. These components collectively form the complete page. The implementation of components also requires support from the renderer.

Rendering Components

From the user’s perspective, a stateful component is simply an options object, as shown in the code below:

// MyComponent is a component, and its value is an options object
const MyComponent = {
  name: 'MyComponent',
  data() {
    return { foo: 1 }
  }
}

However, from the internal implementation of the renderer, a component is a special type of virtual DOM node. For example, to describe a regular tag, we use the vnode.type property of the virtual node to store the tag name, as shown in the code below:

// This vnode is used to describe a regular tag
const vnode = {
  type: 'div'
  // ...
}

To describe a fragment, we set the vnode.type property of the virtual node to ‘Fragment’, and to describe text, we set the vnode.type property to ‘Text’.

Do you recall the patch function we discussed earlier in the renderer?

In the patch function, Vue processes different logic based on the differences between the new and old virtual DOM nodes. If it’s the initial rendering, it executes the logic for the initial rendering; if it’s an update rendering, it updates the actual DOM nodes based on the differences.

function patch(n1, n2, container, anchor) {
  // 02. If the types of new and old nodes are different, perform unmount operation
  if (n1 && n1.type !== n2.type) {
    unmount(n1);
    n1 = null;
  }

  // 07. Get the node type
  const { type } = n2;

  // 09. Check the node type
  if (typeof type === 'string') {
    // 10. Process regular elements
    // TODO: Logic for regular elements
  } else if (type === Text) {
    // 11. Process text nodes
    // TODO: Logic for text nodes
  } else if (type === Fragment) {
    // 13. Process fragments
    // TODO: Logic for fragments
  }

  // Return the actual DOM element of the new node
  return n2.el;
}

As you can see, the renderer uses the vnode.type property of the virtual node to differentiate its type. Different types of nodes require different methods for mounting and updating.

In reality, this applies to components as well. To use virtual nodes to describe components, we can use the vnode.type property to store the component’s options object.

function patch(n1, n2, container, anchor) {
  // 02. If the types of new and old nodes are different, perform unmount operation
  if (n1 && n1.type !== n2.type) {
    unmount(n1);
    n1 = null;
  }

  // 07. Get the node type
  const type = n2.type;

  // 09. Check the node type
  if (typeof type === 'string') {
    // 10. Process regular elements
    // TODO: Logic for regular elements
  } else if (type === Text) {
    // 11. Process text nodes
    // TODO: Logic for text nodes
  } else if (type === Fragment) {
    // 13. Process fragments
    // TODO: Logic for fragments
  } else if (typeof type === 'object') {
    // 16. The value of vnode.type is an options object, treated as a component
    if (!n1) {
      // 17. Mount the component
      mountComponent(n2, container, anchor);
    } else {
      // 21. Update the component
      patchComponent(n1, n2, anchor);
    }
  }

  // Return the actual DOM element of the new node
  return n2.el;
}

In the above code, we added an else if branch to handle the case where the vnode.type property value is an object, treating it as a virtual node describing a component. We call the mountComponent and patchComponent functions to mount and update the component.

Now let’s focus on the basics of writing components—what the user should write when creating components, what the options object of a component must include, and what capabilities a component possesses.

Therefore, a component must include a rendering function, i.e., the render function, and the return value of the render function should be a virtual DOM. In other words, the render function of a component is an interface for describing the content that the component renders, as shown in the code below:

// Definition of the MyComponent component
const MyComponent = {
  // Component name, optional
  name: 'MyComponent',

  // Rendering function of the component, its return value must be a virtual DOM
  render() {
    // Return a virtual DOM
    return {
      type: 'div',
      children: ['text content']
    };
  }
};

// Vnode object describing the component, type property value is the options object of the component
const CompNode = {
  type: MyComponent
};

// Call the renderer to render the component
renderer.render(CompNode, document.querySelector('#app'));

// The mountComponent function in the renderer is responsible for the actual rendering of the component
function mountComponent(vnode, container, anchor) {
  // Get the options object of the component, i.e., vnode.type
  const componentOptions = vnode.type;

  // Get the rendering function of the component, render
  const render = componentOptions.render;

  // Execute the rendering function, get the content the component should render, i.e., the virtual DOM returned by the render function
  const subTree = render();

  // Finally, call the patch function to mount the content described by the component, i.e., subTree
  patch(null, subTree, container, anchor);
}

Conclusion

Let’s recap the basics of components. We explicitly declared an object instance for a component, and the options object of the component must include a rendering function, i.e., the render function. The return value of the render function should be a virtual DOM. We then call render and patch to update and replace components. **In other words, the render function of a component is an interface for describing

Introduction

After December 31, 2023, the functionality of Vue 2 will still be available, but no further updates will be provided, including security updates and browser compatibility.

Evan announced that the first RC of Vue 3 will be released in mid-July. This article suggests that library/plugin authors start migrating their support to Vue 3. However, due to significant changes in API and behavior, is it possible to make our libraries support both Vue 2 and 3 simultaneously?

Universal Code

The simplest approach is to write universal code that works for both versions, without any additional modifications, similar to what people have done with Python 2 and 3. However, simplicity does not mean it’s easy. Writing such components requires avoiding newly introduced features in Vue 3 and deprecated features in Vue 2. In other words, you cannot use:

  • Composition API
  • .sync and .native modifiers
  • Filters
  • 3rd-party vendor objects

Using Branches

The response from core team members suggests using different branches to separate support for each targeted version. This is a good solution for existing and mature libraries, as their codebases are usually more stable, and version targeting optimizations may require better code isolation.

The downside of this approach is that you need to maintain two codebases, which doubles your workload. It is not ideal for small libraries or new libraries that want to support both versions and avoid duplicating bug fixes or feature additions. I do not recommend using this approach from the beginning of a project.

Build Scripts

In VueUse, I wrote some build scripts to import code from the target version’s API during the build. After that, I need to publish two tags, vue2 and vue3, to differentiate the support for different versions. With this, I can write the code once and make the library support both Vue versions. The issue is that I need to build twice on each version and guide users to install the corresponding plugin versions (manually install @vue/composition-api for Vue 2).

Approach for Coexistence Development of Vue 2/3

Simultaneous Support for Vue 2/3 Projects

Possible Scenarios for Vue 2/3 Projects

Progressive Migration: If there is a large Vue 2 project but you want to gradually migrate to Vue 3, you can choose to introduce Vue 3 into the project and then gradually migrate Vue 2 components to Vue 3.

Compatibility with Dependency Libraries and Plugins: If the project depends on some Vue 2 plugins or libraries that have not been upgraded to Vue 3 yet, it may be necessary to use both Vue 2 and Vue 3 to ensure compatibility.

Adopting Vue 3 for New Features: You may want to use Vue 3 in the project to take advantage of its new features and performance benefits while still keeping Vue 2 for old components or features.

Project Integration: Based on experience requirements within the company, there is a need to present Vue 2/3 projects on the same page.

Internal Component Asset Maintainer: Support is needed for both Vue 2 and 3 projects, and the capabilities must be consistent.

Legacy Application Developer: Need to use a third-party chart component, but only the Vue 3 version is available, not the Vue 2 version.

Solutions

1. Coexistence of Vue 2/3 Projects

vue-5

Directly create a Vue 3 root instance using createApp and mount it to the Vue 2 root instance using the mount method. This allows using Vue 3 components in a Vue 2 project.

The related code repository can be found here: vue5

vue-5

// Vue 3 项⽬
import { createApp } from 'vue'
import App from './App.vue'

createApp(App).mount('#vue3')
// Vue 2 项⽬
import Vue from 'vue2'
import App from './App.vue'

new Vue({
  render: h => h(App as any),
}).$mount('#vue2')

The important thing about this approach is that we use the vite.config.ts to solve the compilation problem of different modules: I wrote some build scripts to import code from the target version’s API during the build. After that, I need to publish two tags vue2 and vue3 to differentiate the support for different versions. But the issue is that it requires guiding users to install the corresponding plugin versions on each version. This is not very friendly for developers to deal with package conflicts.

import path from 'path'
import { defineConfig } from 'vite'
import Vue2 from '@vitejs/plugin-vue2'
import Vue3 from '@vitejs/plugin-vue'
import Inspect from 'vite-plugin-inspect'
import compiler from 'vue2/compiler-sfc'

const src = path.resolve(__dirname, 'src')

export default defineConfig({
  plugins: [
    Vue3({
      include: [/vue3[/\\].*\.vue$/],
    }),
    Vue2({
      include: [/vue2[/\\].*\.vue$/],
      compiler: compiler as any,
    }),
    Inspect(),
  ],
})

Here we have separated Vue 2 and Vue 3 into two independent packages and configured different compilation rules in vite.config.ts, allowing us to use Vue 2 and Vue 3 in the same page.

2. JessicaSachs/petite Solution

Let’s briefly introduce petite:

Petite is a subjective GitHub template built for Vue component authors. It sets up the tools needed for developing, documenting, and testing common SFC components and is backward compatible with Vue 2.7 runtime.

This is achieved through some runtime helper functions and a very opinionated monolithic library structure.

Petite sets up Vite, Volar, Linting, Vitepress, TypeScript, and Testing, allowing you to choose to write Vue 3-style code while easily maintaining backward compatibility with Vue 2.x users.

This also means that you will be publishing two versions of your package on npm instead of breaking major versions to support Vue 2 or Vue 3.

The downside of this approach is that your users will need to install the new version when upgrading and changing imports. The benefit is that you can write backward-compatible code more easily and provide regular updates for users. Additionally, you can also separate dependencies for Vue 2-only and Vue 3-only.

If you use lodash in your shared code, you will need to run pnpm build in the workspace root directory, and each package (lib-vue3, lib-vue2) should be deployed independently.

3. vue-bridge Solution

4. vue-demi Solution

Repository example: vue-demi

Vue Demi is a development utility that allows you to write universal Vue libraries for both Vue 2 and 3 without worrying about the version installed by the user.

When creating a Vue plugin/library, simply install vue-demi as a dependency and import any Vue-related content from it. Publish your plugin/library as usual, and your package will become universal!

{
  "dependencies": {
    "vue-demi": "latest"
  }
}
import Vue, { reactive, ref } from 'vue-demi'

At the underlying level, it uses the postinstall npm hook. After installing all the packages, the script will start checking the installed Vue version and redirect the exports based on the local Vue version. When using Vue 2, it will also automatically install @vue/composition-api if it is not already installed.

Points to note about libraries/components:

Libraries/Components

  • Single repository - Multiple package builds
  • Dependency management
  • Alias configuration
    • NPM package names
    • Build tool configuration

Importing Vue 3 Components in a Vue 2 Application

There are limitations to component interoperability

  • Shared context
  • Scoped slots
  • Events

Approach for importing Vue 3 components in a Vue 2 application

  • Vue 3 can have multiple global instances
  • Prerequisite: Upgrade Vue 2 to 2.7, remove outdated plugins from Vue CLI
  • Interoperability layer: Custom Elements
  • Build tool: Vite

Introduction

In this section, we will discuss how to handle events in Vue, including how to describe events in virtual nodes, how to add events to DOM elements, and how to update events. Let’s start by addressing the first question, which is how to describe events in virtual nodes. Events can be considered as special attributes, so we can agree that any attribute starting with the string “on” in the vnode.props object should be treated as an event. For example:

const vnode = {
  type: 'p',
  props: {
    // Describe events using onXxx
    onClick: () => {
      alert('clicked');
    }
  },
  children: 'text'
};

Once we have resolved how events are described in virtual nodes, let’s see how to add events to DOM elements. This is very simple, just call the addEventListener function in the patchProps method to bind the event, as shown in the following code:

function patchProps(el, key, prevValue, nextValue) {
  // Match attributes starting with on as events
  if (/^on/.test(key)) {
    // Get the corresponding event name based on the attribute name, e.g., onClick ---> click
    const name = key.slice(2).toLowerCase();
    
    // Remove the previously bound event handler
    prevValue && el.removeEventListener(name, prevValue);
    // Bind the new event handler
    el.addEventListener(name, nextValue);
  } else if (key === 'class') {
    // Omitted code (handling class attribute logic)
  } else if (shouldSetAsProps(el, key, nextValue)) {
    // Omitted code (handling other attribute logic)
  } else {
    // Omitted code (handling other attribute logic)
  }
}

In fact, the event update mechanism can be further optimized to avoid multiple calls to removeEventListener and addEventListener.

function patchProps(el, key, prevValue, nextValue) {
  if (/^on/.test(key)) {
    const name = key.slice(2).toLowerCase();
    let invoker = el.__vei || (el.__vei = {});

    if (nextValue) {
      if (!invoker[name]) {
        // If there is no invoker, create a fake invoker function
        invoker[name] = (e) => {
          invoker[name].value(e);
        };
      }
      
      // Assign the actual event handler to the value property of the invoker function
      invoker[name].value = nextValue;

      // Bind the invoker function as the event handler
      el.addEventListener(name, invoker[name]);
    } else if (invoker[name]) {
      // If the new event handler does not exist and the previously bound invoker exists, remove the binding
      el.removeEventListener(name, invoker[name]);
      invoker[name] = null;
    }
  } else if (key === 'class') {
    // Omitted code (handling class attribute logic)
  } else if (shouldSetAsProps(el, key, nextValue)) {
    // Omitted code (handling other attribute logic)
  } else {
    // Omitted code (handling other attribute logic)
  }
}

Looking at the above code, event binding is divided into two steps. First, read the corresponding invoker from el._vei. If invoker does not exist, create a fake invoker function and cache it in el._vei. Assign the actual event handler to the invoker.value property, and then bind the fake invoker function as the event handler to the element. When the event is triggered, the fake event handler is executed, indirectly invoking the actual event handler invoker.value(e).

When updating events, since el._vei already exists, we only need to modify the value of invoker.value to the new event handler.

This way, updating events can avoid a call to removeEventListener, improving performance. However, the current implementation still has issues. The problem is that el._vei currently caches only one event handler at a time. This means that if an element binds multiple events simultaneously, event override will occur.

const vnode = {
  type: 'p',
  props: {
    // Describe events using onXxx
    onClick: () => {
      alert('clicked');
    },
    onContextmenu: () => {
      alert('contextmenu');
    }
  },
  children: 'text'
};

// Assume renderer is your renderer object
renderer.render(vnode, document.querySelector('#app'));

When the renderer tries to render the vnode provided in the above code, it first binds the click event and then binds the contextmenu event. The contextmenu event handler bound later will override the click event handler. To solve the event override problem, we need to redesign the data structure of el._vei. We should design el._vei as an object, where the keys are event names and the values are corresponding event handler functions. This way, event override issues will be resolved.

Based on the code snippet you provided, this code is mainly used for handling attribute updates on DOM elements, including the logic for event binding and unbinding. In this code, it uses an el._vei object to cache event handler functions.

Introduction

Vue.js templates are powerful and can meet most of our application needs. However, in certain scenarios, such as creating dynamic components based on input or slot values, the render function can be a more flexible solution.

Developers familiar with the React ecosystem might already be acquainted with render functions, commonly used in JSX to construct React components. While Vue render functions can also be written in JSX, this discussion focuses on using plain JavaScript. This approach simplifies understanding the fundamental concepts of the Vue component system.

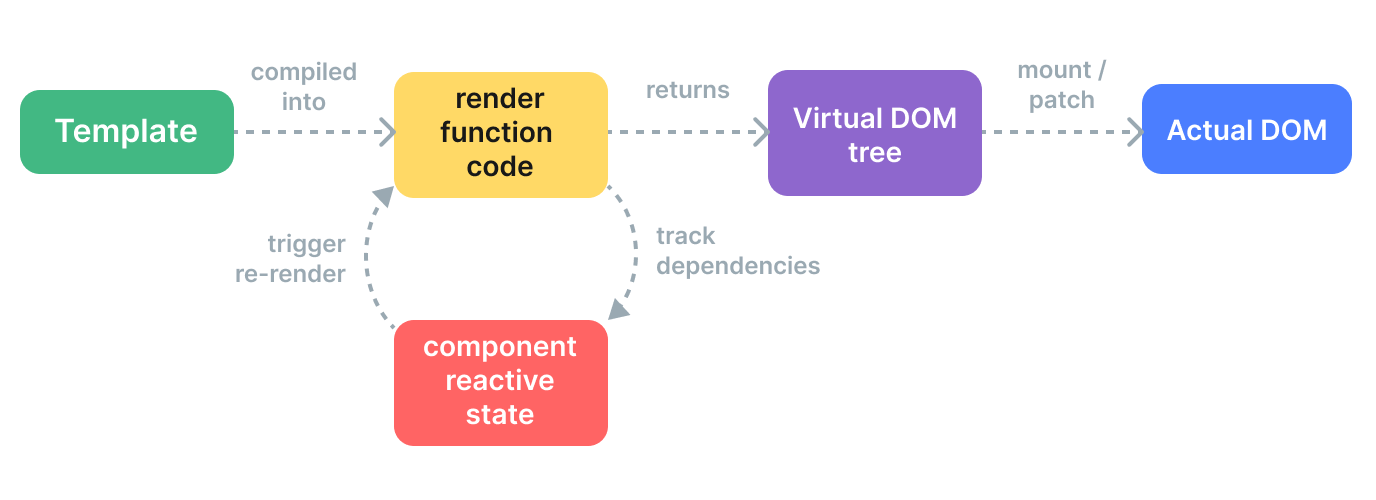
Every Vue component includes a render function. Most of the time, this function is created by the Vue compiler. When a template is specified for a component, the Vue compiler processes the template’s content, ultimately generating a render function. This render function produces a virtual DOM node, which Vue renders in the browser DOM.

This brings us to the concept of the virtual DOM. But what exactly is the virtual DOM?

The virtual Document Object Model (or “DOM”) enables Vue to render components in its memory before updating the browser. This approach enhances speed and avoids the high cost associated with re-rendering the DOM. Since each DOM node object contains numerous properties and methods, pre-rendering them in memory using the virtual DOM eliminates the overhead of creating DOM nodes directly in the browser.

When Vue updates the browser DOM, it compares the updated virtual DOM with the previous virtual DOM. Only the modified parts of the virtual DOM are used to update the actual DOM, reducing the number of element changes and enhancing performance. The render function returns virtual DOM nodes, often referred to as VNodes in the Vue ecosystem. These objects enable Vue to write these nodes into the browser DOM. They contain all the necessary information Vue needs.

vue-render

Mounting Child Nodes and Element Attributes

When vnode.children is a string, it sets the element’s text content. An element can have multiple child elements besides text nodes. To describe an element’s child nodes, vnode.children needs to be defined as an array:

const vnode = {
  type: 'div',
  children: [
    {
      type: 'p',
      children: 'hello'
    }
  ]
};

In the above code, we describe “a div tag with a child node, which is a p tag.” As seen, vnode.children is an array, and each element of the array is an independent virtual node object. This creates a tree-like structure, or a virtual DOM tree.

To render child nodes, we need to modify the mountElement function, as shown in the following code:

function mountElement(vnode, container) {
  const el = createElement(vnode.type);
  if (typeof vnode.children === 'string') {
    setElementText(el, vnode.children);
  } else if (Array.isArray(vnode.children)) {
    // If `children` is an array, iterate through each child node and call the `patch` function to mount them
    vnode.children.forEach(child => {
      patch(null, child, el);
    });
  }
  insert(el, container);
}

In this code, we have added a new conditional branch. We use the Array.isArray function to check if vnode.children is an array. If it is, we loop through each child node and call the patch function to mount the virtual nodes in the array. During mounting of child nodes, we need to pay attention to two points:

  1. The first argument passed to the patch function is null. Since this is the mounting phase and there is no old vnode, we only need to pass null. This way, when the patch function is executed, it will recursively call the mountElement function to mount the child nodes.

  2. The third argument passed to the patch function is the mounting point. Since the child elements being mounted are child nodes of the div element, the div element created earlier serves as the mounting point to ensure that these child nodes are mounted in the correct position.

After mounting the child nodes, let’s look at how to describe the attributes of an element using vnode and how to render these attributes. We know that HTML elements have various attributes, some of which are common, such as id and class, while others are specific to certain elements, such as the action attribute for form elements. In this discussion, we will focus on the basic attribute handling.

To describe the attributes of an element, we need to define a new field in the virtual DOM called vnode.props, as shown in the following code:

const vnode = {
  type: 'div',
  props: {
    id: 'foo'
  },
  children: [
    {
      type: 'p',
      children: 'hello'
    }
  ]
};

vnode.props is an object where the keys represent the attribute names of the element, and the values represent the corresponding attribute values. This way, we can iterate through the props object and render these attributes onto the element, as shown in the following code:

function mountElement(vnode, container) {
  const el = createElement(vnode.type);
  // Skip children handling for now

  // Only handle `vnode.props` if it exists
  if (vnode.props) {
    // Iterate through `vnode.props` object
    for (const key in vnode.props) {
      // Use `setAttribute```javascript
      // Use `setAttribute` to set attributes on the element
      el.setAttribute(key, vnode.props[key]);
    }
  }

  insert(el, container);
}

In this code snippet, we first check if vnode.props exists. If it does, we iterate through the vnode.props object and use the setAttribute function to set attributes on the element. This approach ensures that the attributes are rendered onto the element during the mounting process.

When dealing with attributes, it’s essential to understand the distinction between HTML Attributes and DOM Properties. HTML Attributes are the attributes defined in the HTML tags, such as id="my-input", type="text", and value="foo". When the browser parses this HTML code, it creates a corresponding DOM element object, which we can access using JavaScript code:

const el = document.querySelector('#my-input');

Now, let’s talk about DOM Properties. Many HTML Attributes have corresponding DOM Properties on the DOM element object, such as id="my-input" corresponding to el.id, type="text" corresponding to el.type, and value="foo" corresponding to el.value. However, the names of DOM Properties don’t always exactly match HTML Attributes:

<div class="foo"></div>

In this case, class="foo" corresponds to the DOM Property el.className. Additionally, not all HTML Attributes have corresponding DOM Properties:

<div aria-valuenow="75"></div>

Attributes with the aria-* prefix do not have corresponding DOM Properties.

Similarly, not all DOM Properties have corresponding HTML Attributes. For example, you can use el.textContent to set the element’s text content, but there is no equivalent HTML Attribute for this operation.

The values of HTML Attributes and DOM Properties are related. For example, consider the following HTML snippet:

<div id="foo"></div>

This snippet defines a div element with an id attribute. The corresponding DOM Property is el.id, and its value is the string 'foo'. We consider this situation as a direct mapping, where the HTML Attribute and DOM Property have the same name (id in this case).

However, not all HTML Attributes and DOM Properties have a direct mapping relationship. For example:

<input value="foo" />

Here, the input element has a value attribute set to 'foo'. If the user does not modify the input field, accessing el.value would return the string 'foo'. If the user changes the input value to 'bar', accessing el.value would return 'bar'. But if you run the following code:

console.log(el.getAttribute('value')); // Still 'foo'
console.log(el.value); // 'bar'

You’ll notice that modifying the input value does not affect the return value of el.getAttribute('value'). This behavior indicates the meaning behind HTML Attributes. Essentially, HTML Attributes are used to set the initial value of corresponding DOM Properties. Once the value changes, the DOM Properties always store the current value, while getAttribute retrieves the initial value.

However, you can still access the initial value using el.defaultValue, as shown below:

el.getAttribute('value'); // Still 'foo'
el.value; // 'bar'
el.defaultValue; // 'foo'

This example illustrates that an HTML Attribute can be associated with multiple DOM Properties. In this case, value="foo" is related to both el.value and el.defaultValue.

Although HTML Attributes are considered as setting the initial values of corresponding DOM Properties, some values are restricted. It’s as if the browser internally checks for default value validity. If the value provided through HTML Attributes is invalid, the browser uses a built-in valid value for the corresponding DOM Properties. For example:

<input type="foo" />

We know that specifying the string 'foo' for the type attribute of the <input/> tag is invalid. Therefore, the browser corrects this invalid value. When you try to read el.type, you actually get the corrected value, which is 'text', not 'foo':

console.log(el.type); // 'text'

From the analysis above, we can see that the relationship between HTML Attributes and DOM Properties is complex. However, the core principle to remember is this: HTML Attributes are used to set the initial values of corresponding DOM Properties.

How to Properly Set Element Attributes

In the previous discussion, we explored how HTML Attributes and DOM Properties are handled in Vue.js single-file components’ templates. In regular HTML files, the browser automatically parses HTML Attributes and sets the corresponding DOM Properties. However, in Vue.js templates, the framework needs to handle the setting of these attributes manually.

Firstly, let’s consider a disabled button as an example in plain HTML:

<button disabled>Button</button>

The browser automatically disables this button and sets its corresponding DOM Property el.disabled to true. However, if the same code appears in a Vue.js template, the behavior would be different.

In Vue.js templates, the HTML template is compiled into virtual nodes (vnode). The value of props.disabled in the virtual node is an empty string. If you use the setAttribute function directly to set the attribute, unexpected behavior occurs, and the button becomes disabled. For example, in the following template:

<button disabled="false">Button</button>

The corresponding virtual node is:

const button = {
  type: 'button',
  props: {
    disabled: false
  }
};

If you use the setAttribute function to set the attribute value to an empty string, it is equivalent to:

el.setAttribute('disabled', '');

However, the el.disabled property is of boolean type and does not care about the specific value of HTML Attributes; it only checks for the existence of the disabled attribute. So, the button becomes disabled. Therefore, renderers should not always use the setAttribute function to set attributes from the vnode.props object.

To solve this issue, a better approach is to prioritize setting the element’s DOM Properties. However, if the value is an empty string, manually correct it to true. Here is an implementation example:

function mountElement(vnode, container) {
  const el = createElement(vnode.type);

  if (vnode.props) {
    for (const key in vnode.props) {
      if (key in el) {
        const type = typeof el[key];
        const value = vnode.props[key];
        if (type === 'boolean' && value === '') {
          el[key] = true;
        } else {
          el[key] = value;
        }
      } else {
        el.setAttribute(key, vnode.props[key]);
      }
    }
  }

  insert(el, container);
}

In this code, we first check if the property exists on the DOM element. If it does, we determine the type of the property and the value from vnode.props. If the property is of boolean type and the value is an empty string, we correct it to true. If the property does notexist on the DOM element, we use the setAttribute function to set the attribute.

However, there are still issues with this implementation. Some DOM Properties are read-only, such as el.form. To address this problem, we can create a helper function, shouldSetAsProps, to determine whether an attribute should be set as DOM Properties. If the property is read-only or requires special handling, we should use the setAttribute function to set the attribute.

Finally, to make the attribute setting operation platform-agnostic, we can extract the attribute-related operations into the renderer options. Here is the updated code:

const renderer = createRenderer({
  createElement(tag) {
    return document.createElement(tag);
  },
  setElementText(el, text) {
    el.textContent = text;
  },
  insert(el, parent, anchor = null) {
    parent.insertBefore(el, anchor);
  },
  patchProps(el, key, prevValue, nextValue) {
    if (shouldSetAsProps(el, key, nextValue)) {
      const type = typeof el[key];
      if (type === 'boolean' && nextValue === '') {
        el[key] = true;
      } else {
        el[key] = nextValue;
      }
    } else {
      el.setAttribute(key, nextValue);
    }
  }
});

In the mountElement function, we only need to call the patchProps function and pass the appropriate parameters. This way, we’ve extracted the attribute-related rendering logic from the core renderer, making it more maintainable and flexible.

Please note that the shouldSetAsProps function should be implemented according to your specific requirements and the DOM properties you want to handle differently.

Preface

In Vue.js, many functionalities rely on renderers to be implemented, such as Transition components, Teleport components, Suspense components, as well as template refs and custom directives.

Moreover, the renderer is the core of the framework’s performance, as its implementation directly affects the framework’s performance. Vue.js 3’s renderer not only includes the traditional Diff algorithm but also introduces a fast path update method, leveraging the information provided by the compiler, significantly improving update performance.

In Vue.js, the renderer is responsible for executing rendering tasks. On the browser platform, it renders the virtual DOM into real DOM elements. The renderer can render not only real DOM elements but also plays a key role in the framework’s cross-platform capabilities. When designing a renderer, its customizable capabilities need to be considered.

Basic Concepts and Meanings of Renderer

Before implementing a basic renderer, we need to understand a few fundamental concepts:

In Vue.js, a renderer is a component responsible for rendering virtual DOM (or virtual nodes) into real elements on a specific platform. On the browser platform, the renderer renders virtual DOM into real DOM elements.

Renderer

The renderer is responsible for rendering virtual DOM (or virtual nodes) into real elements on a specific platform. On the browser platform, the renderer renders virtual DOM into real DOM elements.

Virtual DOM (vnode)

The virtual DOM (also known as virtual nodes, abbreviated as vnode) is a tree-like structure, similar to real DOM, consisting of various nodes. The renderer’s task is to render the virtual DOM into real DOM elements.

Mounting

Mounting refers to rendering the virtual DOM into real DOM elements and adding them to a specified mounting point. In Vue.js, the mounted lifecycle hook of a component is triggered when the mounting is completed, and it can access the real DOM element at this point.

Container

The container specifies the mounting position’s DOM element. The renderer renders the virtual DOM into real DOM elements and adds them to the specified container. In the renderer’s render function, a container parameter is usually passed in, indicating which DOM element the virtual DOM is mounted to.

Creation and Usage of Renderer

The renderer is usually created using the createRenderer function, which returns an object containing rendering and hydration functions. The hydration function is used in server-side rendering (SSR) to hydrate virtual DOM into existing real DOM elements. Here’s an example of creating and using a renderer:

function createRenderer() {
  function render(vnode, container) {
    // Render logic
  }

  function hydrate(vnode, container) {
    // Hydration logic
  }

  return {
    render,
    hydrate
  };
}

const { render, hydrate } = createRenderer();
// Initial rendering
render(vnode, document.querySelector('#app'));
// Server-side rendering
hydrate(vnode, document.querySelector('#app'));

In the above code, the createRenderer function creates a renderer object that contains the render and hydrate functions. The render function is used to render the virtual DOM into real DOM elements, while the hydrate function is used to hydrate the virtual DOM into existing real DOM elements.

Now that we have a basic understanding of the renderer, let’s dive deeper step by step.

The implementation of the renderer can be represented by the following function, where domString is the HTML string to be rendered, and container is the DOM element to mount to:

function renderer(domString, container) {
  container.innerHTML = domString;
}

Example usage of the renderer:

renderer('<h1>Hello</h1>', document.getElementById('app'));

In the above code, <h1>Hello</h1> is inserted into the DOM element with the id app. The renderer can not only render static strings but also dynamic HTML content:

let count = 1;
renderer(`<h1>${count}</h1>`, document.getElementById('app'));

If count is a reactive data, the reactivity system can automate the entire rendering process. First, define a reactive data count and then call the renderer function inside the side effect function to render:

const count = ref(1);

effect(() => {
  renderer(`<h1>${count.value}</h1>`, document.getElementById('app'));
});

count.value++;

In the above code, count is a ref reactive data. When modifying the value of count.value, the side effect function will be re-executed, triggering re-rendering. The final content rendered to the page is <h1>2</h1>.

Here, the reactive API provided by Vue 3’s @vue/reactivity package is used. It can be included in the HTML file using the <script> tag:

<script src="https://unpkg.com/@vue/reactivity@3.0.5/dist/reactivity.global.js"></script>

The basic implementation of the render function is given in the above code. Let’s analyze its execution flow in detail. Suppose we call the renderer.render function three times consecutively for rendering:

const renderer = createRenderer();

// Initial rendering
renderer.render(vnode1, document.querySelector('#app'));
// Second rendering
renderer.render(vnode2, document.querySelector('#app'));
// Third rendering
renderer.render(null, document.querySelector('#app'));

During the initial rendering, the renderer renders vnode1 into real DOM and stores vnode1 in the container element’s container.vnode property as the old vnode.

During the second rendering, the old vnode exists (container.vnode has a value), and the renderer takes vnode2 as the new vnode, passing both the new and old vnodes to the patch function to perform patching.

During the third rendering, the new vnode’s value is null, indicating that no content should be rendered. However, at this point, the container already contains the content described by vnode2, so the renderer needs to clear the container. In the code above, container.innerHTML = '' is used to clear the container. It’s important to note that clearing the container this way is not the best practice but is used here for demonstration purposes.

Regarding the patch function, it serves as the core entry point of the renderer. It takes three parameters: the old vnode n1, the new vnode n2, and the container container. During the initial rendering, the old vnode n1 is undefined, indicating a mounting action. The patch function not only serves for patching but can also handle mounting actions.

Custom Renderer

The implementation of a custom renderer involves abstracting the core rendering logic, making it independent of specific platform APIs. The following example demonstrates the implementation of a custom renderer using configuration options to achieve platform-independent rendering:

// Create a renderer function, accepting options as parameters
function createRenderer(options) {
  // Retrieve DOM manipulation APIs from options
  const { createElement, insert, setElementText } = options;

  // Define the function to mount elements
  function mountElement(vnode, container) {
    // Call createElement function to create an element
    const el = createElement(vnode.type);
    // If children are a string, use setElementText to set text content
    if (typeof vnode.children === 'string') {
      setElementText(el, vnode.children);
    }
    // Call insert function to insert the element into the container
    insert(el, container);
  }

  // Define the function to patch elements
  function patch(n1, n2, container) {
    // Implement patching logic, this part is omitted in the example
  }

  // Define the render function, accepting virtual nodes and a container as parameters
  function render(vnode, container) {
    // If the old virtual node exists, execute patching logic; otherwise, execute mounting logic
    if (container.vnode) {
      patch(container.vnode, vnode, container);
    } else {
      mountElement(vnode, container);
    }
    // Store the current virtual node in the container's vnode property
    container.vnode = vnode;
  }

  // Return the render function
  return render;
}

// Create configuration options for the custom renderer
const customRendererOptions = {
  // Function for creating elements
  createElement(tag) {
    console.log(`Creating element ${tag}`);
    // In a real application, you can return a custom object to simulate a DOM element
    return { type: tag };
  },
  // Function for setting an element's text content
  setElementText(el, text) {
    console.log(`Setting text content of ${JSON.stringify(el)}: ${text}`);
    // In a real application, set the object's text content
    el.textContent = text;
  },
  // Function for inserting an element under a given parent
  insert(el, parent, anchor = null) {
    console.log(`Adding ${JSON.stringify(el)} to ${JSON.stringify(parent)}`);
    // In a real application, insert el into parent
    parent.children = el;
  },
};

// Create a render function using the custom renderer's configuration options
const customRenderer = createRenderer(customRendererOptions);

// Create a virtual node describing <h1>hello</h1>
const vnode = {
  type: 'h1',
  children: 'hello',
};

// Use an object to simulate a mounting point
const container = { type: 'root' };

// Render the virtual node to the mounting point using the custom renderer
customRenderer(vnode, container);

In the above code, we create a custom renderer using the createRenderer function, which takes configuration options as parameters. The configuration options include functions for creating elements, setting text content, and inserting elements into a parent. The customRenderer function takes a virtual node and a container as parameters, and it can handle both mounting and patching logic based on the existence of the old virtual node (container.vnode).

This custom renderer allows platform-independent rendering by abstracting the core logic and making it adaptable to different platforms through configuration options.

Please note that the code above demonstrates the concept of a custom renderer and focuses on its implementation logic. In a real-world scenario, you might need additional error handling, optimizations, and proper DOM manipulations based on the specific platform requirements.

Introduction

Explore the differences between reactive and shallowReactive, delving into the concepts of deep reactivity and shallow reactivity in Vue.js.

Shallow Reactivity vs Deep Reactivity

const obj = reactive({ foo: { bar: 1 } })
effect(() =>{ 
console.log(obj.foo.bar)
})
// Modifying obj.foo.bar value does not trigger reactivity
obj.foo.bar = 2

Initially, an object obj is created with a property foo containing another object { bar: 1 }. When accessing obj.foo.bar inside an effect function, it is noticed that modifying obj.foo.bar does not trigger the effect function again. Why does this happen? Let’s take a look at the current implementation:

function reactive(obj) {
  return new Proxy(obj ,{
    get(target, key, receiver) {
      if (key === 'raw') 
        return target;
    track(target, key);
// When reading the property value, return it directly
    return Reflect.get(target, key, receiver)
}
// Other trapping functions are omitted
})
}

In the given code, when accessing obj.foo.bar, it first reads the value of obj.foo. Here, Reflect.get is used to directly return the result of obj.foo. Since the result obtained through Reflect.get is a plain object, namely { bar: 1 }, it is not a reactive object. Therefore, when accessing obj.foo.bar inside the effect function, no reactivity is established. To address this, the result returned by Reflect.get needs to be wrapped:

function reactive(obj) {
  return new Proxy(obj, {
    get(target, key, receiver) {
      const result = Reflect.get(target, key, receiver);
      // If the result is an object, make it reactive
      if (typeof result === 'object') {
        return reactive(result);
      }
      return result;
    },
    // Other traps...
  });
}

In this code snippet, the reactive function is defined. It takes an object as a parameter and returns a proxy of that object. The proxy uses a get trap function that triggers when accessing a property of the object. In the get trap, Reflect.get is used to retrieve the property value. If the result is an object, it is made reactive by calling the reactive function recursively. This ensures that nested objects also possess reactive properties, allowing modifications to trigger the reactivity system.

Shallow Reactivity

However, there are scenarios where deep reactivity is not desired, leading to the concept of shallowReactive or shallow reactivity. Shallow reactivity means that only the top-level properties of an object are reactive. For example:

Suppose we have an object with a nested object as its property:

let obj = {
  innerObj: {
    key: 'value'
  }
}

If we apply deep reactivity to obj:

let reactiveObj = reactive(obj);

Any modifications to obj or innerObj properties will trigger the reactivity system:

reactiveObj.innerObj.key = 'new value'; // Triggers reactivity

However, if we want only the top-level properties of obj to be reactive, meaning modifications to obj trigger reactivity but modifications to innerObj do not, we use the shallowReactive function:

let shallowReactiveObj = shallowReactive(obj);

With shallowReactive, only modifications to obj will trigger reactivity:

shallowReactiveObj.innerObj = {}; // Triggers reactivity
shallowReactiveObj.innerObj.key = 'new value'; // Does not trigger reactivity

Vue.js and reactive vs shallowReactive

In Vue.js, both reactive and shallowReactive functions are used to create reactive objects. Let’s explore their differences.

The reactive function creates deeply reactive objects. This means that both the object itself and all its nested objects become reactive. Any modifications to the object or its nested objects’ properties will trigger the reactivity system.

On the other hand, the shallowReactive function creates shallowly reactive objects. This means that only the top-level properties of the object are reactive. If the object contains nested objects, modifications to those nested objects’ properties will not trigger the reactivity system.

let obj = {
  innerObj: {
    key: 'value'
  }
}

let reactiveObj = Vue.reactive(obj);
reactiveObj.innerObj.key = ‘new value’; // Triggers reactivity

let shallowReactiveObj = Vue.shallowReactive(obj);
shallowReactiveObj.innerObj.key = ‘new value’; // Does not trigger reactivity

Readonly and Shallow Readonly

After discussing reactivity and shallow reactivity, let’s talk about readonly and shallow readonly:

Vue.js provides readonly and shallowReadonly functions to create readonly reactive objects.

The readonly function creates deeply readonly reactive objects. This means that both the object itself and all its nested objects are readonly. Any attempts to modify the object or its nested objects’ properties will fail.

The shallowReadonly function creates shallow readonly reactive objects. This means that only the top-level properties of the object are readonly. If the object contains nested objects, properties of these nested objects can be modified.

let obj = {
  innerObj: {
    key: 'value'
  }
}

let readonlyObj = Vue.readonly(obj);
readonlyObj.innerObj.key = 'new value'; // This will fail because the object is readonly

let shallowReadonlyObj = Vue.shallowReadonly(obj);
shallowReadonlyObj.innerObj.key = 'new value'; // This will succeed because only top-level properties are readonly

Note: This article is a translated version of the original post. For the most accurate and up-to-date information, please refer to the original source.
```

Introduction

Since Vue.js 3’s reactive data is based on Proxy, it’s essential to understand Proxy and its associated concept, Reflect. What is Proxy? In simple terms, Proxy allows you to create a proxy object. It can proxy other objects, emphasizing that Proxy can only proxy objects and not non-object values like strings, booleans, etc. So, what does proxying mean? Proxying refers to the act of creating a basic semantic representation of an object. It allows us to intercept and redefine the basic operations on an object.

Create object proxies with Proxy

Built-in object Reflect

When we talk about “basic semantics” in programming languages, we mean the fundamental operations for reading and modifying data. In JavaScript, these operations typically include reading property values and setting property values. For example, given an object obj, the following operations are considered basic semantics:

  1. Read property value: obj.foo (reads the value of property foo)
  2. Set property value: obj.foo = newValue (sets the value of property foo)

In the above code, Proxy objects allow us to intercept (or redefine) these basic semantic operations. The Proxy constructor takes two parameters: the object being proxied and an object containing interceptors (also known as traps). In the interceptor object, we can define the get method to intercept property read operations and the set method to intercept property set operations. This way, we can execute custom logic when these operations occur.

Understanding these basic semantic operations and how to use Proxy and Reflect to intercept and handle them is crucial for implementing reactive data in JavaScript. In reactive data, we can use Proxy and Reflect to track reads and modifications of object properties, enabling reactive updates of data.

Basic Usage of Proxy

When we talk about basic semantics, we refer to fundamental operations in JavaScript, such as reading object property values and setting object property values. Consider the following object obj:

const obj = { foo: 1 };

Here, obj.foo is a basic semantic operation for reading property values, and obj.foo = newValue is a basic semantic operation for setting property values.

Now, we can use Proxy to intercept these basic semantic operations.

const handler = {
  get(target, key) {
    console.log(`Reading property ${key}`);
    return target[key];
  },
  set(target, key, value) {
    console.log(`Setting property ${key} to ${value}`);
    target[key] = value;
  }
};

const proxyObj = new Proxy(obj, handler);

proxyObj.foo; // Outputs: Reading property foo
proxyObj.foo = 2; // Outputs: Setting property foo to 2

In the above code, we created a handler object that defines get and set methods to intercept property reads and sets. Then, we created a proxy object proxyObj using the Proxy constructor, which intercepts read and set operations on the obj object. When we access proxyObj.foo, the get method is triggered, outputting the corresponding message. When we set the value of proxyObj.foo, the set method is triggered, again outputting the corresponding message.

This way, Proxy allows us to execute custom logic when basic semantic operations occur, without directly manipulating the original object. In practical applications, this capability can be used to implement reactive data, data validation, logging, and more.

When intercepting object property reads with Proxy, special attention is required for accessor properties because accessor properties are defined using getter functions. The this keyword inside these getter functions changes based on the method of invocation.

To solve this issue, we use Reflect.get(target, key, receiver) instead of target[key] when accessing property values. This ensures that the receiver parameter correctly points to the proxy object, not the original object. Consequently, within the getter function of accessor properties, the this keyword refers to the proxy object, establishing the correct reactive relationship.

Here is the corrected code using Reflect.get:

const handler = {
  get(target, key, receiver) {
    track(target, key); // Reactive data dependency tracking
    return Reflect.get(target, key, receiver); // Use Reflect.get to get property value
  },
  // Other interceptor methods...
};

const proxyObj = new Proxy(obj, handler);

effect(() => {
  console.log(proxyObj.bar); // Access the bar property inside the side effect function
});

proxyObj.foo++; // Triggers re-execution of the side effect function

In this code, we use Reflect.get with the receiver parameter to ensure that this points to the proxy object within the get interceptor function. This establishes the correct reactive relationship, allowing proper dependency tracking when accessing object properties.

Usage of Reflect in Reactivity

In interceptor functions, we aim to establish a connection between side-effect functions and reactive data. This ensures that when properties are accessed, the correct dependencies are tracked, enabling re-execution of side-effect functions when properties change. However, if we directly use target[key] to access property values, the this keyword inside the getter function of accessor properties points to the original object, not the proxy object. This prevents the establishment of the correct reactive relationship.

To address this issue, we use Reflect.get(target, key, receiver) instead of target[key]. By doing so, the receiver parameter correctly points to the proxy object, allowing the this keyword inside the getter function to refer to the proxy object. This establishes the proper reactive relationship.

Here is an example demonstrating the use of the receiver parameter and comparing it with the scenario where the receiver parameter is not used:

1. Using the receiver parameter:

const data = {
  foo: 1
};

const proxy = new Proxy(data, {
  get(target, key, receiver) {
    // Use Reflect.get to ensure `this` points to the proxy object
    const result = Reflect.get(target, key, receiver);
    // Additional processing, such as triggering update operations, can be performed in practical applications
    console.log(`Accessed ${key} property with value ${result}`);
    return result;
  }
});

console.log(proxy.foo); // Outputs: Accessed foo property with value 1

In this example, we use the receiver parameter passed to Reflect.get to ensure that this inside the get interceptor function refers to the proxy object proxy. When you access proxy.foo, the get interceptor function is triggered, and this points to the proxy object.

2. Not using the receiver parameter:

const data = {
  foo: 1
};

const proxy = new Proxy(data, {
  get(target, key) {
    // Without using the receiver parameter, 'this' refers to the original object 'data'
    
    const result = target[key];
    // In practical applications, additional processing might be required, such as triggering update operations
    console.log(`Accessed ${key} property with value ${result}`);
    return result;
  }
});

console.log(proxy.foo); // Output: Accessed foo property with value 1

In this example, we did not use the receiver parameter. Since the receiver parameter was not passed, this inside the get interceptor function points to the original object data. Although the proxy object proxy is used, the this inside the get interceptor function does not refer to proxy but instead refers to the original object data. Therefore, in this scenario, the reactive relationship is not established.

While the output of the two functions is the same, it’s evident that without using the receiver parameter, the reactive relationship is not established. This means that within the effect function, the object will not receive the correct reactivity.


Note: This article is a translated version of the original post. For the most accurate and up-to-date information, please refer to the original source.
```