#Vue,Browser,FE

Preface

In fact, browsers come with many built-in events, and many events automatically trigger certain behaviors in the browser.

For example:

  • Clicking a link triggers navigation to the URL.
  • Clicking the submit button in a form triggers submission to the server.
  • Pressing and dragging the mouse button on text selects the text.

When handling an event with JavaScript, we usually don’t want the corresponding browser behavior to occur. Instead, we want to implement alternative behaviors.

Preventing Browser Behavior

There are two ways to tell the browser that we don’t want it to execute default behavior:

  • The common way is to use the event object, which has a event.preventDefault() method.
  • If the handler is assigned using on<event> (rather than addEventListener), returning false is also effective.

In the example below, clicking the link will not trigger navigation, and the browser will not perform any action:

<a href="/" onclick="return false">Click here</a>
or
<a href="/" onclick="event.preventDefault()">here</a>

Click here
or
here


It’s important to note that using on<event> and returning false is not a good practice.

Returning false from the handler is an exception. The return value of event handlers is usually ignored. The only exception is returning false from a handler assigned using on<event>.

Handler Option “passive”

The optional passive: true option in addEventListener signals to the browser that the handler will not call preventDefault().

Why is this necessary?

On mobile devices, some events like touchmove (when the user moves their finger on the screen) can lead to scrolling by default, which can be prevented using preventDefault() in the handler.

So, when the browser detects such events, it must first process all handlers. If preventDefault is not called anywhere, the page can continue scrolling. However, this may cause unnecessary delays and “jitter” in the UI.

The passive: true option informs the browser that the handler will not cancel scrolling. The browser then immediately scrolls the page to provide a smoother experience and somehow processes the event.

For certain browsers (such as Firefox and Chrome), touchstart and touchmove events have passive set to true by default.

event.defaultPrevented

If the default behavior is prevented, the event.defaultPrevented property is true; otherwise, it is false.

Here’s an interesting use case.

Do you remember our discussion on event.stopPropagation() in the Bubbling and Capturing chapter and why stopping propagation is not good?

Sometimes, we can use event.defaultPrevented as an alternative to notify other event handlers that the event has been handled.

Let’s look at a practical example.

By default, the browser displays a context menu with standard options on the contextmenu event (right-click). We can prevent it and display our custom menu like this:

<button>Right-click shows browser context menu</button>

<button oncontextmenu="alert('Draw our menu'); return false">
  Right-click shows our context menu
</button>


Now, in addition to this context menu, let’s implement a document-wide context menu.

When right-clicking, it should display the nearest context menu:

<p>Right-click here for the document context menu</p>
<button id="elem">Right-click here for the button context menu</button>

<script>
  elem.oncontextmenu = function(event) {
    event.preventDefault();
    alert("Button context menu");
  };

  document.oncontextmenu = function(event) {
    event.preventDefault();
    alert("Document context menu");
  };
</script>

Right-click here for the document context menu


Issue and Solutions

The problem arises when clicking on elem, and we get two menus: the button-level menu and the document-level menu due to event bubbling.

One solution is to prevent the event from bubbling up when handling the right-click event in the button. We can achieve this using event.stopPropagation():

<p>Right-click for the document menu</p>
<button id="elem">Right-click for the button menu (fixed with event.stopPropagation)</button>

<script>
  elem.oncontextmenu = function(event) {
    event.preventDefault();
    event.stopPropagation();
    alert("Button context menu");
  };

  document.oncontextmenu = function(event) {
    event.preventDefault();
    alert("Document context menu");
  };
</script>

Now, the button-level menu works as expected. However, this comes at a cost — we deny any external code access to right-click information, including counters for collecting statistics. This is not advisable.

Another alternative is to check whether the document handler has prevented the browser’s default behavior. If it has, the event has already been handled, and we don’t need to react to it:

<p>Right-click for the document menu (added a check for event.defaultPrevented)</p>
<button id="elem">Right-click for the button menu</button>

<script>
  elem.oncontextmenu = function(event) {
    event.preventDefault();
    alert("Button context menu");
  };

  document.oncontextmenu = function(event) {
    if (event.defaultPrevented) return;

    event.preventDefault();
    alert("Document context menu");
  };
</script>

Now everything works as expected. If we have nested elements, each with its own context menu, this approach will work. Just make sure to check event.defaultPrevented in each contextmenu handler.

event.stopPropagation() and event.preventDefault()
As we’ve seen, event.stopPropagation() and event.preventDefault() (also considered as return false) are two different things. They are unrelated to each other.

Nested Context Menu Structure
There are other ways to implement nested context menus. One approach is to have a global object with a document.oncontextmenu handler and a method to store other handlers. This object would capture any right-click, browse stored handlers, and run the appropriate one.

However, every piece of code needing a context menu should be aware of this object and use its assistance rather than having its own contextmenu handler.

Summary

There are many default browser behaviors:

  • mousedown — Starts selection (dragging the mouse for selection).
  • click on <input type="checkbox"> — Selects/deselects the input.
  • submit — Clicking <input type="submit"> or pressing Enter in form fields triggers this event, leading the browser to submit the form.
  • keydown — Pressing a key adds a character to a field or triggers other actions.
  • contextmenu — Event occurs on right-click, triggering the default behavior of showing the browser context menu.
  • …and many more…

If we want to handle events using JavaScript only, all default behaviors can be prevented.

To prevent default behavior, you can use event.preventDefault() or return false. The second method is only applicable to handlers assigned through on<event>.

The passive: true option of addEventListener informs the browser that the behavior will not be prevented. This is useful for certain mobile events (like touchstart and touchmove) to let the browser scroll without waiting for all handlers to finish.

If the default behavior is prevented, the value of event.defaultPrevented becomes true; otherwise, it is false.
Preface

Let’s start with an example.

A handler is assigned to the <div>, but if you click on any nested tags (e.g., <em> or <code>), the handler will also run:

<div onclick="alert('The handler!')">
  <em>If you click on <code>EM</code>, the handler on <code>DIV</code> runs.</em>
</div>

So, if you click on EM, the handler on DIV runs.

Bubbling

The bubbling principle is straightforward.

When an event occurs on an element, it first runs the handler on that element, then runs the handler on its parent element, and continues up to handlers on other ancestors.

Suppose we have 3 layers of nesting FORM > DIV > P, each with its own handler:

<style>
  body * {
    margin: 10px;
    border: 1px solid blue;
  }
</style>

<form onclick="alert('form')">FORM
  <div onclick="alert('div')">DIV
    <p onclick="alert('p')">P</p>
  </div>
</form>

Now, what happens if you click on <p>?

  1. First, the handler runs on <p>.

  2. Then, it runs on <div>.

  3. Then, it runs on <form>.

  4. Finally, it runs on the document.

This behavior is called “event bubbling” because it bubbles up from the element like a bubble.

So, if we click on <p>, we will see 3 alerts: p → div → form.

event.target

The handler on a parent element can always access detailed information about where the event actually occurred.

The element that triggered the event, the deepest nested one, is called the target element, and it can be accessed through event.target.

Note the difference with this (which equals event.currentTarget):

  • this is the “current” element at the time the handler is running, and it remains the same.

  • event.target is the “target” element when the event happens, and it can be any element; it changes during the bubbling process.

Let’s illustrate this with an example!

For instance, if we have a handler form.onclick, it can “capture” all clicks inside the form. Regardless of where the click happens, it will bubble up to <form> and run the handler.

Note: Here, all events are bound to the form instead of individual elements.

In the form.onclick handler:

  • this (=event.currentTarget) is the <form> element because the handler runs on it.
  • event.target is the actual clicked element inside the form.
<!DOCTYPE HTML>
<html>
<head>
  <meta charset="utf-8">
</head>
<body>

  A click shows both <code>event.target</code> and <code>this</code> to compare:

  <form style="background-color: green;
      position: relative;
      width: 150px;
      height: 150px;
      text-align: center;
      cursor: pointer;">FORM
    <div style="background-color: blue;
      position: absolute;
      top: 25px;
      left: 25px;
      width: 100px;
      height: 100px;">DIV
      <p style="background-color: red;
      position: absolute;
      top: 25px;
      left: 25px;
      width: 50px;
      height: 50px;
      line-height: 50px;
      margin: 0;">P</p>
    </div>
  </form>

  <script>
    form=document.querySelector('form');
    form.onclick = function(event) {
      // Output the event target and the current element
      // (this=the current element=form, event.target=the clicked element)
      alert("target = " + event.target.tagName + ", this=" + this.tagName);
    };
  </script>
</body>
</html>

## Stopping Bubbling
Bubbling events ascend from the target element. Usually, they rise all the way up to `<html>`, then to the document object, and some events even reach the window, calling all handlers on their way.

However, any handler can decide that the event has been fully processed and stop the bubbling.

The method used to stop bubbling is `event.stopPropagation()`.

For example, if you click `<button>`, the `body.onclick` here won't work:

```html
<body onclick="alert(`the bubbling doesn't reach here`)">
  <button onclick="event.stopPropagation()">Click me</button>
</body>

Capturing

Another phase of event handling is called “capturing.”

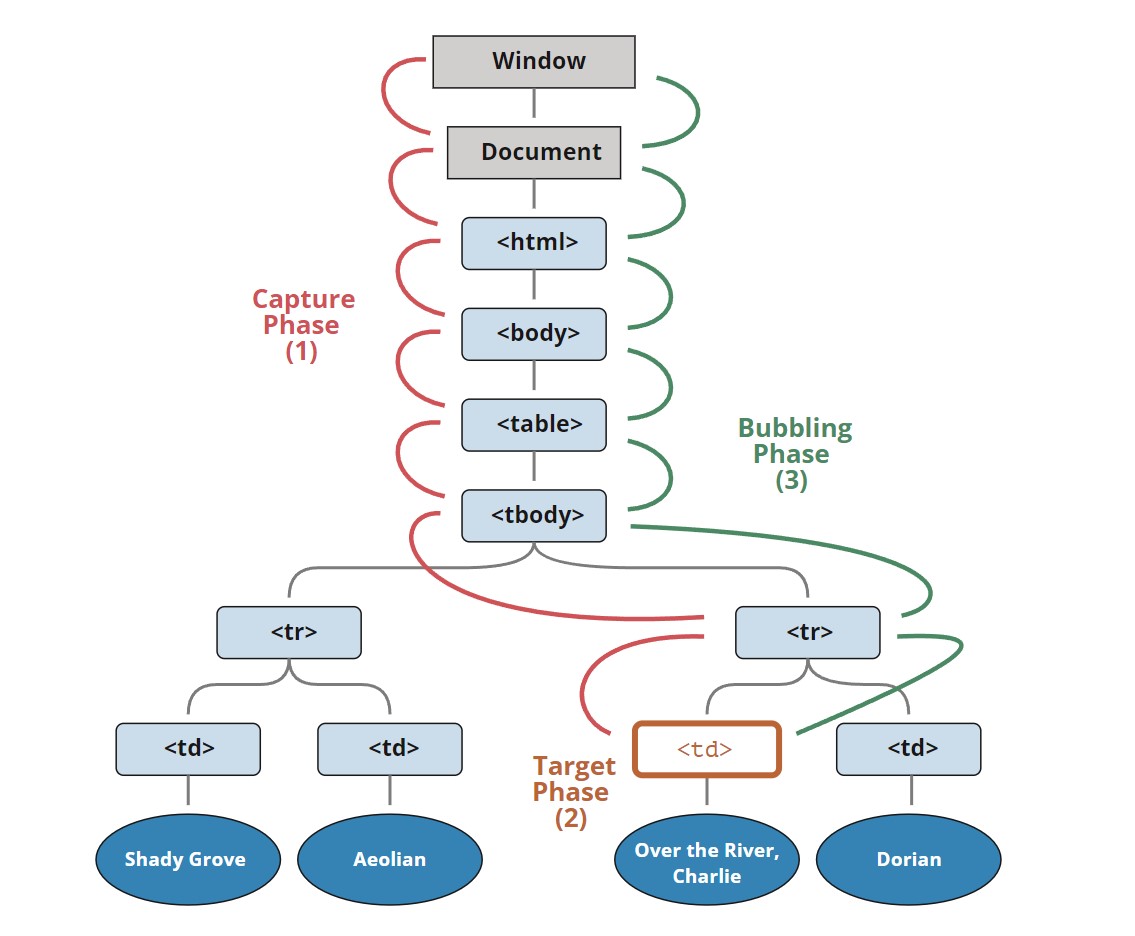
The DOM event standard describes the three phases of event propagation:

  1. Capturing phase — The event travels down the hierarchy of elements (from the window).
  2. Target phase — The event reaches the target element.
  3. Bubbling phase — The event starts to bubble up from the element.

Below is an illustration of clicking on <td> in a table, taken from the specification:

Event-Bubbling

In other words: Clicking on <td>, the event first descends through the ancestor chain to the element (capturing phase), then reaches the target (target phase), and finally ascends (bubbling phase), calling handlers along the way.

So far, we have only discussed bubbling because the capturing phase is rarely used. Typically, we don’t see it.

Handlers added with on<event> attributes or using HTML attributes or with addEventListener(event, handler) with two arguments have no knowledge of capturing; they run only in the second and third phases.

Summary

When an event occurs — the element nested deepest where the event happened is marked as the “target element” (event.target).

  • Then, the event moves down from the document root to the event.target, invoking handlers assigned with addEventListener(..., true) (where true is a shorthand for {capture: true}).
  • Next, the handler on the target element itself is called.
  • Finally, the event bubbles up from event.target to the root, calling handlers assigned with on<event>, HTML attributes, and addEventListener without a third parameter or with false/{capture: false}.

Each handler has access to properties of the event object:

  • event.target — The element deepest in the hierarchy that triggered the event.
  • event.currentTarget (=this) — The current element handling the event (the one with the handler).
  • event.eventPhase — The current phase (capturing=1, target=2, bubbling=3).

Any event handler can stop the event by calling event.stopPropagation(), but it’s not recommended because we might not be sure if we genuinely don’t need the event to bubble up for other purposes.

The capturing phase is rarely used, and usually, events are handled during the bubbling phase. There’s a reason for this logic.

Event handlers work the same way. Code that sets a handler on a specific element gains the most detailed information about that element. A handler specific to a <td> might be perfectly tailored for that <td>, knowing all about it. So, it should get the chance first. Then, its immediate parent also knows context-specific details but fewer, and so on, until handling general concepts and running the last handler on the topmost element.

Preface

Web Components is a collective term for a set of native web APIs that allow developers to create reusable custom elements.

Vue and Web Components are primarily complementary technologies. Whether integrating custom elements into existing Vue applications or building and distributing custom elements using Vue, Vue provides excellent support for both using and creating custom elements.

What are Custom Elements

A key feature of Web Components is the ability to create custom elements: HTML elements whose behavior is defined by web developers, extending the set of elements available in browsers.

There are two types of custom elements in Web Components:

  • Customized Built-in Elements: Inherit from standard HTML elements, such as HTMLImageElement or HTMLParagraphElement. Their implementation defines the behavior of standard elements.
  • Autonomous Custom Elements: Inherit from the HTML element base class HTMLElement. You have to implement their behavior from scratch.

Custom Element Lifecycle Callbacks

Custom Elements also have lifecycle callbacks.

Once your custom element is registered, the browser calls certain methods of your class when your custom element interacts with the page in specific ways. By providing implementations for these methods, known as lifecycle callbacks, you can run code to respond to these events.

The custom element lifecycle callbacks include:

  • connectedCallback(): Called whenever the element is added to the document. The specification recommends developers to set up custom element properties in this callback rather than in the constructor.
  • disconnectedCallback(): Called whenever the element is removed from the document.
  • adoptedCallback(): Called whenever the element is moved to a new document.
  • attributeChangedCallback(): Called when attributes are changed, added, removed, or replaced. For more detailed information about this callback, see Responding to attribute changes.

Here is a minimal example of a custom element that logs these lifecycle events:

// Create a class for this element
class MyCustomElement extends HTMLElement {
  static observedAttributes = ["color", "size"];

  constructor() {
    // Must call the super method first
    super();
  }

  connectedCallback() {
    console.log("Custom element added to the page.");
  }

  disconnectedCallback() {
    console.log("Custom element removed from the page.");
  }

  adoptedCallback() {
    console.log("Custom element moved to a new page.");
  }

  attributeChangedCallback(name, oldValue, newValue) {
    console.log(`Attribute ${name} has changed.`);
  }
}

customElements.define("my-custom-element", MyCustomElement);

Using Custom Elements in Vue

Using custom elements in a Vue application is largely similar to using native HTML elements, but a few points need to be kept in mind:

Skipping Component Resolution

By default, Vue tries to parse non-native HTML tags as registered Vue components and then render them as custom elements. This leads to Vue issuing a “Unknown custom element” warning during development. To inform Vue that certain elements should be treated as custom elements and skip component resolution, we can specify the compilerOptions.isCustomElement option.

If you are using Vue for build setup, this option should be passed through build configuration as it is a compile-time option.

Example of in-browser configuration:

// Only works if using in-browser compilation.
// If using build tools, see config examples below.
app.config.compilerOptions.isCustomElement = (tag) => tag.includes('-')

Vite Configuration Example

// vite.config.js
import vue from '@vitejs/plugin-vue'

export default {
  plugins: [
    vue({
      template: {
        compilerOptions: {
          // treat all tags with a dash as custom elements
          isCustomElement: (tag) => tag.includes('-')
        }
      }
    })
  ]
}

Vue CLI Configuration Example

// vue.config.js
module.exports = {
  chainWebpack: config => {
    config.module
      .rule('vue')
      .use('vue-loader')
      .tap(options => ({
        ...options, 

        
        compilerOptions: {
          // treat any tag that starts with ion- as custom elements
          isCustomElement: tag => tag.startsWith('ion-')
        }
      }))
  }
}

Building Custom Elements with Vue

The primary advantage of custom elements is their ability to be used with any framework or even without a framework. This makes them suitable for distributing components to end consumers who may not use the same frontend stack, or when you want to isolate the implementation details of the components used in the final application.

Defining Custom Elements

Vue supports creating custom elements using the same Vue component API with the defineCustomElement method. This method takes the same parameters as defineComponent but returns an extended custom element constructor HTMLElement:

Template:0

<my-vue-element></my-vue-element>
import { defineCustomElement } from 'vue'

const MyVueElement = defineCustomElement({
  // normal Vue component options here
  props: {},
  emits: {},
  template: `...`,

  // defineCustomElement only: CSS to be injected into shadow root
  styles: [`/* inlined css */`]
})

// Register the custom element.
// After registration, all `<my-vue-element>` tags
// on the page will be upgraded.
customElements.define('my-vue-element', MyVueElement)

// You can also programmatically instantiate the element:
// (can only be done after registration)
document.body.appendChild(
  new MyVueElement({
    // initial props (optional)
  })
)

When discussing custom elements and Vue components, we are essentially talking about two different approaches to building web applications. Custom elements are a web standard, akin to HTML elements, while Vue components are a more advanced building approach provided by the Vue.js framework.

Some argue that using only custom elements is a more “future-proof” approach, but this passage points out that such a view is overly simplistic. It lists reasons explaining why the Vue component model is more practical. Some key points include:

Vue components offer more features, such as a convenient template system, methods for managing state, and an efficient way to render components on the server. These features are essential for building complex applications.

Vue components support powerful composition mechanisms, while custom elements have some limitations in this regard. This means that with Vue, you can build flexible and powerful component structures more easily. Using Vue, you leverage a mature framework and a large community, without having to build and maintain an internal framework.

There is indeed some overlap in functionality between custom elements and Vue components: both allow us to define reusable components with data passing, event emitting, and lifecycle management. However, the Web Components API is relatively lower-level and simpler. To build actual applications, we need some additional features not covered by the platform:

  • Declarative and efficient template system;
  • A reactive state management system conducive to extracting and reusing logic across components;
  • A high-performance method for rendering components on the server (SSR) and composing them on the client side, crucial for Web Vitals metrics like SEO and LCP. Native custom elements SSR typically involves simulating the DOM in Node.js and then serializing the mutated DOM, while Vue SSR compiles as much as possible into string concatenation, which is more efficient.

defineCustomElement API Vue Component Transformation

Using the defineCustomElement API to transform Vue components into registerable custom element classes has several benefits:

  1. Cross-Framework Integration: By transforming Vue components into custom element classes, you can use these components in different frontend frameworks and libraries. This makes your components more versatile and integrable with other technology stacks.

  2. Independent Usage: After registering a Vue component as a custom element, it can be used independently of a Vue application. This means you can use the component without an entire Vue application, and introduce it into different build systems and module systems.

  3. Progressive Migration: If your application is gradually transitioning to Vue, you can achieve a progressive migration by transforming certain components into custom elements. This allows you to gradually introduce Vue components into an existing project without the need for a complete rewrite.

  4. Web Components Standard Compatibility: Registering Vue components as custom elements makes them compatible with the Web Components standard. This means you can leverage other tools and libraries in the Web Components ecosystem, enhancing the interoperability of your components.

In other words, the defineCustomElement API’s purpose is to compile Vue components into custom elements that can be used in the browser without relying on the Vue compiler for real-time compilation.

When using the defineCustomElement API, Vue components are pre-compiled into native custom elements, allowing them to be used directly in the browser without runtime compilation.

Overall, by using the defineCustomElement API, you can combine Vue components with custom elements, making these components usable and shareable in a broader context. This provides increased reusability and flexibility for components, especially in the context of cross-platform component development, where you can develop components as custom elements and use them in different environments. A typical example is the integration implementation mentioned earlier between Vue 2 and Vue 3, meaning you only need to compile Vue 3 components into custom elements and then use them in Vue 2.